Posts Tagged vibration isolation
Quiet that fan… Ceiling Fan – With Vib-X
Posted by Acoustics First in DIY, HOW TO, Product Applications, Products on December 10, 2013
Airflow is good. Circulating stagnant air has many health benefits, but what do you do when that ceiling fan is just making too much noise?
To start, check all the normal suspects; is it balanced, cleaned, level, blah blah blah… You’ve probably already checked these anyway. It’s an older fan, the motor hums, because older fans hum. If it’s vibrating through the structure, there may be something you can do to isolate that extra vibration – and at least keep the other occupants happy.
When most people think of Vib-X pads, they think of a musical function; Isolate your speakers, isolate an amplifier, isolate a (insert name of miscellaneous musical gear here)… but there are some really useful everyday functions for this wonderful material. Like keeping that fan from vibrating the entire house!

Isolate that ceiling fan with Vib-X!
The simple install may involve a contractor, or at least some one who knows electricity, so you don’t electrocute yourself… but after shutting off the power to the fan, it’s pretty quick. Take down the fan and find the box. Disconnect the box. Cut some Vib-X to separate the box from the wood. Cut some Vib-X squares to use as washers. Remount the box using the diagram, a couple fender washers, maybe a couple optional grommets if you desire – then re-install the fan.
Ceiling fans are usually mounted to an electrical junction box in the ceiling, which is usually just screwed to a ceiling joist or some simple wooden frame. By using the Vib-X to isolate the electrical box from the wood, the vibrations do not directly transfer from the fan into the structure of the house, turning that old, vibrating ceiling fan – into a breath of fresh air.
Simple. Thought so. Don’t forget to balance, level, and clean that ceiling fan while you’re doing all this. Turn that power back on and enjoy the breeze.
DIY: Back Wall Diffuser Array/Bass Trap
Posted by Acoustics First in Absorption, Auditorium, Broadcast Facilities, Diffusion, DIY, Home Entertainment, Home Theater, HOW TO, Media Room, Multipurpose Rooms, Music Rehearsal Spaces, Music Tracking Room, Product Applications, Products, Recording Facilities, Recording Studio, Restaurants, Studio Control Room, Teleconferencing, Theater, Vocal Booth, Voice Over, Worship Facilities on June 20, 2013
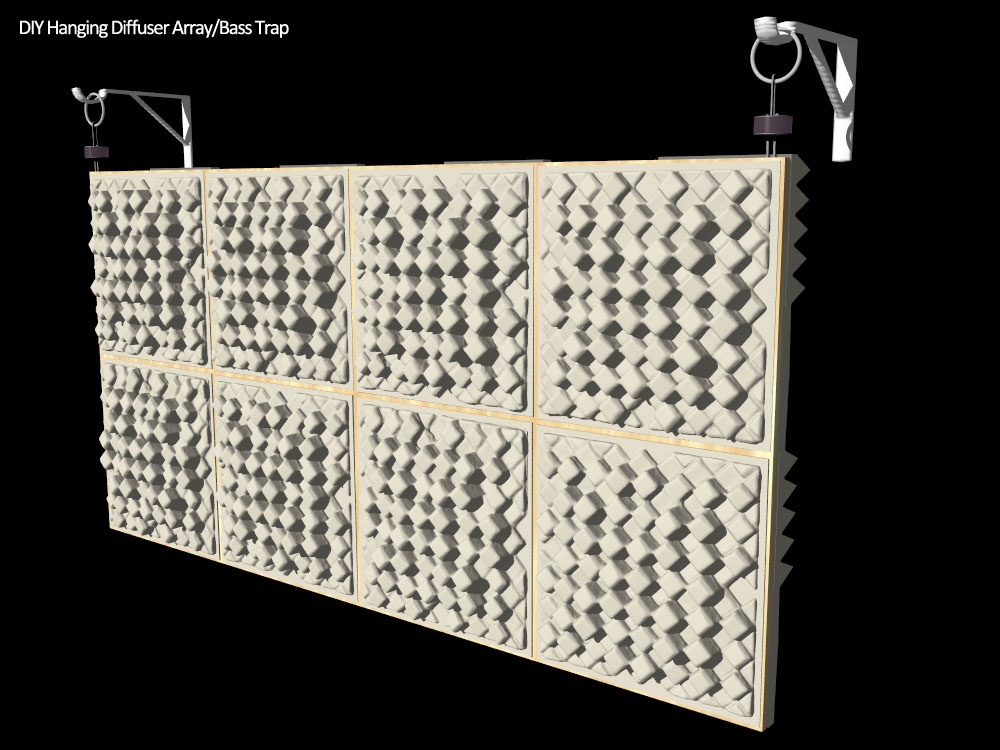
Getting more out of your back wall diffuser array with a simple hanging DIY array/bass trap.
One of the big “back wall” questions people have is “If I have a large diffuser array, how can I get the bass trapping I need?” A great answer to this question is to turn the entire array into a hanging bass absorber. If you are already planning on getting diffusion for your back wall, here is a great way to use that wall space for more than just diffusion.
Stuff you need:
- 4’x 8’ sheet of 3/4” Plywood
- 32 sq/ft of 4” Cutting Wedge® Classic Foam (Or similar absorber)
- 8 x Art Diffusers® – Model C (or Model F, Quadrapyramid™, or other comparable diffuser)
- 2 x IsoHangers
- 2 x Heavy rings (Think big Curtain Rings or Hanging Wire will also work)
- 2x Closet Rod/Shelf Brackets
- 2 x 7/8” wood screws and fender washers
- Construction Adhesive (Make sure it’s safe for Foam)

Assembly instructions
- Screw the two IsoHangers to the plywood, using a fender washer on each screw. These should be about an inch in from each end -drill small pilot holes first. (These will be used to hang the panel, this side will be designated as the back from here on out.)
- Use Construction adhesive to attach the Cutting Wedge® Foam to the back of the panel in a checkerboard pattern (each panel 90° rotated from adjacent)
- Use Construction adhesive again to attach the 8 Diffusers to the front of the Plywood (Follow the installation instructions for adhesive placement)
- Attach the Rings or Wire to the free end of the IsoHangers.
What you have created is a hanging panel that will diffuse mid-high frequencies and trap the lows. The hanging mass absorbs low frequency energy by moving slightly when pushed by the energy of the Low frequency Waves. The rear facing fiberglass also absorbs low frequencies by dampening the panel, but it also absorbs any of the waves that happen to get trapped behind the panel.

Hanging the Diffuser/Trap Assembly
- Measure and attach the Closet Brackets to the Wall – Use appropriate anchors! If you have standard or double wall construction without Resilient Channels, use the studs – The IsoHangers will keep vibrations from transmitting through the wall.
- Hang the panel on the Closet Brackets using the rings/wire with the Diffusers facing you and that’s it!
 This simple DIY project is provided as a way for our customers to learn better ways to use our products and get more value out of the products they buy. For those customers who are planning on purchasing diffusers to make an array, or maybe already have an array and are looking to try a new configuration – this project may be what you’re looking for.
A little History…
If you embark on this little construction project, you will be constructing studio elements that have remained basically unchanged since at least the early 1970’s. Hanging plywood wrapped in studio foam or fiberglass has been used “behind the curtains” of many of the top studios for effective bass control for over 40 years – just no one has ever seen it, as it has been hidden in walls; masked as a false wall of fabric stretched across wooden louvers!
————————————————————————————————————————————————————————————
Acoustics First Corporation supplies acoustical panels and soundproofing materials to control sound and eliminate noise in commercial, residential, government, and institutional applications worldwide. Products include the patented Art Diffusor®, sound absorbers, noise barriers, acoustical fabrics and accessories. Acoustics First® products are sold for O.E.M applications, direct, and through dealers. For more information on acoustical materials and their application, please visit www.AcousticsFirst.com or call Toll Free 1-888-765-2900 (US & Canada).
Acoustics First releases video on Vibration Isolation
Posted by Acoustics First in HOW TO, Press Release, Product Applications, Sound proofing, Video on February 1, 2013
 Acoustics First has conjured up yet another video demonstration. As the fourth in a series designed to help explain common acoustic principles, this video briefly reveals what is necessary to provide vibration isolation.
Vibration isolation can quickly prove to be obtuse and relatively difficult to understand. Common problems like footfall from upstairs neighbors, industrial noise from machinery and HVAC equipment or isolating speakers and scientific devices can require completely different approaches. Most often, an on site assessment should be completed by a qualified engineering professional to determine an appropriate acoustic solution. In many cases the solution will require a modification to the structure and implement more than a single strategy.
This simple vibration demonstration challenges to provide a basic understanding of how acoustical materials may be used to prevent the spread of mechanical noise and vibration through existing structures like walls, floors and ceilings.
In this acoustic demonstration, a surface mounted piezo transducer connected to an analog meter will register levels of sound vibrations transmitted to the table. A vibrating device placed directly on the surface will transmit sound vibrations and resonate loudly throughout the table. These vibrations will register on the analog meter. By inserting isolation materials between the device and the surface, the mechanical sound transmission is reduced and sound no longer registers on the meter.
VIBRATION ISOLATION DEMONSTRATION: Controlling Mechanical Sound Transmission
CLICK HERE FOR MORE ON: VIBRATION CONTROL PRODUCTS

You must be logged in to post a comment.