Posts Tagged sound absorption
Before & After: Video Conference Room
Posted by Acoustics First in Absorption, Customer Feedback, Media Room, Multipurpose Rooms, Offices, Product Applications, Products, Teleconferencing, Video on March 6, 2024
AMC Technology is located in a 5,400 square-foot suite that features a large open office area, a break room as well as several conference rooms.
When Acoustics First® initially met with the AMC team, they had recently moved into the space and were experiencing a number of acoustic problems in the open office area. Although Acoustics First® originally provided recommendations to improve workstation isolation in the open office, once the employees settled into the space, call-clarity issues in the conference rooms had become the much larger concern.
Three of the conference rooms were rudimentarily treated with 1” sound absorbing panels. The other four conference rooms were not treated acoustically and had hard/reflective walls, floors and ceilings. These hard surfaces were most at fault for excessive reverberation, noise buildup and distracting flutter-echoes (“ringing” caused by parallel reflective surfaces). These conditions contributed to an acoustically uncomfortable environment in which speech was hard to understand and conference call clarity suffered.

AMC Technology’s CTO, Anthony Uliano, identified a few goals for potential acoustic remediation. Anthony often works remotely and will call into the conference rooms to talk with team members. The sound of these calls on his side was frequently distorted and individual team members were difficult to understand. Anthony was concerned that clients were experiencing the same intelligibility issues. The primary goal for acoustic treatment was to improve the clarity of conference calls by reducing echoes and excessive reverberation within each conference room. Anthony also mentioned that they were experiencing some isolation problems. Though not a high priority, steps to reduce sound transmission were detailed for future consideration.
Acoustics First® specified Sonora® wall and ceiling treatment within each conference room to control flutter echoes and reduce reverberation down to suitable levels for conference calls. The video below provides a great snapshot of how the room sounded before and after treatment. Each recording is done in the same room, with the same employee and sitting the same distance from the microphone. The end result is a much clearer and intelligible conversation.
Demystifying Acoustic Data: Part 2 – Test Material Mounting
Posted by Acoustics First in Absorption, Home Entertainment, Home Theater, Products, Recording Facilities, Theater on October 13, 2016
For anyone new to the world of acoustics, there is a multitude of terms, coefficients and numbers that are thrown around. This flood of information can seem intimidating, especially to beginners. In this series, acoustician Cameron Girard of Acoustics First® hopes to help you distinguish between what’s useful and what’s not.
Part 2: How Mounting in Testing Affects Sound Absorption Data
As I discussed in my previous article, the best way to compare the performance of sound absorbing panels is by referencing the Sound Absorption Coefficient (SAC) and Noise Reduction Coefficient (NRC). However, these coefficients are often used as marketing tools. Be on the lookout for companies that list absorption coefficients and NRCs without mention of a particular testing standard or mounting method. It’s vital to check for this information, as direct comparisons to competitors and other materials can only be made if their testing procedures are the same.
The sound absorption of a material that covers a flat surface not only depends on the physical qualities of the material but also on how the material is mounted during installation. The mountings specified in laboratory tests are intended to simulate conditions that exist in normal use, such as direct wall mounting and installation into a ceiling grid.

Many materials for treatment of walls or ceiling are tested using what is called Type ”A” mounting. Type ”A” mounting means the test specimen was placed directly on the test surface of the reverberation chamber. Lay-in ceiling tiles, on the other hand, are often tested using ”E400” mounting. The ”E” designates a sealed air space behind the specimen (simulating the air gap between a dropped tile ceiling and the structural ceiling) and the number after the ”E” is the depth of the airspace in millimeters. The airspace behind the acoustic material affects the sound absorption by acting as a bass trap. The deeper the cavity behind the panels is, the lower the fundamental of the “trapped” frequencies will be.

To see what this look like in terms of actual numbers, let’s take a look at how different mounting methods effect the sound absorption coefficients of Acoustics First’s HiPer® Panel (a low-profile, composite absorber/diffuser panel).
Since the HiPer® Panel can be used effectively in multiple applications; we had it tested in accordance to the two most-common mounting procedures, Type E-400 and Type A. The results of the laboratory tests are as follows:
|
Product Info |
Sound Absorption Coefficients |
||||||||
| Product Name | Thickness | Mounting | 125Hz | 250Hz | 500Hz | 1kHz | 2kHz | 4kHz |
NRC |
| 1″ HiPer® Panel | 1″ | E-400 | 0.43 | 0.28 | 0.51 | 0.76 | 0.99 | 1.10 | 0.65 |
| 1″ HiPer® Panel | 1″ | A | 0.09 | 0.28 | 0.78 | 0.75 | 0.94 | 0.85 | 0.70 |
As you can see from the chart, the sound absorption coefficient at 125 Hz varies greatly between E-400 mounting (SAC of .43) and Type-A mounting (SAC of .09). If mounting the HiPer® Panel in a ceiling grid, with a sizable airspace, you can expect significant low-frequency absorption, but mounting it on a wall (Type-A) will result in much less absorption at 125Hz.
Other mounting methods are available, but are not used as frequently. Here are some of the basic mounting designations (See ASTM E795 for more information.)
Type A mounting – Test specimen laid directly against the test surface (wall panel on drywall).
Type B mounting – Test specimen cemented directly against the test surface. Type B mounting is intended to simulate acoustical ceiling tiles or other sound-absorptive products adhered to a hard surface with an adhesive.
Type C Mounting—Test specimen comprising sound-absorptive material behind a perforated, expanded, open facing or other porous material.
Type D Mounting—Test specimen mounted on wood furring strips.
Type E Mounting—Test specimen mounted with an air space behind it (dropped tile ceiling).
As we’ve discussed, acoustical data can vary greatly depending on the mounting method used during testing. Acoustics First tries to include as much information about testing procedures as possible, because we feel an informed client makes the best client.
Contact Acoustics First for your all your sound control needs!
Sound Channels® – Top Product!
Posted by Acoustics First in Absorption, Classrooms, Customer Feedback, Mentions, Press Release, School & Educational Facilities on December 22, 2015
Acoustics First® Sound Channels® wall fabric has been named a ‘2015 Top Product’ by Christian School Products magazine!
http://www.cspmagdigital.com/publication/?i=284531&p=18

Christian School Products – 2015 Top Products
This article from their November issue explains why:
Merry Christmas and Happy New Year from all of us at Acoustics First!
Custom Panels and the Aesthetics of Acoustics
Posted by Acoustics First in Absorption, Product Applications, Products, School & Educational Facilities on September 29, 2015
There is a saying in our industry: When it comes to designing a space, acoustic consultants are blind and architects are deaf. In reality, it is in both parties best interest to consider the other side when designing a space, so visual form meets acoustic functionality.
Let’s be real, standard acoustic treatment is far from sexy. Typical 2’x4’ panels, while fully functional, don’t present the architects with much in terms of visual interest. This is where Acoustics First can supplement the design goals of the architect/interior designer with our technical expertise to find a custom solution that sounds and looks great.
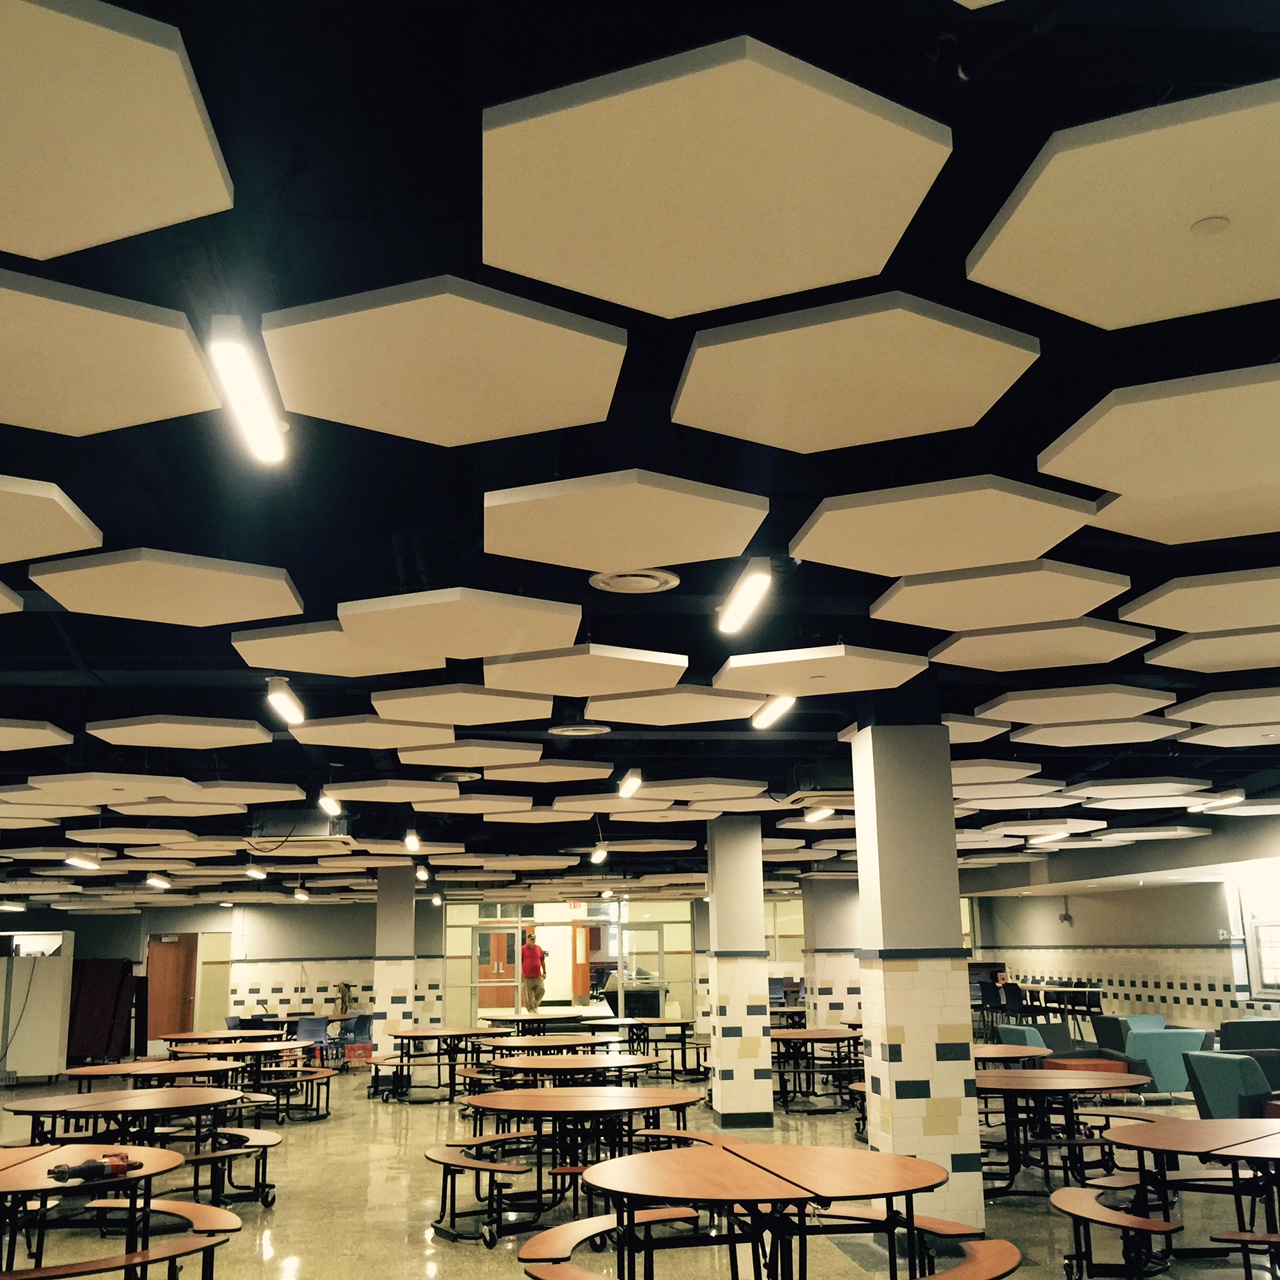
Hexagonal ToneTiles™ at Kramer Middle School.
Recently, Acoustics First® was asked to provide the custom panels for the cafeteria at Kramer Middle School in Washington DC. It was settled that hexagonal ToneTiles™ would be suspended as clouds in a geometric pattern around the ceiling. The resulting “honeycomb” effect is not only visually appealing, but the treatments effectively cut down the overall reverberation; increasing speech intelligibility and making the space more comfortable for a variety of activities.
Acoustics First® enjoys the inherent challenge in making these custom panels a success. We have plenty of experience in fulfilling the design goals of architects and interior designers. Interested in seeing more of these custom projects?
Visit http://acousticsfirst.com/installations-education-school-museum.htm to see some more examples.
Feel free to give Acoustics First® a call to discuss your custom treatment needs!
DIY: Back Wall Diffuser Array/Bass Trap
Posted by Acoustics First in Absorption, Auditorium, Broadcast Facilities, Diffusion, DIY, Home Entertainment, Home Theater, HOW TO, Media Room, Multipurpose Rooms, Music Rehearsal Spaces, Music Tracking Room, Product Applications, Products, Recording Facilities, Recording Studio, Restaurants, Studio Control Room, Teleconferencing, Theater, Vocal Booth, Voice Over, Worship Facilities on June 20, 2013
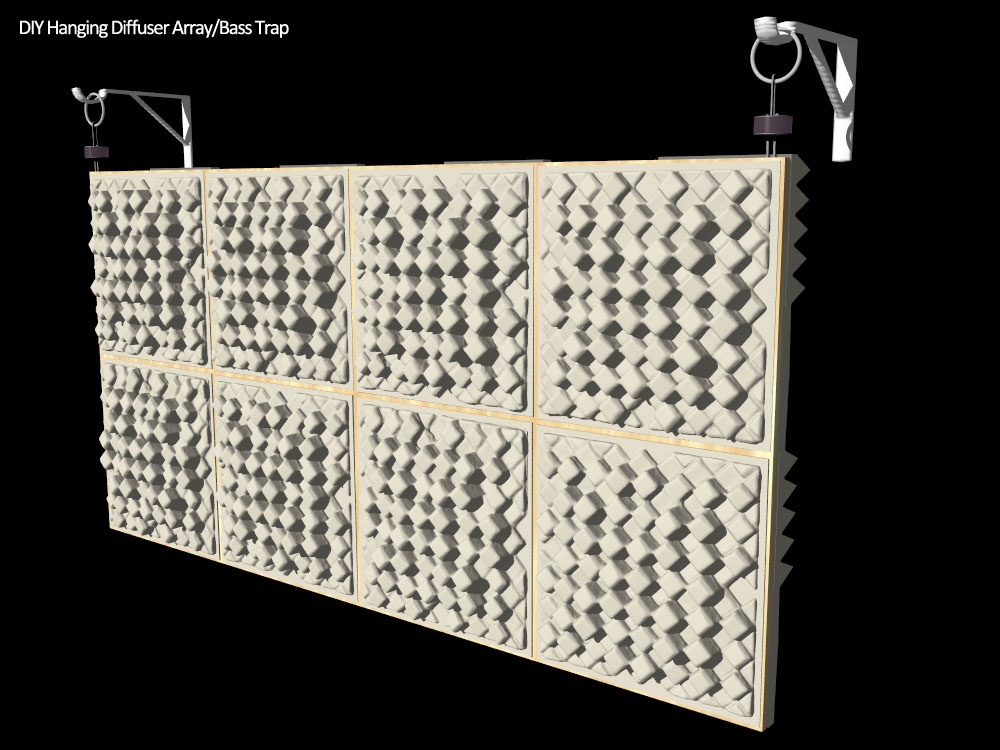
Getting more out of your back wall diffuser array with a simple hanging DIY array/bass trap.
One of the big “back wall” questions people have is “If I have a large diffuser array, how can I get the bass trapping I need?” A great answer to this question is to turn the entire array into a hanging bass absorber. If you are already planning on getting diffusion for your back wall, here is a great way to use that wall space for more than just diffusion.
Stuff you need:
- 4’x 8’ sheet of 3/4” Plywood
- 32 sq/ft of 4” Cutting Wedge® Classic Foam (Or similar absorber)
- 8 x Art Diffusers® – Model C (or Model F, Quadrapyramid™, or other comparable diffuser)
- 2 x IsoHangers
- 2 x Heavy rings (Think big Curtain Rings or Hanging Wire will also work)
- 2x Closet Rod/Shelf Brackets
- 2 x 7/8” wood screws and fender washers
- Construction Adhesive (Make sure it’s safe for Foam)

Assembly instructions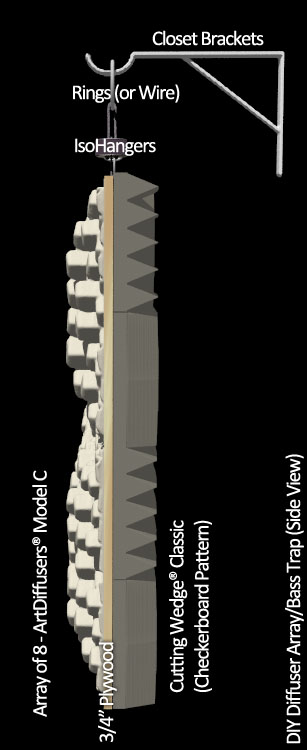
- Screw the two IsoHangers to the plywood, using a fender washer on each screw. These should be about an inch in from each end -drill small pilot holes first. (These will be used to hang the panel, this side will be designated as the back from here on out.)
- Use Construction adhesive to attach the Cutting Wedge® Foam to the back of the panel in a checkerboard pattern (each panel 90° rotated from adjacent)
- Use Construction adhesive again to attach the 8 Diffusers to the front of the Plywood (Follow the installation instructions for adhesive placement)
- Attach the Rings or Wire to the free end of the IsoHangers.
What you have created is a hanging panel that will diffuse mid-high frequencies and trap the lows. The hanging mass absorbs low frequency energy by moving slightly when pushed by the energy of the Low frequency Waves. The rear facing fiberglass also absorbs low frequencies by dampening the panel, but it also absorbs any of the waves that happen to get trapped behind the panel.

Hanging the Diffuser/Trap Assembly
- Measure and attach the Closet Brackets to the Wall – Use appropriate anchors! If you have standard or double wall construction without Resilient Channels, use the studs – The IsoHangers will keep vibrations from transmitting through the wall.
- Hang the panel on the Closet Brackets using the rings/wire with the Diffusers facing you and that’s it!
 This simple DIY project is provided as a way for our customers to learn better ways to use our products and get more value out of the products they buy. For those customers who are planning on purchasing diffusers to make an array, or maybe already have an array and are looking to try a new configuration – this project may be what you’re looking for.
A little History…
If you embark on this little construction project, you will be constructing studio elements that have remained basically unchanged since at least the early 1970’s. Hanging plywood wrapped in studio foam or fiberglass has been used “behind the curtains” of many of the top studios for effective bass control for over 40 years – just no one has ever seen it, as it has been hidden in walls; masked as a false wall of fabric stretched across wooden louvers!
————————————————————————————————————————————————————————————
Acoustics First Corporation supplies acoustical panels and soundproofing materials to control sound and eliminate noise in commercial, residential, government, and institutional applications worldwide. Products include the patented Art Diffusor®, sound absorbers, noise barriers, acoustical fabrics and accessories. Acoustics First® products are sold for O.E.M applications, direct, and through dealers. For more information on acoustical materials and their application, please visit www.AcousticsFirst.com or call Toll Free 1-888-765-2900 (US & Canada).

You must be logged in to post a comment.