Archive for category Recording Facilities
Eight very different 2′ x 2′ sound diffusers.
Posted by Acoustics First in Diffusion, Product Applications, Products, Recording Facilities on June 30, 2025
Acoustics First® has maximized the idea of adaptable designs. One of the most common modular architectural elements is the 2′ x 2′ ceiling grid. While standard, fiber ceiling tiles have their uses, specialized acoustic environments require higher-performing materials – for both absorption and diffusion. While Acoustics First® excels with its Sonora® and Cloudscape® Ceiling tiles, today we are going to focus on the wide range of 2’x 2′ diffusers that have been developed over the several decades.
Sound diffusers in a 2′ x 2′ format have several advantages, other than just being placed in a ceiling grid to help diffuse the ceiling. They integrate well on walls and in arrays, where they can help break up large flat surfaces and help minimize flutter and standing waves from parallel surfaces. While they provide many different aesthetic options, there are also many different functional types of diffusers available in this form-factor to address different acoustic issues, from flutter, bass issues, targeted frequency absorption, and geometric scattering. Let’s look at some of these devices and their uses.
Geometric Diffusers.
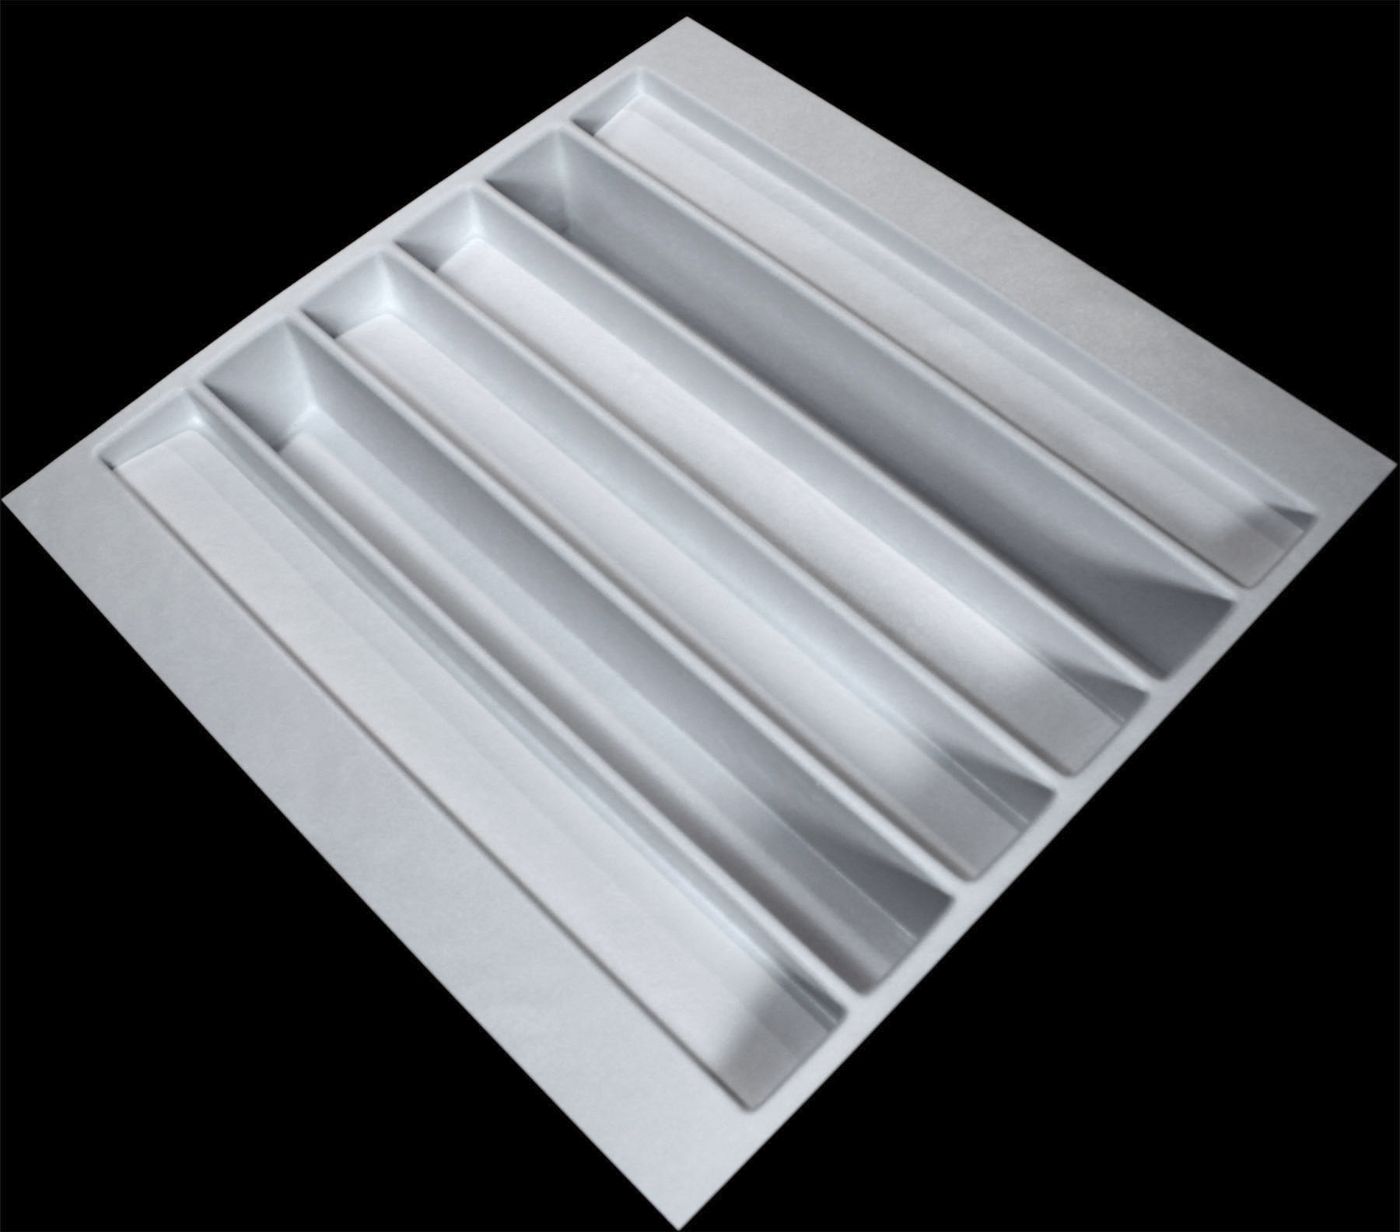
Geometric diffusers have been around a long time. These devices break up large flat surfaces and redirect or “scatter” those reflections in different directions. They work great in environments where you need to redirect acoustic energy in a predictable way, and redistribute a specular reflection over a wider area. In a 2′ x 2′ size, you can also get a fair amount of bass absorption, due to the large cavity behind the geometric shapes creating a space that can be stuffed with absorbent material to tune it.


Quadratic/Mathematic Diffusers
Mathematic diffusers are devices that use specific calculations to design their size, shape, and structures to effect their performance. A common type is called the Quadratic Residue Diffuser (sometimes called a Schroeder Diffuser, after its pioneering inventor, Manfred Schroeder). This type uses a Quadratic Residue Sequence that optimizes uniform sound diffusion at specific design frequencies. There are different ways to implement these designs, but two common designations are based on their diffusion patters – 1D or 2D. A 1D Quadratic diffuser mostly spreads energy in one plane, and a 2D provides a hemispheric pattern.


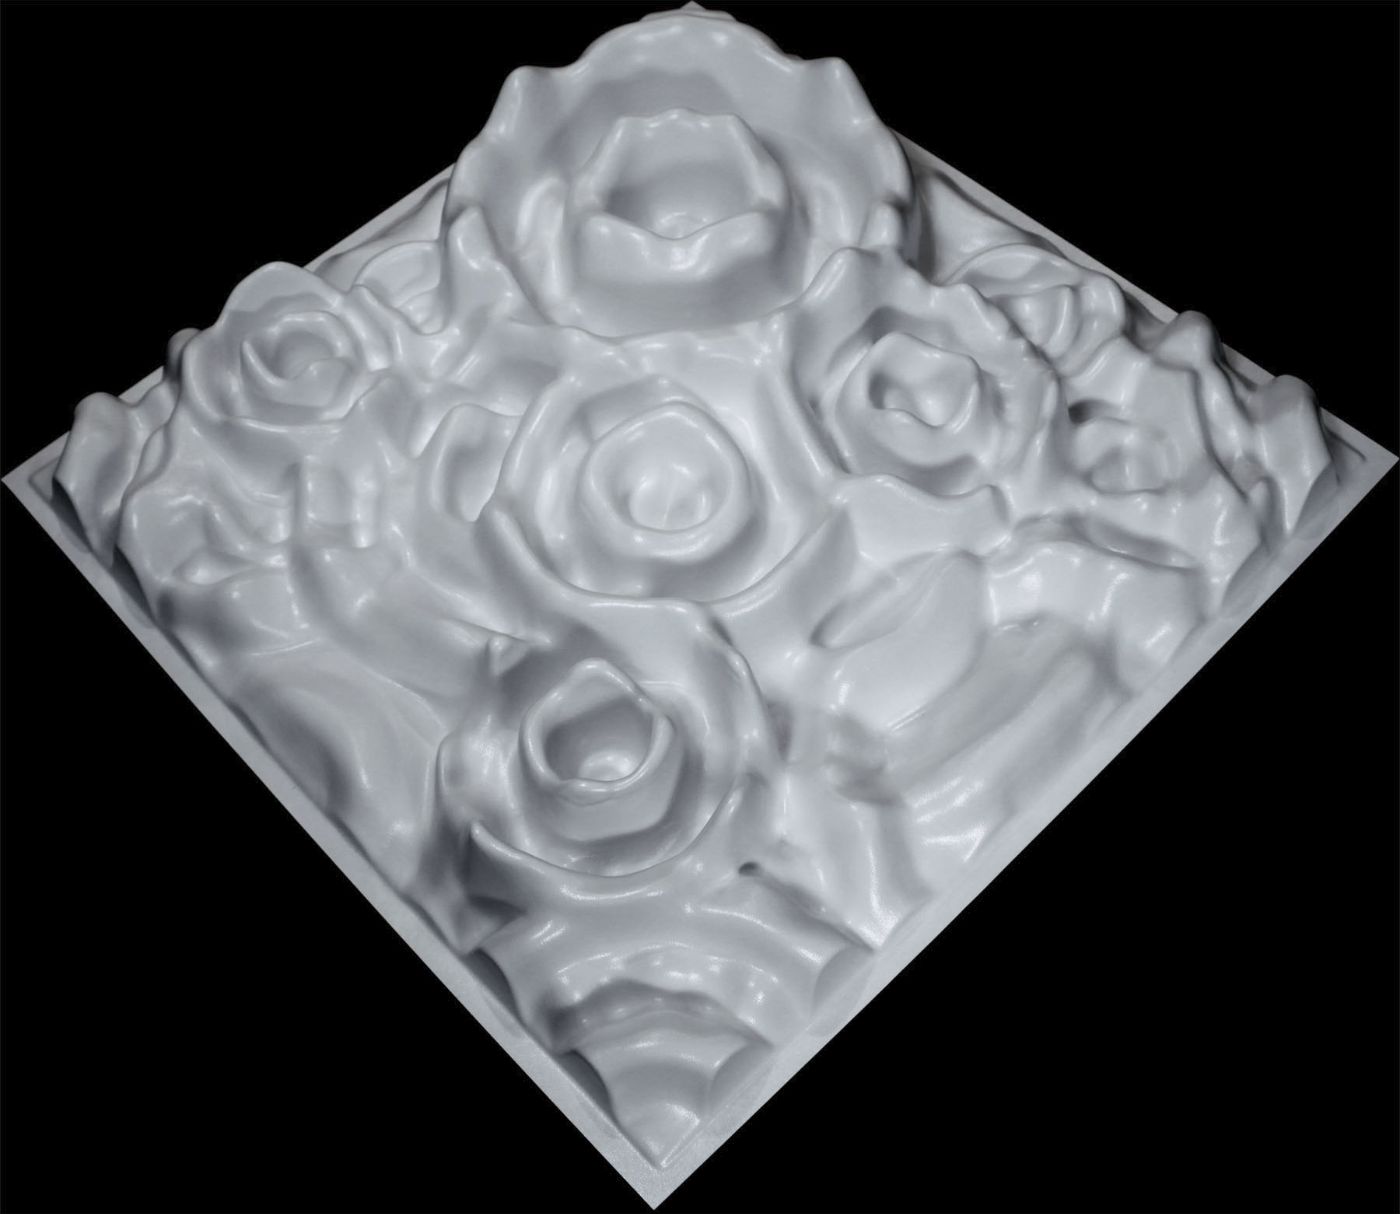
Organic Diffusers.
Organic diffusers are a variation on the classic mathematic diffusers which use different mathematic functions to optimize the diffusion further by creating a smooth transition. Once such method is called Bicubic Interpolation. Instead of having the math restricted to having blocks at certain heights, the interpolation bridges these heights using a function that provides a smooth transition to the next target height. This transition creates unlimited resolution in the frequencies within it’s functional range, providing expanded uniformity throughout its range, and increasing its capabilities. As different frequencies are affected differently depending on their wavelength – the organic diffusers have no hard edges to define their pattern and look differently to different frequencies and energy from varied sources.

These diffusers all have the ability to be used in different types of installations for different reasons. Many of these diffusers are mixed and matched in the same room. You will see these on the walls or ceiling, and placed in different locations. There are rooms with Double-Duty diffusers for low frequency control, Model C for Mids, and Model F for flutter, while other rooms may have Aeolians™ on the rear wall and Model C’s and Model F’s to control the ceiling.

Keep in mind, these aren’t even all the diffusers we have available, these are just the ones specific to the 2′ x 2′ format. The Aeolian™ has a 1′ x 1′ version called the Aeolian™ Mini. There are flat panel diffusers that are hybrid absorbers and diffuser like the HiPer Panel® and the HiPer Panel® Impact. There are even large format versions of the Double Duty™ diffuser, Pyramidal, and even the Quadratic Diffuser.
For more info about these diffusers, read some of our, “Similar, Yet Different Series,” where we go into more detail about our products… and how some of these are similar, yet different!”
If you have any questions as to which products you need to optimize your space, reach out to Acoustics First® and we can help you find which products will be best for your application. Remember that Acoustics First’s® full line of sound diffusers are all made in the USA, with many available in stock for quick shipping.
Why use a mix of objective and subjective goals to make a great sounding space?
Posted by Acoustics First in Articles, Media Room, Music Tracking Room, Recording Facilities, Recording Studio, Studio Control Room on July 30, 2024
With the ability to measure and analyze every detail of an acoustic environment, sometimes we forget about the basic fact that it should sound the way we want it to sound. There are scenarios where objective measurement is important, desired, and even required. If there is a physical safety concern that may damage hearing ( loud noises, machinery, etc.), a need to have safety information understood (evacuation/safety notices or alarms, etc.), absolute sound privacy is required (HIPAA regulations, government security, or legal need…), or the need for speech clarity for education… often we require some guidelines be met to insure the acoustics meet a decided standard for performance. These standards use objective measurement and data to make these determinations. There isn’t a governing body that regulates how your home theater should perform, or how an office needs to sound (beyond the safety and privacy concerns mentioned above.)

Entertainment venues, theaters, churches, commercial spaces, restaurants, offices, and residential spaces have very little regulation, and while there are many occasions that testing is used to improve the performance of these spaces, there are some environments where the effort to measure and quantify everything can get in the way of the goal of making a great acoustic space. If you wanted to compare different small “critical listening environments” (mixing and mastering studios are examples of these), there would be some general commonalities in their construction and treatment. Many are built to minimize parallel reflections, have short reverb times, symmetric placement of source speakers, control first reflections, and balance the frequency performance of the space.
A “ruler-flat” frequency response shouldn’t be the acoustic goal.
“Balancing the frequency performance of a space” doesn’t mean “attain ruler-flat frequency response across the entire human hearing range.” There are several reasons that the “ruler-flat” interpretation is counterproductive – the first being that it is nearly impossible to attain in any room. Second, is that everyone perceives sound differently. As humans age, almost all people will experience some degree of “presbycusis,” which is slow decline in high-frequency sensitivity that comes with age. If you are lucky enough to reach a ripe old age, there is a 60% – 80% chance (depending on the study you read) that your high-frequency hearing won’t be what it was when you were young. But even with that factor removed, when your hearing was at its best, your personal perception of sound is different from every other person – making sound, by definition, subjective.
The closest you can get to ruler-flat performance is to remove the room entirely and get some high quality headphones – but you may still find yourself tweaking the equalization curve to your preference. There are many people who feel that headphones sound unnatural, or that they are uncomfortable to listen to for long periods of time. Even the best mixing studios are not completely flat. Also, you will see many different sets of speakers in these spaces… or even headphones. These different sources are to compare how a mix will sound in different environments… and that the mix will “translate” in different listening scenarios. These environments which people will listen to music in vary to include outdoors, bathroom, kitchen, movie theater, grocery store, car, truck, SUV, convertible, living room, and more… coming from sources like phone speakers, headphones, assistants like echo and Google, bookshelf speakers, sound bars, audiophile equipment, movie theater sound systems, and an array of automotive audio systems.

Start with the basics.
If you are making a space for critical listening, there are some objective guides that will help you. If building from scratch, build with a geometry that will reduce room modes and parallel surfaces. Reduce reflections that will interfere with the source. Reduce reverb time. Control the bass response to reduce build up. These can all be readily calculated, measured, and controlled with bass traps, absorption, and diffusion. Most of the time, just following these objective guides will get you a room that will sound subjectively “good.”
After you get that far, you could continue trying to measure the room and tweak the performance to try and attain the unattainable ruler-flat response… or you could listen to music in your room and decide with you ears what should to be done to make it sound how you want. There are many subjective arguments people make about why they think something sounds better. There are philosophical arguments about listening to it “as the engineer/artist intended.” There are debates about if you should equalize music at all – even if you are in the majority of the aging population who may need to give the high-frequencies a nudge to experience the sizzle of Stevie Wonder’s glorious high-hat mastery.
When it comes to your own space… if it sounds good to you… it’s right. By following a few objective guidelines to get you in the arena, you can tweak the last bit with your ears until you are experiencing the material the way you prefer it to sound.
Similar, Yet Different: Model C vs. Model D!
Posted by Acoustics First in Diffusion, Home Entertainment, Home Theater, Media Room, Multipurpose Rooms, Music Rehearsal Spaces, Music Tracking Room, Product Applications, Products, Recording Facilities, Recording Studio, Studio Control Room, Theater on January 5, 2024
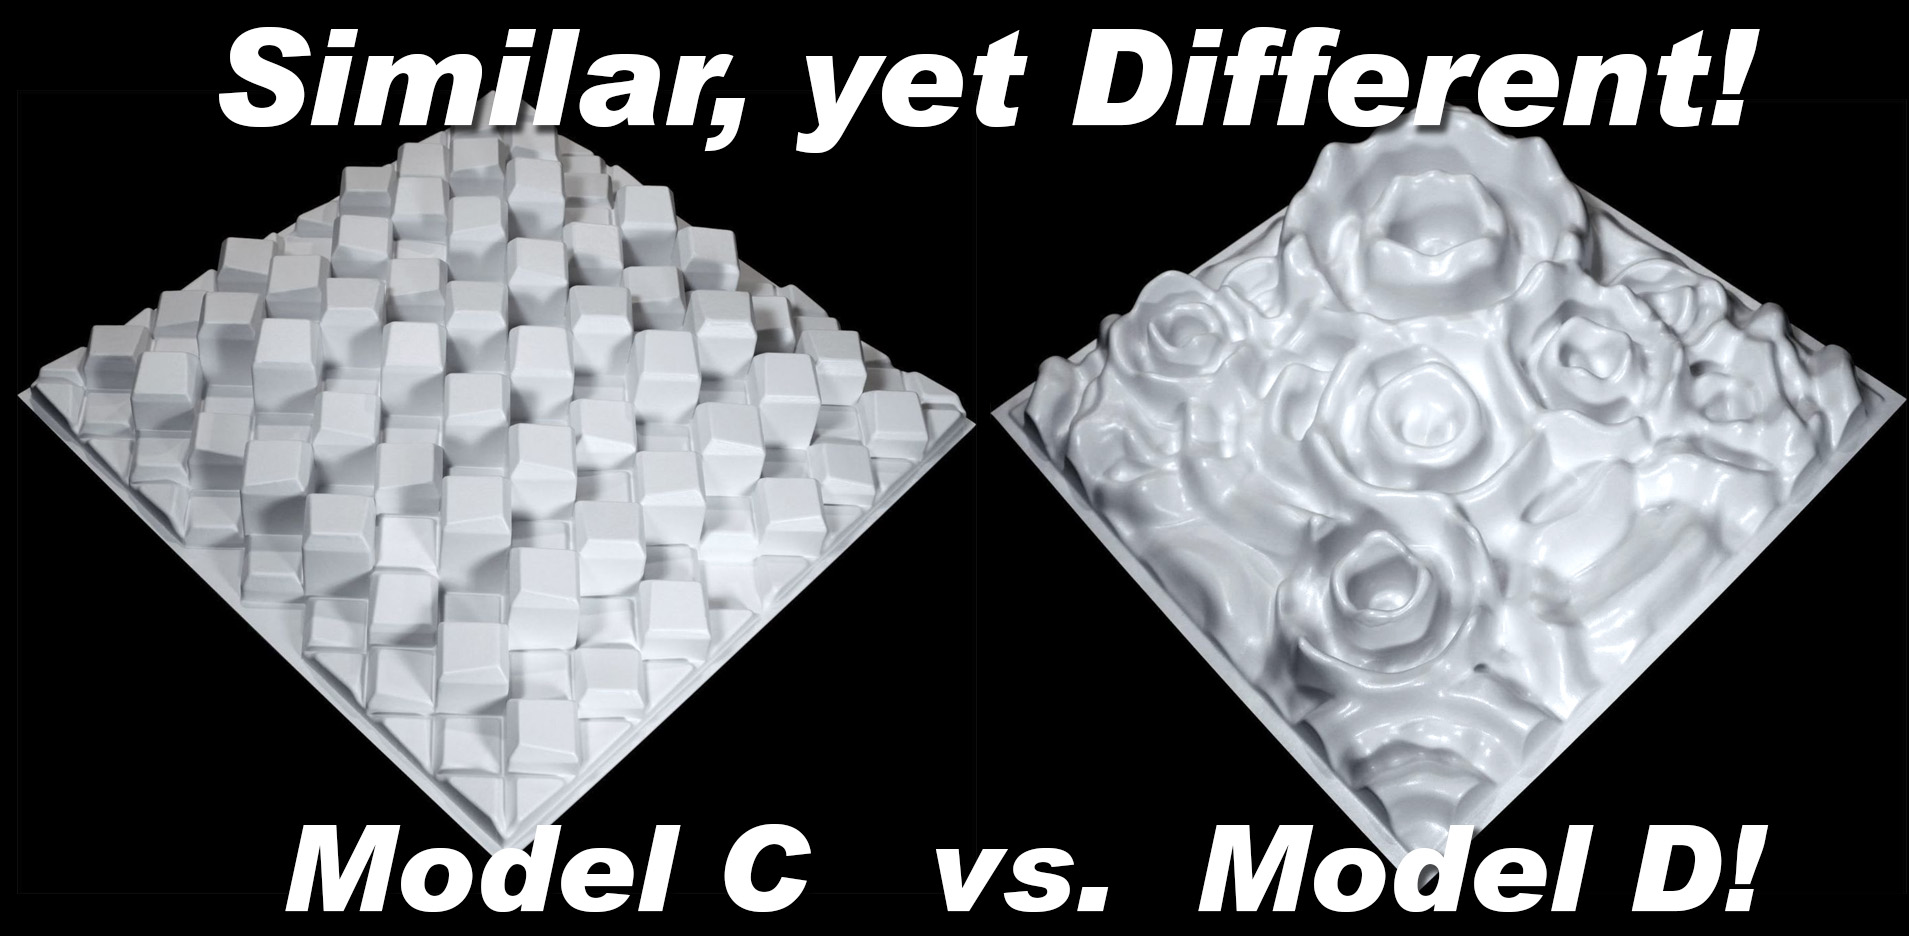
In this installment of “Similar, Yet Different,” we take a good look at two very different looking diffusers in the 2’x2′ size… the classic ArtDiffusor® Model C and the organic, rippled ArtDiffusor® Model D – while there are some similarities, there are some key differences in how they look (obviously) and how they perform.
Quick Similarities.
The ArtDiffusor® Model C and Model D are both 2’x2′ diffusers which are made to be either wall mounted or installed in a standard drop-tile ceiling grid. They are both formed from a Class A fire-rated polymer in a single piece. Both are mathematical diffusers, which create their different physical features in a “form follows function” methodology. They also cover roughly the same frequency bands, with some minor variation in how they execute their control.
Difference in Math
The Model C is an interesting configuration. Often you will see quadratic residue diffusers with flat blocks or wells in a relatively standard quadratic cell formula configuration. The Model C runs in a much different alternating binary configuration. The basic idea is that cells are placed in a 45° array with each cell adjacency calculated as an alternating array of higher and lower cells starting in the middle and working in a pattern of alternating low/high cell clusters decreasing toward the edges of the diffuser. These diffusers also do not have flat tops on the blocks – they are angled at 10°. The orientation is then rotated in 90° steps in a pattern that maximizes the spatial redistribution of reflected sound. This was a vast design departure over the original quadratic design, and created a diffusion profile that was distinctly different.

The Model D was an even greater departure. It began with a Maximum Length Sequence (MLS) concept that first changed the varied straight channels into rings of different dimensions. These rings then broke from the MLS mold by getting varied height profiles based on the QRD sequence. As if having different size rings at different heights wasn’t enough… the randomness was further perpetuated through a Boolean process of assigning certain rings a random property that would either add or subtract height from any other ring that they crossed. Finally, the entire surface geometry was smoothed using a bicubic interpolation, creating the organic undulating surface which gracefully spans the entire profile.

What this difference in math does to the acoustic performance.
The Model C has a nice even diffusion profile through it’s primary working range. This is a product of the QRD design and binary distribution. The set size for the blocks guarantees a solid primary frequency range from about 1KHz to over 4Khz. This tunes the Model C squarely in the most sensitive bands of the human hearing range. Below this range the device becomes a bit of an absorber. Above this range and the performance becomes more effective at intervals, which can be seen in the areas of wide diffusion at 6KHz – 18 KHz. These repeating zones are common in “stepped” quadratic designs. Due to the heights of the well being at specific intervals, the intervals repeat at octaves of their effective bands.

The Model D doesn’t have the same stepping. The spline interpolation and the random Boolean shifts smooth the transition from one quadratic height to the next, and the MLS sequence causes a bit of a high-pass filter pushing the start of the primary range to around 2KHz – which is a little higher than the Model C. The main difference is that once the Model D starts it’s range it diffuses everything up to and over 20KHz without the banding that can happen in other quadratic designs.
Another difference in symmetry.
The ArtDiffusor® Model C is a fairly symmetric design, but it’s 45° angle pushes that symmetry along the diagonal (corner to corner) across the unit. The asymmetry is subtle but allows for enough variation to account for any “lobing” issues that can occur in more simple geometric devices The 10° block faces being at varied orientations is key to increasing the spatial directivity over the older “flat-faced” Quadratics. This was a very novel design when it was first introduced, and those benefits are crucial to the longevity of the Model C’s reign – It just works. It’s predictable and musical… and that’s why it’s here to stay!
The ArtDiffusor® Model D is a completely different animal from the Model C when it comes to symmetry… as a matter of fact… there isn’t really much on it that is symmetric! The Model D was designed as a departure from symmetry. Focusing on the mid to high frequencies, which are very specular, the organic geometry creates an asymmetric reflection pattern. This pattern can be used to steer the sound into a wider field.. and that profile changes with the wavelength of the sound that hits it. This steering ability and the wide frequency range has made the Model D a favorite in mixing and mastering environments, where they can get smooth performance through the entire frequency spectrum.
How these differences benefit everyone.
We have stated before that there isn’t really a one-size-fits-all solution in acoustics. Many environments will use various treatments to achieve their desired goals. You will often have different devices to address different problems, in different frequencies, in different locations, in the same space. Bass traps for controlling the lows. Absorption to reduce gross energy across the board. Large geometric surfaces to break up parallel reflections and steer the projection of sources. Mid range diffusers to create clarity to the sources and reduce artifacts. High frequency diffusers to reduce flutter and add a feeling of envelopment and airiness in the space. These devices all have their place – from the smaller listening rooms, to critical listening environments, and large multifunction spaces and venues.
It is also worth noting that these two devices have a very different aesthetic visually. The classic blocks of the Model C have become a signature look for quality sound environments, and people recognize them as they would classic geometric pyramids and barrels. The Model D aesthetic provides a visual accent that people take advantage of to set their space apart from others. The undulating, asymmetric pattern changes drastically when you rotate the individual units in the array. This allows for not only varied acoustic performance, but also a unique visual possibilities – with numerous variations.

The ArtDiffusor® Model C and Model D are two tools that are used to craft ideal listening environments around the world… and in those roles they are indeed Similar, Yet Different.
Similar, Yet Different: Aeolian® vs. MiniAeolian™
Posted by Acoustics First in Broadcast Facilities, Home Entertainment, Home Theater, Media Room, Multipurpose Rooms, Music Rehearsal Spaces, Music Tracking Room, Product Applications, Products, Recording Facilities, Recording Studio, Studio Control Room, Uncategorized, Vocal Booth, Worship Facilities on September 28, 2023

In this installment of “Similar, Yet Different”, we are going to compare the two current variations of the popular Aeolian® Diffuser – the original 2’x2′ Aeolian and the 1’x1′ MiniAeolian™!
Design
This comparison has some similarities to the very first “Similar, Yet Different” post we made comparing the ArtDiffusor® Model C to the ArtDiffusor® Model F. We are looking at a diffuser that uses identical mathematic functions to create the shape… both the Aeolian® and the MiniAeolian™ are an “Organic Quadratic” constructed from a Bicubic Interpolation of a Quadratic Residue Function. They are both truncated so that they are completely asymmetric, even to the edge. The MiniAeolian™ IS an Aeolian®, only it is scaled differently.
You may recall that the Model F was constructed of 4 scaled down Model C diffusers in a monolithic 2’x2′ tile – This is not the case with the MiniAeolian™. The Original Aeolian® Diffuser is a 2’x2′ footprint that is 5″ tall, and will fit in a standard 2’x2′ ceiling grid. The MiniAeolian™ is a single scaled down unit, and it is a little different – The 1’x1′ footprint stands alone as a single unit, but it is only scaled down in height to 4″.
In this case, form follows function. The MiniAeolian™ was built to fill a specific function as a smaller wall-mount unit, or a direct-mount ceiling unit for smaller spaces. Part of this wall-mount function was to have a version of the Aeolian® that would fit in tight areas or in spaces that didn’t have enough clearance for the 5″ standard Aeolian® (or would require modification to those areas (or diffusers) to allow this extra height). Some people implement configurations that have tighter footprint requirements, and the 1’x1′ footprint of the Mini allow it to be used in these types of layouts.
Performance
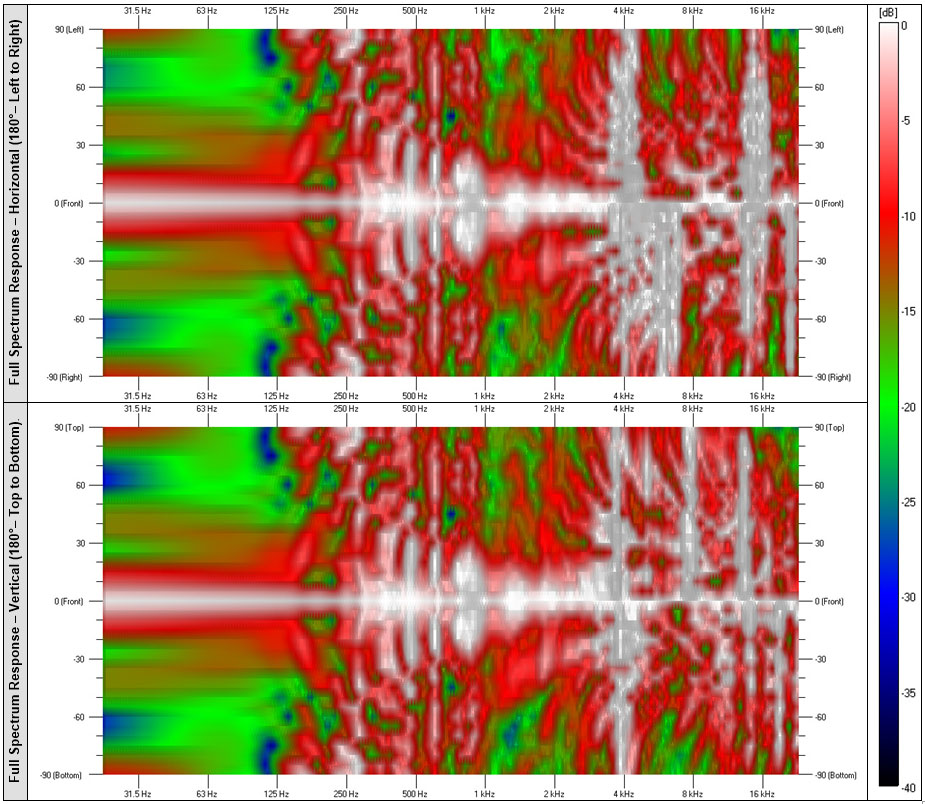
So how does this change affect the performance of the unit? Surprisingly, they are quite similar. The Organic curved design, with only a 20% reduction in height, shows only minor differences in performance of their overall frequencies ranges – with both primary ranges starting at about 1500Hz-1600Hz with and average between 150° and 170° of horizontal and vertical dispersion up to between 5Khz and 7Khz. While the primary range is a good indicator, when we look at the actual polar response, we can get a better picture of their full range performance.

A quick glance shows two very similar performing diffusers, except for the low-frequency performance. The larger elements and deeper formfactor of the original Aeolian® are more effective at the 1000Hz range, where the MiniAeolian™ appears to be mostly specular. There are some surprises however. It appears that at the 2000Hz range leans slightly in the favor of using 4 MiniAeolians™ in an array verses the single Aeolian®. There is more surface variation over the same footprint (2’x2′ in the array of 4), and the size of the Mini’s features are a bit more optimal for diffusing the 2Khz wavelength. This swings back slightly into the favor of the single Aeolian® at 4Khz, where the larger elements have a wider throw, and the elements of the Mini have steeper wells. At 8Khz, it tips back to the Mini, and then at 16Khz, they are both neck-and-neck.
The amazing similarity is that the variations are quite subtle through their entire effective ranges, and even quite a bit above those ranges. While there are slight differences in the performance of the diffusers when we compare the directly, these are really very minimal except for the low-frequency edge in performance of the larger original Aeolian®.
Closing
With the similarity of performance in the two diffusers, they can almost be used interchangeably – or even used together in the same environment to implement an aesthetic vision or add more randomness/variety to the diffusion in the space.
There are several occasions where you may require one over the other.
- If you need more 1Khz diffusion, you should add some 2’x2′ Aeolians® – as they perform better in that range.
- If you need to install diffusers that fit in a ceiling grid… you will also want to use the original.
- If you want the Aeolian® but need diffusers that will fit in a space that is less than 2’x2’x5″, you may want to go with the MiniAeolian™.
Currently the MiniAeolian™ is a custom order item only, and is subject to minimum order quantities.
Contact Acoustics First® for more information and pricing.
John Bullard Live Room – Tuning a Live Room for Classical Banjo
Posted by Acoustics First in Absorption, Customer Feedback, Diffusion, HOW TO, Music Tracking Room, Product Applications, Products, Recording Facilities on May 3, 2023
When you think of classical music; what instruments come to mind? Piano? Violin? Cello? …What about Banjo?
In the summer of 2022, classical banjoist John Bullard reached out to Acoustics First for assistance with his newly renovated home-studio. John is one of a select group of classical musicians aiming to showcase the versatility of this uniquely American instrument. The banjo, with John’s expertise, lends a very distinct, melancholy sound to contemporary and traditional compositions.
Having recorded a number of albums already, John knew he wanted his live room to be catered specifically to tracking solo, classical banjo as well as small acoustic ensembles. Acoustics First analyzed John’s live room and came up with a treatment design that would achieve an “ideal-as-possible” acoustic environment for recording classical instruments.
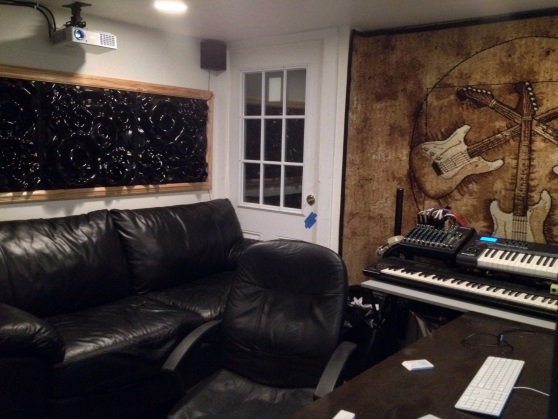
The largely reflective live room had walls comprised of unfinished, reclaimed wood planks over plywood, a drywall ceiling, stone fireplace and a polished concrete floor. The parallel, hard surfaces contributed to a poor tracking environment; with standing waves and “flutter” echoes adding unwanted coloration to recordings, inhibiting music definition.
Spaces used for rehearsing and recording classical music often benefit from elevated levels of reverberation, which add a sense of warmth and ambience to acoustic music. Although the reverb in John’s untreated room was only slightly excessive when measured, it was far from “diffuse”, with the majority of energy coming from early reflections.
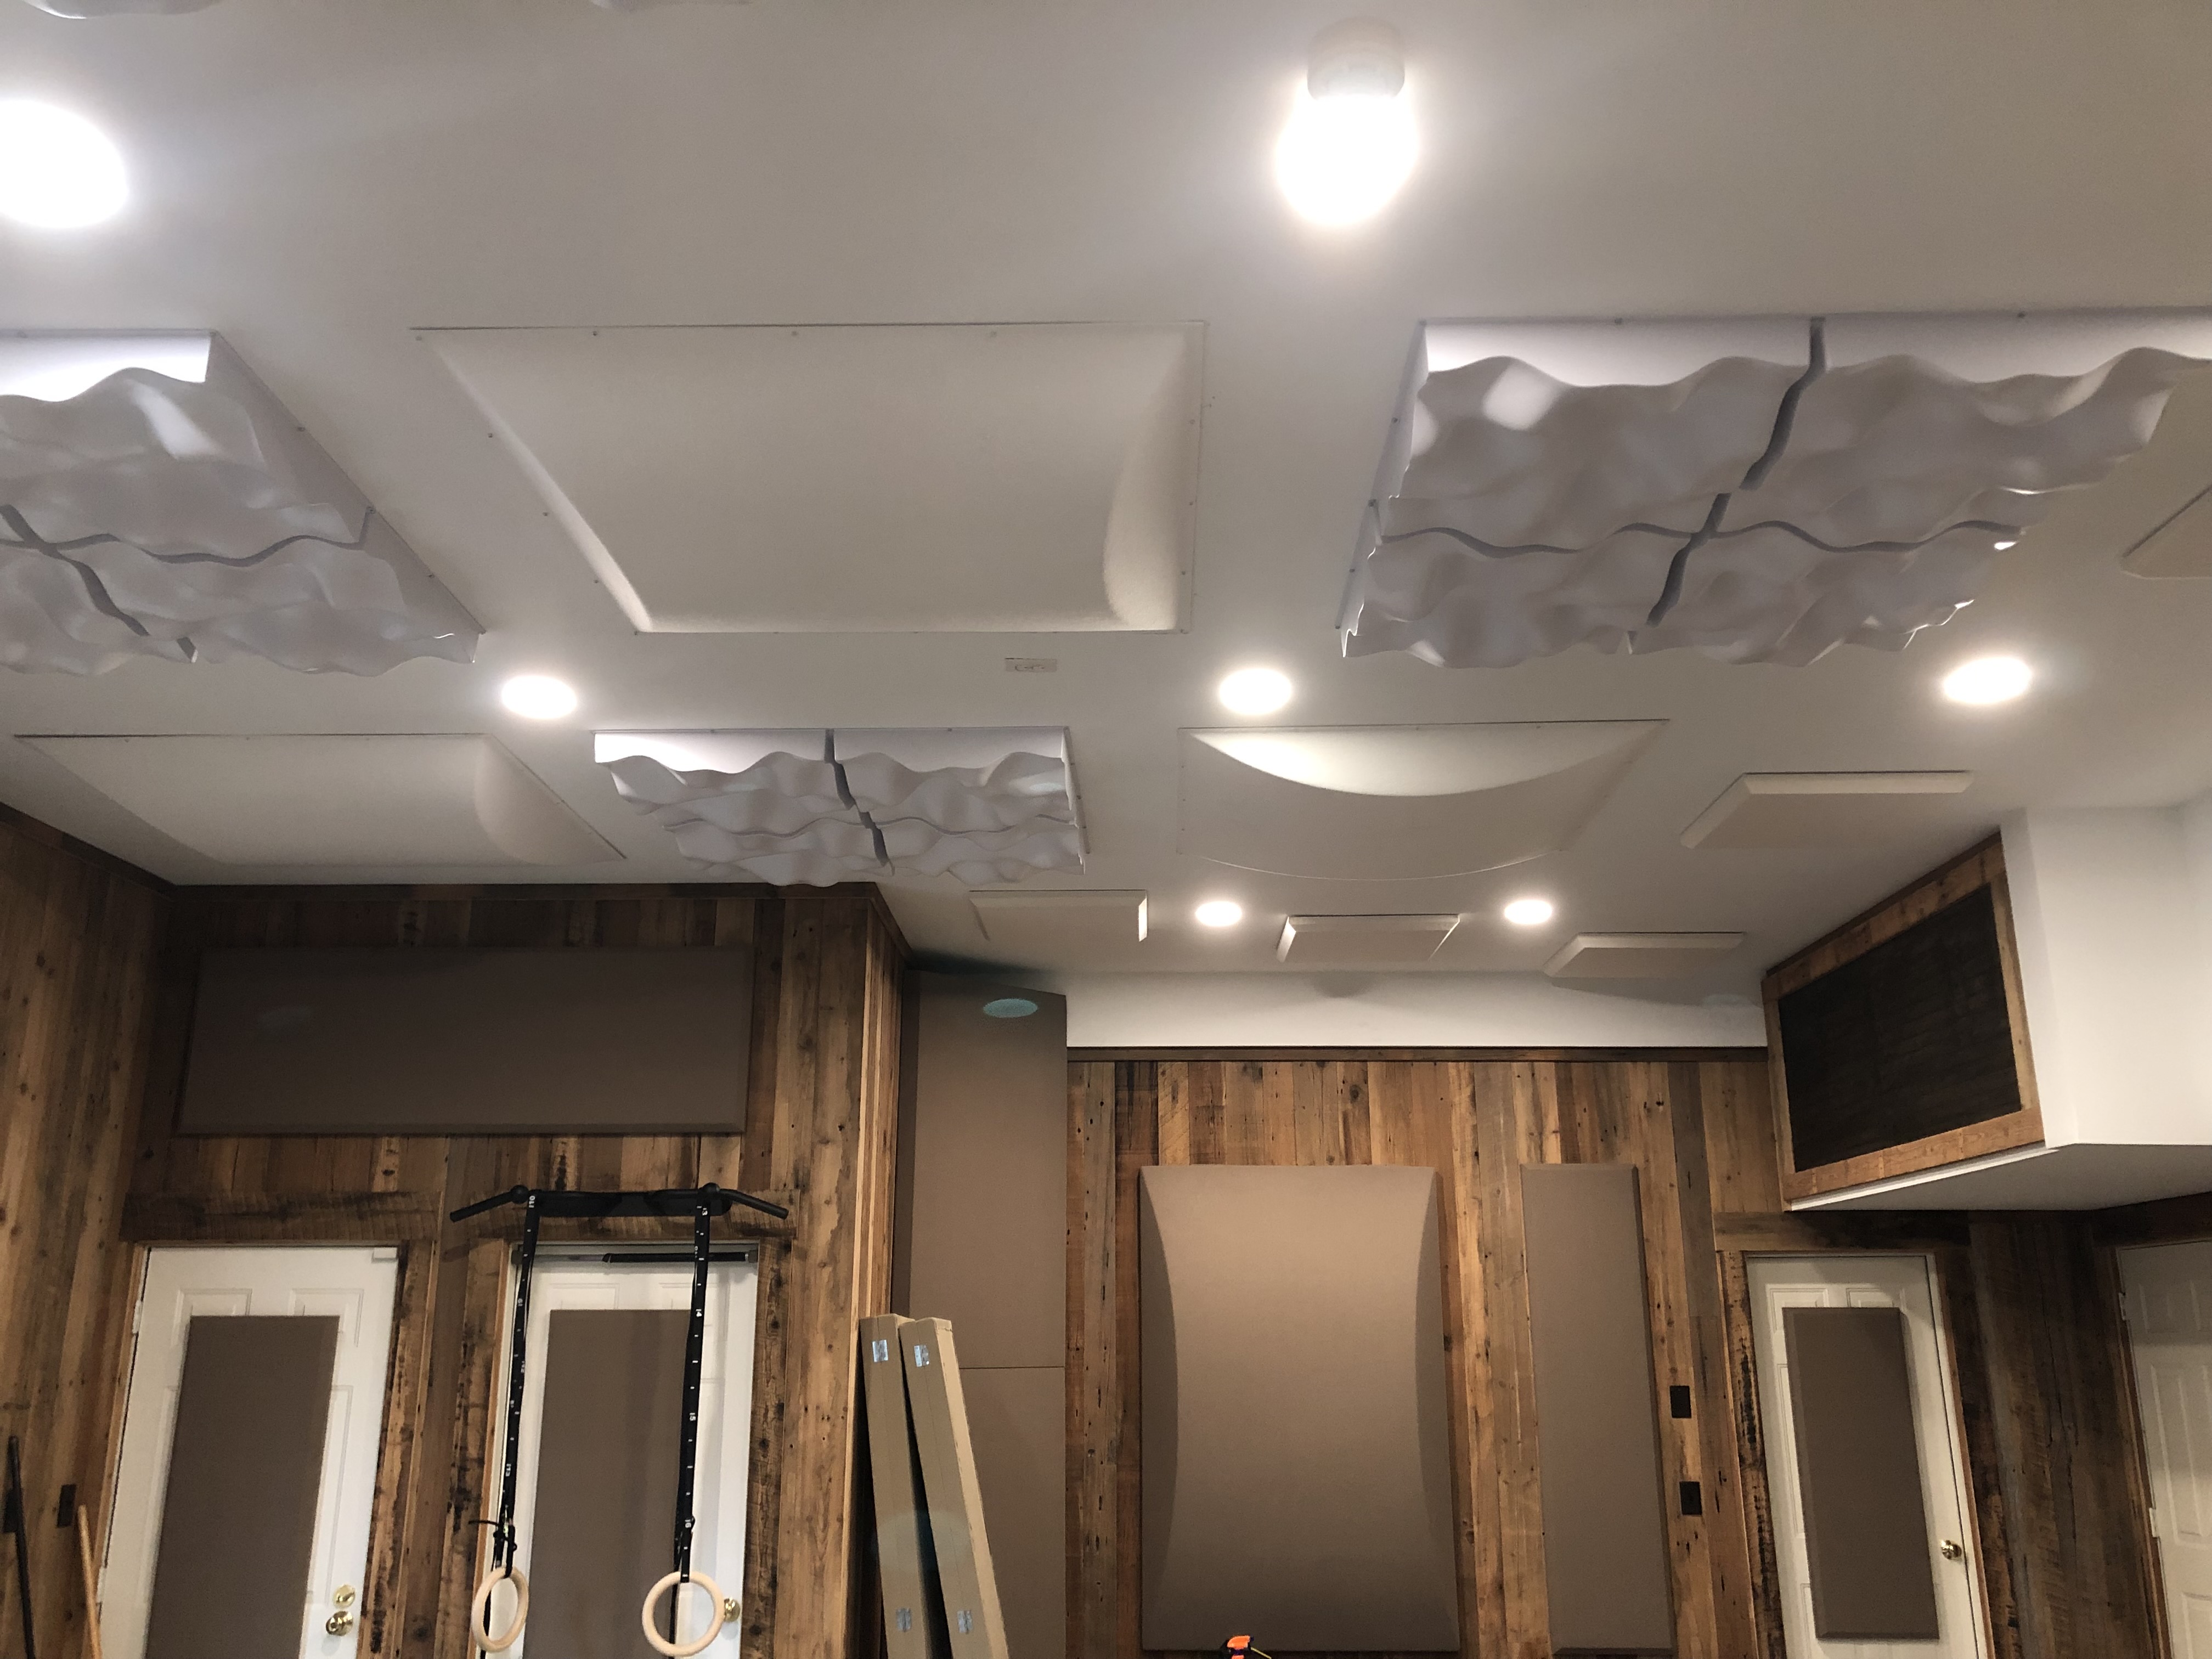
The primary challenge in the live room was to address the early specular reflections and standing waves without taking too much “life” out of the room. To achieve this delicate balance, wide band diffusion was recommended as the primary ceiling and wall treatment with selective sound absorptive treatment with fabric-wrapped Sonora® panels.

Double Duty Diffusers™ and Aeolian® sound diffusers were recommended as they would also provide some much needed low-frequency absorption in addition to broadband diffusion.
After the treatments were installed, John got right to work on experimenting…
“…ready to start doing extensive test recordings to locate the best spot and rug configuration for solo banjo… It sounds really good to my ear – now to see how the microphones hear it!”
John Bullard

Please check out John Bullard’s music!! – https://www.johnbullard.com/

You must be logged in to post a comment.