Archive for category Government
DIY – Treating a Wall – BlockAid® and SoundChannels®
Posted by Acoustics First in Absorption, Animal Shelters, Auditorium, Broadcast Facilities, Classrooms, DIY, Fitness, Government, Gymnasium, Home Entertainment, Home Theater, HOW TO, Media Room, Multipurpose Rooms, Music Rehearsal Spaces, Music Tracking Room, Product Applications, Recording Facilities, Recording Studio, School & Educational Facilities, Sound proofing, Studio Control Room, Teaching Rooms, Teleconferencing, Theater, Uncategorized, Vocal Booth, Voice Over on July 16, 2015
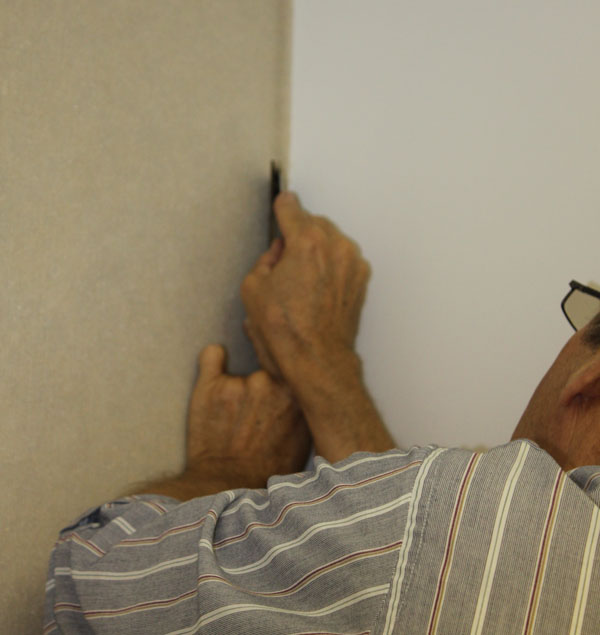
![]() On many occasions, we get asked about common ways to treat a wall (or walls) either for broadcast, podcast, or other voice recording scenario – where they not only want to tame the reflections within the room, but also block a certain amount of sound coming into – or leaving the room.
On many occasions, we get asked about common ways to treat a wall (or walls) either for broadcast, podcast, or other voice recording scenario – where they not only want to tame the reflections within the room, but also block a certain amount of sound coming into – or leaving the room.
Budget is frequently an issue, major construction is usually unwanted, but effective results are always required.
We’re going to show you how to handle a room upgrade – cut down on the sound transmission and cut the room reflections – all with the same skills required to hang high quality wall coverings! Let’s see how you can cover a wall with BlockAid® vinyl sound barrier to block unwanted sound, then go back and cover that with an absorptive layer of Sound Channels® wall covering to finish it off!
This treatment is not recommended for renters, as this is not an easy upgrade to undo. However, if you have an extra bedroom you are using as Podcast studio, this is a great way to treat it… Let’s get started!
Installing BlockAid®
 1. Measure the wall for the first panel length. Mark the panel width on the wall. |
 2. Measure and Mark the length of the wall on the BlockAid® |
 3. Use a straightedge and a razor to cut the BlockAid®. |
 4. Using a trowel, apply vinyl tread adhesive to the wall, covering the whole area where the first panel is going. (You marked the wall right?) |
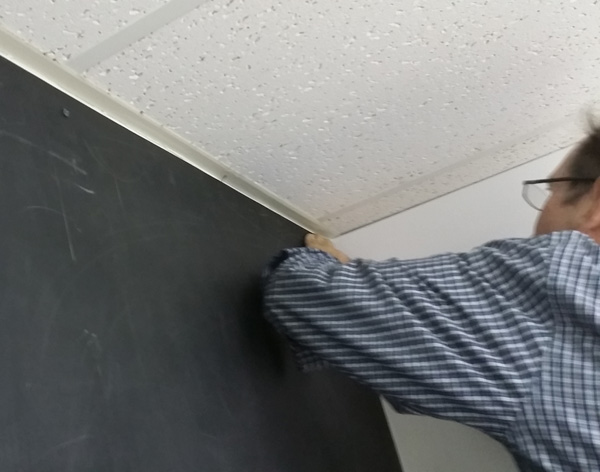 5. Hang the panel starting at the top, install a few screws to hold it in place while the adhesive sets. (You will probably need a friend to help, as BlockAid® is a pound per square foot!) |
 6. Using your hands and a putty knife, smooth out all the air bubbles from behind the BlockAid® so that you get a good bond when the adhesive cures. |
 7. Repeat the steps for the next strip. Measure, Mark, Cut, Trowl, Hang… |
 8. Make sure you line up those seams! push them right up agaist each other. Smooth out the air bubbles, cut out any outles, trim any extra… Let dry! |
Good job! Now, take a breather while that dries, and notice how much less sound is passing through the walls. This is when you will notice that the sounds are now coming from under the door, and through the leaky old window. These can be taken care of in different ways…. but the easiest way is the same way you deal with keeping the cold out! Get some weather strip, a door skirt, seal the gaps around the frame of the door, and windows, maybe go out and buy some heavy curtains for the windows… if you have some leftover BlockAid®, you can always get some Industrial Velcro and temporarily stick a piece over the window!
Installing Sound Channels®
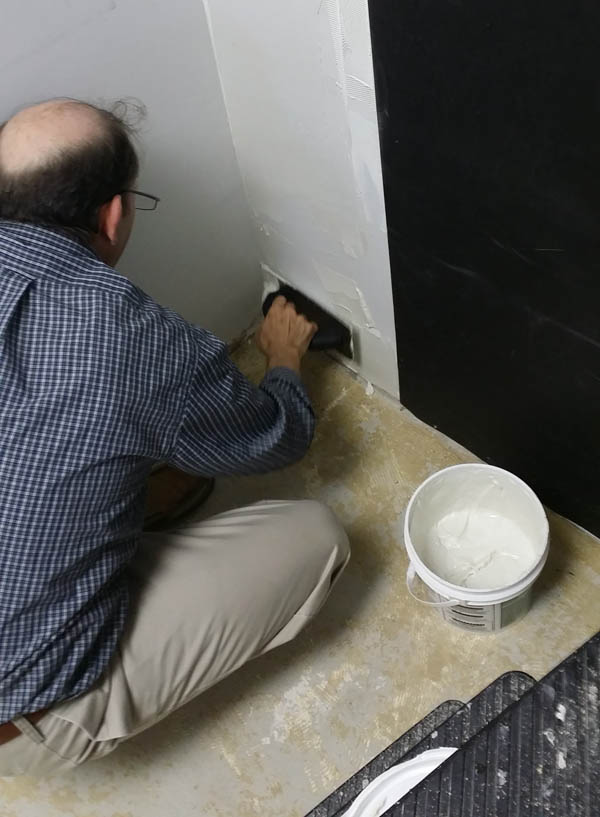
 1. Remove the Screws from the BLockAid® – if you didn’t already… then same as BlockAid®, measure the wall, mark it, measure and cut a piece of Sound Channels® and start troweling on the Chapco! |
 2. Well, when you get tired, make your friend finish troweling out the adhesive to cover where the panel is going. (You are going to overlap the seams.) |
 3. Starting at the top, hang the Sound Channels® overlapping the seam of the BlockAid® under it. Smooth out the air bubbles with your hands. Make sure it lines up well. No screws needed! |
 4. Measure and cut the next strip, carefully following a rib in the fabric, while your friend, (who is way better at troweling than you are anyway,) preps the next section with adhesive. |
 5. Best practice is to run the fabric in the same direction every time. Not just with the ribs, but in the same direction it comes off the roll. So find the top. |
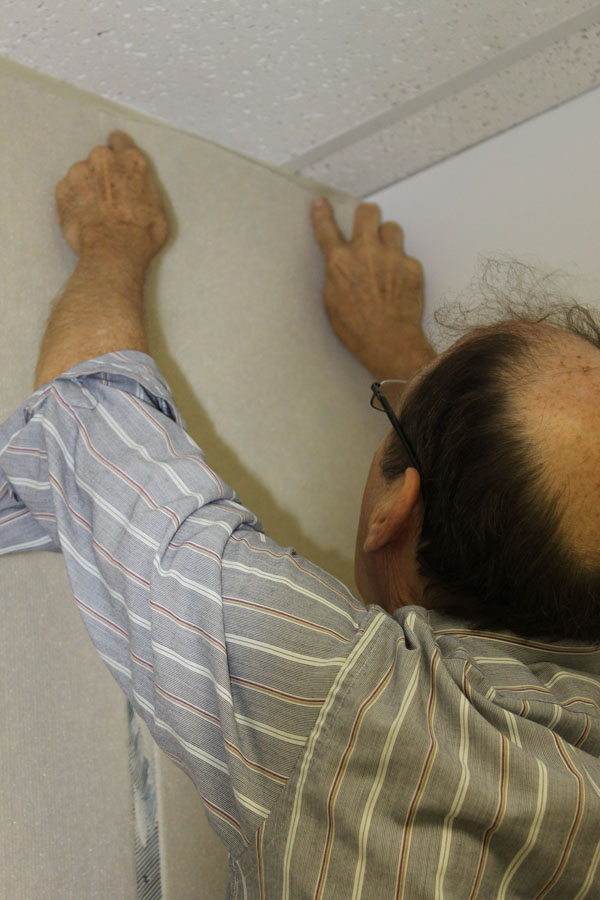 6. After you find the top, start hanging from the top, lining up the seams and smoothing out the bubbles as you go. |
 7. Keep those seams tight as you go. Keep smoothing… almost done! |
 8. Trim up the extra and repeat as many times as needed. |
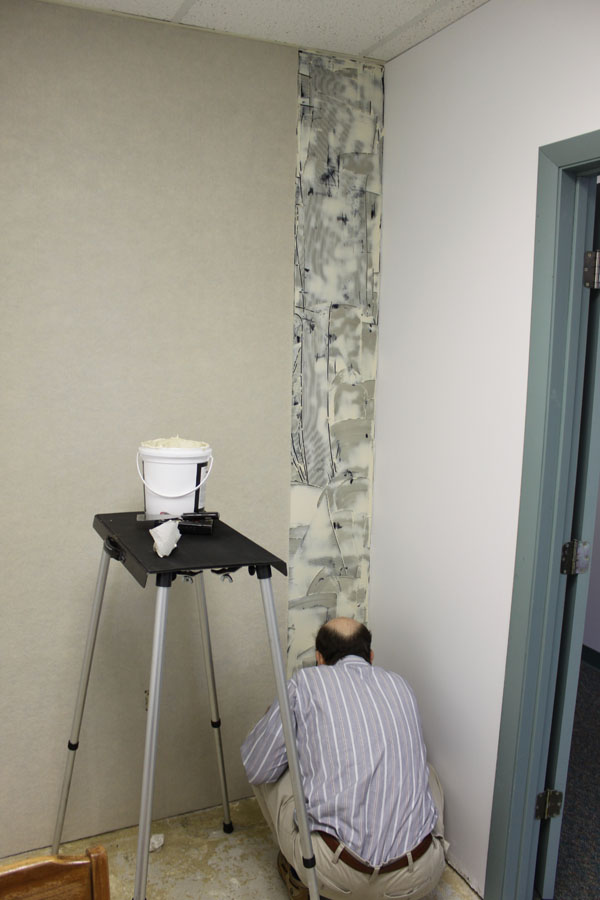
That’s it!

Don’t forget to trim around those outlets!
This treatment is a common first step in treating many professional broadcast studios – it gives you extra isolation with the barrier and takes the edge of the sound reflections. Many professional environments then go back and add some additional treatments such as bass traps, diffusers, and broadband absorber panels – especially if these studios are planning on bringing in any musical guests.
This isn’t just for home studios. It works great for kids play rooms, bedrooms, home theaters, home gyms, and any place you want to block sound and tame the sound inside the room.
Customize your space as you will, but this treatment is a consistent winner for cost and performance, and is a great way to get started without breaking the bank!
DIY: How to quiet down that noisy equipment rack
Posted by Acoustics First in Absorption, Auditorium, Broadcast Facilities, Data Centers, DIY, Government, Home Entertainment, Home Theater, HOW TO, Media Room, Music Rehearsal Spaces, Music Tracking Room, Product Applications, Recording Facilities, Recording Studio, Sound proofing, Studio Control Room, Vocal Booth on May 2, 2013
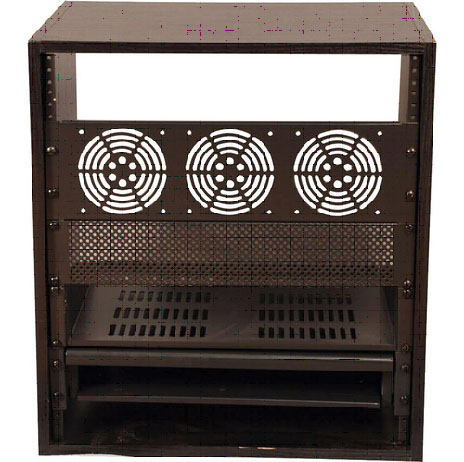 DIY Project – Rack issues
Take a few seconds and DIY fix some of the common problems with using equipment racks!
Not too many people think about their equipment racks, but many of us use them. Usually it’s something like what you see to the right – the great, sturdy, utilitarian box. Unfortunately, there are a couple inherent problems with these:
- Ringing – The metal resonates causing a ringing effect – may be masked by program material.
- Reflections – many times your rack is near sound sources causing reflections off the hard surfaces.
- Noise – Fans and other devices in the rack can make noises that are disruptive to recording.
Here are a few DIY fixes for these common problems.
- Composite foam with adhesive backing is perfect for stopping the ringing of filler panels.
- FireFlex™ acoustical foam the inside of your rack to keep the noise down.


- Use some Composite Foam to line your trays, drawers and shelves to keep items from rattling around inside the case.
- Cover your rack in Sound Channels® fabric to keep the case from causing harsh reflections.
- Make a temporary cover for the front and back with BlockAid® sound barrier with minimal ventilation cut-outs to use during takes if rack-borne noise is problematic.
This simple DIY project is provided as a way for our customers to learn better ways to use our products and get more value out of the products they buy. If you are looking for more ways to use the products you have, look to Acoustics First for Ideas. http://www.acousticsfirst.com
————————————————————————————————————————————————————————————
Acoustics First Corporation supplies acoustical panels and soundproofing materials to control sound and eliminate noise in commercial, residential, government, and institutional applications worldwide. Products include the patented Art Diffusor®, sound absorbers, noise barriers, acoustical fabrics and accessories. Acoustics First® products are sold for O.E.M applications, direct, and through dealers. For more information on acoustical materials and their application, please visit www.AcousticsFirst.com or call Toll Free 1-888-765-2900 (US & Canada).
Acoustic First Ceiling Tiles get a face lift for the perfect fit to any application
Posted by Acoustics First in Absorption, Art Galleries, Auditorium, Broadcast Facilities, Classrooms, Fitness, Government, Home Entertainment, Home Theater, Hospitals, Media Room, Museums, Offices, Press Release, Product Applications, Recording Facilities, Restaurants, School & Educational Facilities, Studio Control Room, Teaching Rooms, Teleconferencing, Theater, Universities, Vocal Booth, Voice Over, Worship Facilities on March 28, 2013
For Immediate Release
Acoustic First Ceiling Tiles get a face lift for the perfect fit to any application.
 Acoustics First® has expanded their line of acoustical ceiling tiles allowing you to dress up any ceiling grid with a generous number of finish options. The legacy line of Sonora® ceiling tiles includes fabric faced ceiling tiles in either the standard square edge or a tegular edge that reveals below the grid. These tiles are available in a multitude of fabric colors and can be utilized in a wide range of applications to provide an upscale ceiling system that looks as good as it sounds. If you are looking for the absence of color, there are now two white options. The Sonora® UltraWHITE facing provides a basic smooth white finish while the Sonora® Nubby tile provides a texture white appearance. White ceiling tiles are an excellent choice for areas where a seamless look is desired and maintaining a room that is both bright and vibrant. Alternatively, if your application requires the ceiling to disappear, a black scrim version is also available. These black scrim ceiling tiles are a popular choice for public theaters, home theaters, restaurants or any application where a dark ceiling is desired. Additionally, choose from either a PVC faced or encapsulated ceiling tile if your application requires a wipe-able surface for resistance to liquids and dirt. Test labs, animal shelters, restaurants and similar facilities may require their ceiling tiles to be cleaned on a regular basis. In addition the ample amount of absorptive ceiling tiles, Acoustics First® also carries a wide range of diffusive ceiling tiles including the patented Art Diffusor® Model C and Model F. Product information, specifications and pricing can be found on the website @ http://www.acousticsfirst.com/sonora-ceiling-tiles.htm.
Image Downloads: http://www.mediafire.com/?21id1fsb0btrq
www.AcousticsFirst.com
Acoustics First Corporation
————————————————————————————————————————————————————————————
Acoustics First Corporation supplies acoustical panels and soundproofing materials to control sound and eliminate noise in commercial, residential, government, and institutional applications worldwide. Products include the patented Art Diffusor®, sound absorbers, noise barriers, acoustical fabrics and accessories. Acoustics First® products are sold for O.E.M applications, direct, and through dealers. For more information on acoustical materials and their application, please visit www.AcousticsFirst.com or call Toll Free 1-888-765-2900 (US & Canada).
Acoustics First’s acoustical wall fabric saves $Green$ while being Green!
Posted by Acoustics First in Art Galleries, Auditorium, Broadcast Facilities, Classrooms, Fitness, Government, Gymnasium, Home Entertainment, Hospitals, Medical Facilites, Multipurpose Rooms, Museums, Music Rehearsal Spaces, Offices, Press Release, Products, Recording Facilities, Restaurants, School & Educational Facilities, Studio Control Room, Teaching Rooms, Teleconferencing, Theater, Universities, Vocal Booth, Voice Over, Worship Facilities on October 18, 2012
For Immediate Release
Acoustical wall fabric saves $Green$ while being Green!
 Sound Channels® acoustical wall fabric is manufactured from 100% Post-Consumer Recycled material, making this a quick ship, easy, no thought acoustic solution.
Sound Channels® is applied directly to vertical surfaces, is easy to cut and installs like wall carpet. This absorptive wall fabric is a great choice to moderate speech frequencies in any application. Great to soften sound in conference rooms, distance learning, offices, and day care facilities, this material can also be used as a base layer in home theaters, recording studios and broadcast facilities.
Not only is this economical acoustical treatment available in countless colors, it is manufactured from recycled materials, reducing environmental impact!
Sound Channels in manufactured using Eco-fi fibers. Eco-fi is a high-quality polyester fiber made from 100% certified recycled plastic bottles. It can go into any textile product such as clothing, blankets, carpets, wall coverings, auto interiors, home furnishings, and craft felt. Eco-fi can also be blended with other fibers, such as cotton or wool, for enhanced qualities.
AN EASY GUIDE: 15 bottles = 1 yard of wall covering
Why buy Eco‐fi products?
We have the capacity to keep billions of plastic bottles out of the world’s landfills each year by using post-consumer plastic bottles instead of virgin materials in the fiber manufacturing process. By doing this, we can lower harmful air emissions and save millions of barrels of oil from being used which, in turn, reduces the harmful effects of acid rain, global warming, and smog. Fabrics made from Eco-fi fiber are chemically and functionally nearly identical to those made from non-recycled fiber. The difference is that Eco-fi fiber is made without depleting the Earth’s natural resources. With properties such as strength, softness, shrinkage-resistance, and colorfastness, market applications for Eco-fi products are expanding every day.
Click here for more information on the Sound Channels acoustical wall fabric.
http://www.acousticsfirst.com/sound-channels-wall-covering.htm
——————————————————————————————————————————————-
Acoustics First Corporation supplies acoustical panels and soundproofing materials to control sound and eliminate noise in commercial, residential, government, and institutional applications worldwide. Products include the patented Art Diffusor®, sound absorbers, noise barriers, acoustical fabrics and accessories. Acoustics First® products are sold for O.E.M applications, direct, and through dealers. For more information on acoustical materials and their application, please visit www.AcousticsFirst.com or call Toll Free 1-888-765-2900 (US & Canada).
|
www.AcousticsFirst.com Acoustics First Corporation PH: (804) 342-2900 |
Sign up for Future Press Releases http://eepurl.com/hxZCs |
Acoustic Solutions for Industrial Noise Control (Blocking and reducing industrial sound)
Posted by Acoustics First in Articles, Construction Sites, Government, HOW TO, Industrial Facilities, Manufacturing, Multipurpose Rooms, Product Applications, Products on October 9, 2012

Industrial facilities include a wide range of applications like manufacturing, processing plants, construction sites and more. The typical sound problem in most industrial applications is the need to lower the overall level of sound or lower the decibel level of specific machinery. Machinery can include punch presses, printing equipment, crushers, grinders, air tools, drills, jack hammers, pumps, etc. The noise generated by these machines not only fatigue operators but may not meet OSHA safety requirements or other local noise ordinances.
To lower the sound level of these machines, the best course of action is to create a sound proof enclosure around the source of the noise. This will eliminate noise and prevent sound from permeating into the rest of the facility or neighboring areas. There are many ways to accomplish this, however, most methods will require some type of massive and/or dense material and possibly the addition of a fluffy absorptive material.
To create sound proof enclosures, you may wish to consider using a combination of the following materials:
BlockAid Sound Barrier is a mass loaded vinyl used in composite structures to add mass and aid to increase the STC (Sound Transmission Loss) of a system. This material weighs one pound per square foot, ships on rolls and can be easily cut with a utility knife.
 Alternatively, like in the image at the top of the page, a machine or enclosure can be lined with a composite foam. This material has a layer of the vinyl sound barrier floating between two layers of acoustical foam. This material combines a layer of massive/dense material (vinyl sound barrier) to block sound with two layers of absorptive acoustical foam. Suspending the barrier as a limp mass between the two layers of acoustical foam decouple it from the existing surface of the enclosure, improving its effectiveness.
In addition, StratiQuilt Blankets can be installed on-site around machinery to reduce the mechanical noises. These quilted fiberglass blankets can be manufactured with or without a barrier septum and available with grommets for hanging. Optional outdoor coverings can be quoted when the material requires UV protection.
Subsequently, Cloudscape ceiling baffles can be installed in large open areas and metal buildings with engineered truss systems to reduce overall reverberation and sound pressure levels (SPL) within the room.
—————————————————————————————————————————————————
Acoustics First Corporation supplies acoustical panels and soundproofing materials to control sound and eliminate noise in commercial, residential, government, institutional applications worldwide. Products include the patented Art Diffusor®, sound absorbers, noise barriers, acoustical fabrics and accessories. Acoustics First® products are sold for O.E.M applications, direct, and through dealers. For more information on acoustical materials and their application, please visit www.AcousticsFirst.com or call Toll Free 1-888-765-2900 (US & Canada).

You must be logged in to post a comment.