Posts Tagged blockaid
BlockAid® Clear Vinyl Sound Barrier on Windows
Posted by Acoustics First in HOW TO, Product Applications, Products, Sound proofing on December 17, 2021
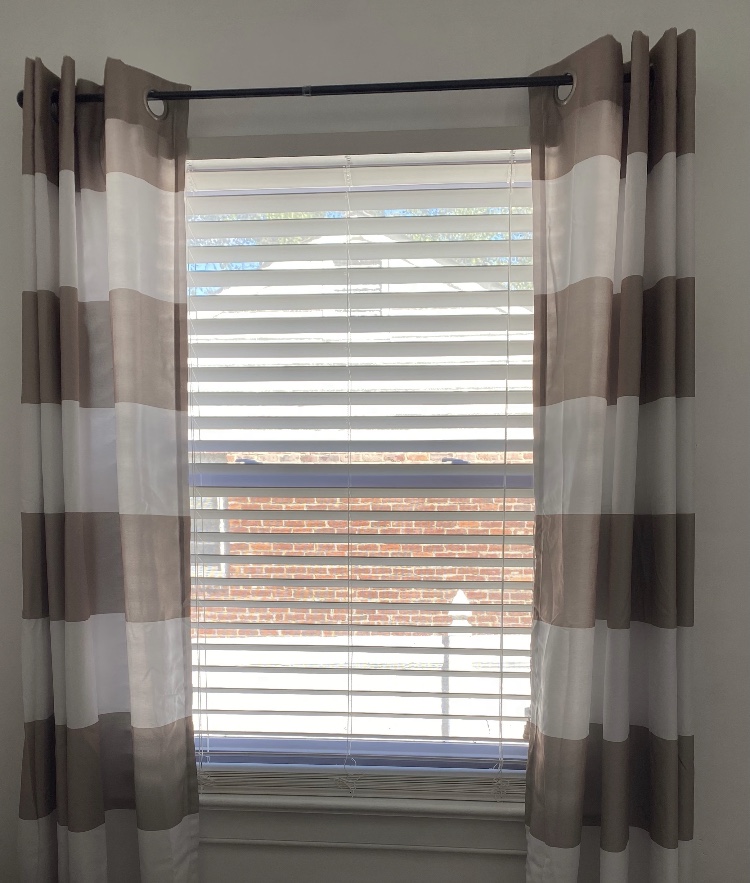
Using BlockAid® Clear Vinyl Sound Barrier is a great way to cut down on unwanted neighbor noise, especially during leaf-blowing season. For this installation, clear vinyl panels were fabricated to size, with heavy-duty Velcro stitched right onto the vinyl. The mating Velcro was simply installed around the window, and presto! You have a significant reduction in unwanted leaf-blower noise, while still being able to see out of your window. Now you can sleep in, even when your overly eager leaf-blowing neighbors do not. Clear Vinyl window covers are also great for reducing unwanted noise from lawnmowers, snow-blowers, cars, marching bands, etc.
New Sound Channels® Colors!
Posted by Acoustics First in Absorption, Press Release, Products on March 23, 2018
Acoustics First® is pleased to announce that our Sound Channels® wall fabric is now available in eight new colors! Just in time for Spring!


Remember, Sound Channels® and Blockaid® Viny Sound Barrier make an excellent combo for treating existing walls. You can block unwanted sound, while improving speech intelligibility and give your room a jazzy new look all at the same time!
Here’s a link to our Sound Channels®/Blockaid® install guide.
https://acousticsfirst.info/2015/07/16/treating-a-wall-blockaid-and-soundchannels/
Demystifying Acoustic Data: Part 1 – Absorption vs Isolation
Posted by Acoustics First in Absorption, Articles, Product Applications, Products, Sound proofing, Video on August 16, 2016
For anyone new to the world of acoustics, there is a multitude of terms, coefficients and numbers that are thrown around. This flood of information can seem intimidating, especially to beginners. In this series, acoustician Cameron Girard of Acoustics First® hopes to help you distinguish between what’s useful and what’s not.

Part 1: Acoustic Terminology – Sound Absorption vs Sound Isolation
In order to make informed decisions about acoustical treatment, it is vital to know the difference between materials that are meant to absorb sound within a room and materials that are meant to block sound from leaving or entering it. In an overly reverberant auditorium, absorptive treatment is needed to reduce echoes and improve speech intelligibility. If the problem is sound passing in between spaces, like offices or apartments, then isolation treatment is required. These are two separate acoustic issues which require separate solutions.
In both scenarios, it is important to know which data is relevant and helpful. Also, given sheer volume of information available on the internet, it is perhaps unavoidable that some info will be incomplete or simply incorrect. It should not be assumed that something which sounds technical is, in fact, backed up by proper testing.
Terms for Sound Absorption
We recently encountered an acoustical ceiling tile which was said to “absorb 50% of sound”. On the surface this sounds like an extremely efficient product. However, let’s delve in closer and decipher what is actually usable information, and what is just marketing.
When sound waves meet a room surface such as a wall, ceiling or floor, some of the sound energy is reflected back into the room and the rest is considered to be “absorbed”. The absorbed sound energy has not vanished, it’s actually been converted into kinetic (vibration of a solid material) and thermal energy (heat due to friction within a porous material) or has simply passed right through the material (transmission). The more surface area a certain material has the better absorber it will likely be. “Soft” materials, like heavy blankets, fabric and fiberglass, have loads of nooks and crannies, which sound tries to “fill”. These porous materials are great for reducing reverberation within a room, but will only marginally reduce the sound that leaves it (but more on that later).

Sonora® wall and ceiling panels are used for absorbing sound within a space.
When comparing sound absorbing products, there is a particular set of terms you should look for: The Sound Absorption Coefficient (SAC) and Noise Reduction Coefficient (NRC). These are used to specify the fraction of incident sound that a material absorbs per 1’x1’ area. An NRC of 1.0 indicates perfect absorption (an open 1’x1’ window) and a value of 0.0 represents perfect reflection (polished concrete has an NRC of .02).
To measure sound absorption, a large sample of the material is placed in a reverberation room with all other surfaces being hard and reflective. The time it takes a test sound signal to decay by 60dB (rough point of inaudibility) after the source of sound is stopped is measured first with the sample in the room and again with the room empty. The difference in decay time defines the efficiency of the absorbing material and thus the absorption coefficients. Large spaces with low-NRC materials (tile, drywall, etc.) have longer reverberation times, while small rooms furnished with high-NRC materials sound much more “dead”.
Clearly, a single 2’x2’ ceiling tile is not going to reduce the reverberation in a real-world space by 50%. So is the above claim false? Not exactly… The ceiling panels do have an NRC rating of .50, so the tile does absorb 50% of incident sound. However, one might assume a much more drastic improvement based on the “50%” claim. In reality you’d need a large square footage of these ceiling tiles to cut the amount of total reflected sound in half. Always be sure to check the NRC number!
Terms for Sound Isolation
Our customers often call with issues related to neighbor noise or office-to-office privacy and are looking for “sound proofing” treatment. Unfortunately, many do not realize that simply installing acoustic foam or fiberglass panels will not appreciably reduce the level noise entering and leaving their space. These absorptive materials are great at reducing unwanted reflections within a room because they are porous and air/sound energy can flow through them. That being said, they are generally poor sound barriers for this exact reason. They will help to reduce noise buildup in a room and improve the ‘acoustics’, but will do very little to “block” sound coming in or out.

BlockAid® is a heavy, impermeable barrier for stopping the transmission of sound.
Sound is like water; it will “flow” into an adjacent space if everything isn’t sealed up. Materials that are air tight and heavy, like our BlockAid® sound barrier, provide the most relief of air-born sound transmission. Continuous coverage of floors/ceilings or walls is necessary to ensure that sound doesn’t ‘flank’ around these barriers. Multiple layers of varying materials, the use of resilient clips or channels, and additional walls will provide even more control. For a demonstration of how different materials affect sound isolation, check out our video http://acousticsfirst.com/educational-videos-the-barrier-and-the-bell.htm
Like NRC for sound absorption, there is also a laboratory tested figure that can be used to compare the sound “blocking” properties of acoustic barriers and wall constructions: Transmission Loss (TL) and Sound Transmission Class (STC). These describe how much air-born sound is attenuated through a given material.
In the lab, the material to be tested is mounted over an opening between two completely separated rooms, one with a speaker (source) and the other with a microphone (receiver). Save for the open “window”, these rooms are completely isolated with thick and massive walls, so virtually all the sound energy transmitted between rooms will be through the test specimen. The difference between sound levels in the source room and the receiving room is the transmission loss (TL). The TL is measured at multiple frequencies, which is fitted to a Sound Transmission Class (STC) “curve” at speech frequencies (125Hz-4kHz). The STC of the material is the TL value of the fitted curve at 500 Hz. For example, a material with an STC of 27 typically “blocks” 27dB of sound. Keep in mind though, the STC’s of materials do not add up linearly; in other words, adding a material with an STC of 27 to an existing wall with an STC 45 will not result in an STC of 72.
As always, Acoustics First is here answer questions and help you find the best solutions.
DIY – Treating a Wall – BlockAid® and SoundChannels®
Posted by Acoustics First in Absorption, Animal Shelters, Auditorium, Broadcast Facilities, Classrooms, DIY, Fitness, Government, Gymnasium, Home Entertainment, Home Theater, HOW TO, Media Room, Multipurpose Rooms, Music Rehearsal Spaces, Music Tracking Room, Product Applications, Recording Facilities, Recording Studio, School & Educational Facilities, Sound proofing, Studio Control Room, Teaching Rooms, Teleconferencing, Theater, Uncategorized, Vocal Booth, Voice Over on July 16, 2015
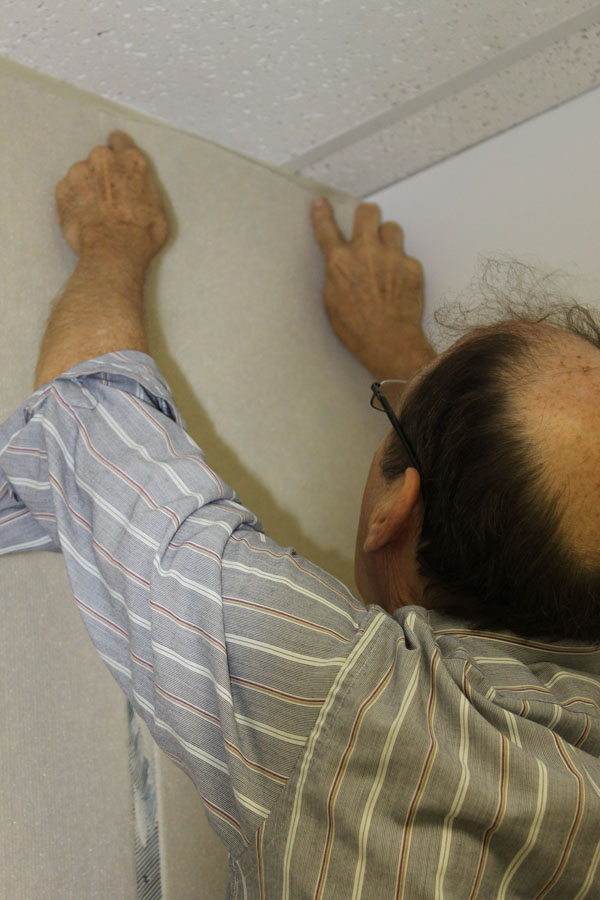
![]() On many occasions, we get asked about common ways to treat a wall (or walls) either for broadcast, podcast, or other voice recording scenario – where they not only want to tame the reflections within the room, but also block a certain amount of sound coming into – or leaving the room.
On many occasions, we get asked about common ways to treat a wall (or walls) either for broadcast, podcast, or other voice recording scenario – where they not only want to tame the reflections within the room, but also block a certain amount of sound coming into – or leaving the room.
Budget is frequently an issue, major construction is usually unwanted, but effective results are always required.
We’re going to show you how to handle a room upgrade – cut down on the sound transmission and cut the room reflections – all with the same skills required to hang high quality wall coverings! Let’s see how you can cover a wall with BlockAid® vinyl sound barrier to block unwanted sound, then go back and cover that with an absorptive layer of Sound Channels® wall covering to finish it off!
This treatment is not recommended for renters, as this is not an easy upgrade to undo. However, if you have an extra bedroom you are using as Podcast studio, this is a great way to treat it… Let’s get started!
Installing BlockAid®
 1. Measure the wall for the first panel length. Mark the panel width on the wall. |
 2. Measure and Mark the length of the wall on the BlockAid® |
 3. Use a straightedge and a razor to cut the BlockAid®. |
 4. Using a trowel, apply vinyl tread adhesive to the wall, covering the whole area where the first panel is going. (You marked the wall right?) |
 5. Hang the panel starting at the top, install a few screws to hold it in place while the adhesive sets. (You will probably need a friend to help, as BlockAid® is a pound per square foot!) |
 6. Using your hands and a putty knife, smooth out all the air bubbles from behind the BlockAid® so that you get a good bond when the adhesive cures. |
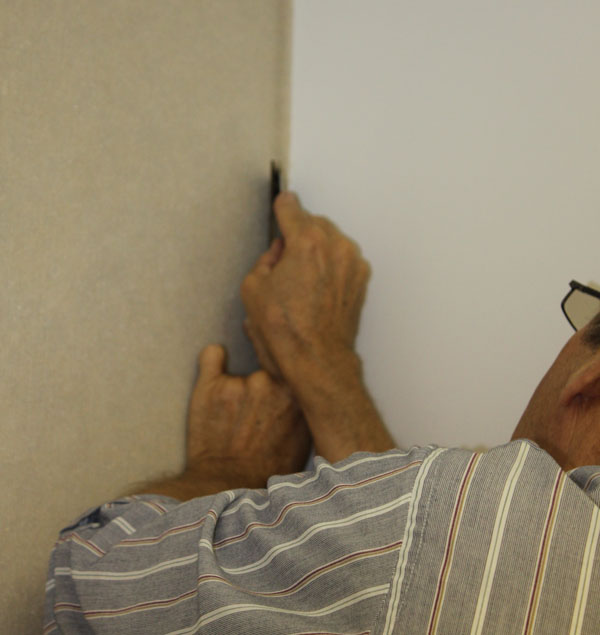
 7. Repeat the steps for the next strip. Measure, Mark, Cut, Trowl, Hang… |
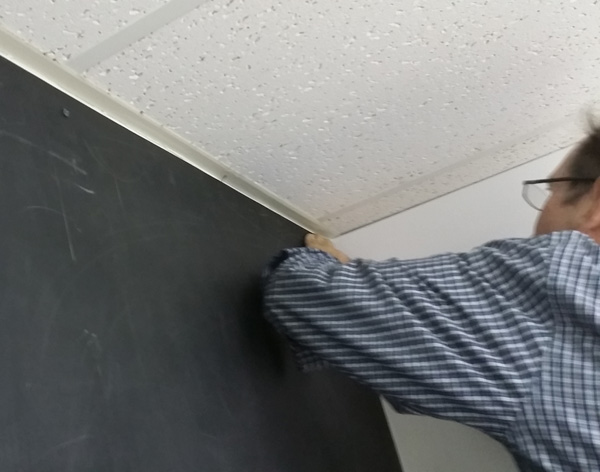
 8. Make sure you line up those seams! push them right up agaist each other. Smooth out the air bubbles, cut out any outles, trim any extra… Let dry! |
Good job! Now, take a breather while that dries, and notice how much less sound is passing through the walls. This is when you will notice that the sounds are now coming from under the door, and through the leaky old window. These can be taken care of in different ways…. but the easiest way is the same way you deal with keeping the cold out! Get some weather strip, a door skirt, seal the gaps around the frame of the door, and windows, maybe go out and buy some heavy curtains for the windows… if you have some leftover BlockAid®, you can always get some Industrial Velcro and temporarily stick a piece over the window!
Installing Sound Channels®
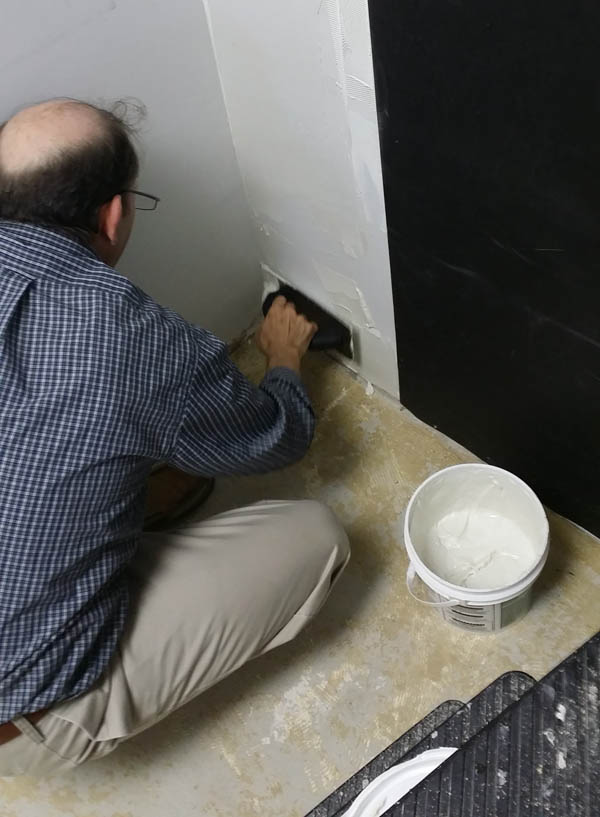
 1. Remove the Screws from the BLockAid® – if you didn’t already… then same as BlockAid®, measure the wall, mark it, measure and cut a piece of Sound Channels® and start troweling on the Chapco! |
 2. Well, when you get tired, make your friend finish troweling out the adhesive to cover where the panel is going. (You are going to overlap the seams.) |
 3. Starting at the top, hang the Sound Channels® overlapping the seam of the BlockAid® under it. Smooth out the air bubbles with your hands. Make sure it lines up well. No screws needed! |
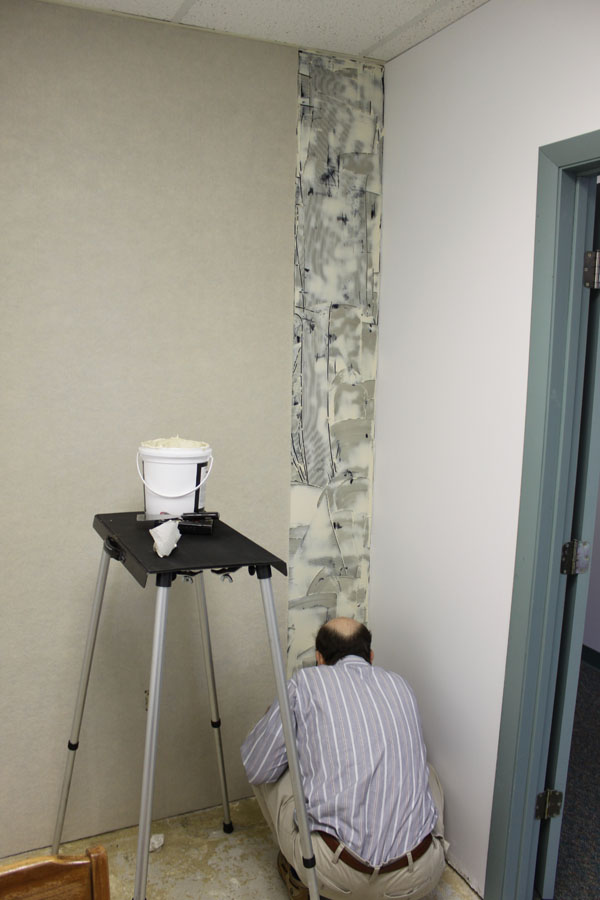 4. Measure and cut the next strip, carefully following a rib in the fabric, while your friend, (who is way better at troweling than you are anyway,) preps the next section with adhesive. |
 5. Best practice is to run the fabric in the same direction every time. Not just with the ribs, but in the same direction it comes off the roll. So find the top. |
 6. After you find the top, start hanging from the top, lining up the seams and smoothing out the bubbles as you go. |
 7. Keep those seams tight as you go. Keep smoothing… almost done! |
 8. Trim up the extra and repeat as many times as needed. |
That’s it!

Don’t forget to trim around those outlets!
This treatment is a common first step in treating many professional broadcast studios – it gives you extra isolation with the barrier and takes the edge of the sound reflections. Many professional environments then go back and add some additional treatments such as bass traps, diffusers, and broadband absorber panels – especially if these studios are planning on bringing in any musical guests.
This isn’t just for home studios. It works great for kids play rooms, bedrooms, home theaters, home gyms, and any place you want to block sound and tame the sound inside the room.
Customize your space as you will, but this treatment is a consistent winner for cost and performance, and is a great way to get started without breaking the bank!
Season’s Greetings!
Posted by Acoustics First in Uncategorized on December 24, 2013
Acoustics First would like to wish everyone a happy holiday season, and a happy new year.

– Acoustics First Team

You must be logged in to post a comment.