Archive for July, 2015

DIY – Treating a Wall – BlockAid® and SoundChannels®

AcousticsFirstOn many occasions, we get asked about common ways to treat a wall (or walls) either for broadcast, podcast, or other voice recording scenario – where they not only want to tame the reflections within the room, but also block a certain amount of sound coming into – or leaving the room.

Budget is frequently an issue, major construction is usually unwanted, but effective results are always required.

We’re going to show you how to handle a room upgrade – cut down on the sound transmission and cut the room reflections – all with the same skills required to hang high quality wall coverings!  Let’s see how you can cover a wall with BlockAid® vinyl sound barrier to block unwanted sound, then go back and cover that with an absorptive layer of Sound Channels® wall covering  to finish it off!

This treatment is not recommended for renters, as this is not an easy upgrade to undo.  However, if you have an extra bedroom you are using as Podcast studio, this is a great way to treat it… Let’s get started!

Installing BlockAid®

Measure the wall for the first panel length. Mark the panel width on the wall.

1. Measure the wall for the first panel length. Mark the panel width on the wall.

Measure and Mark the length of the wall on the BlockAid®

2. Measure and Mark the length of the wall on the BlockAid®

Use a straightedge and a razor to cut the BlockAid® to length.

3. Use a straightedge and a razor to cut the BlockAid®.

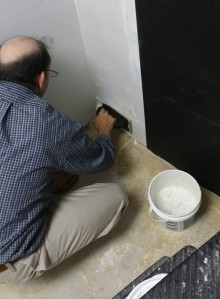
Using a trowel, apply vinyl tread adhesive to the wall, covering the whole area where the first panel is going. (You marked the wall right?)

4. Using a trowel, apply vinyl tread adhesive to the wall, covering the whole area where the first panel is going. (You marked the wall right?)

Hang the panel starting at the top, install a few screws to hold it in place while the adhesive sets. (You will probably need a friend to help, as BlockAid® is a pound per square foot!)

5. Hang the panel starting at the top, install a few screws to hold it in place while the adhesive sets. (You will probably need a friend to help, as BlockAid® is a pound per square foot!)

Using your hands and a putty knife, smooth out all the air bubbles from behind the BLockaid® so that you get a good bond when the adhesive cures.

6. Using your hands and a putty knife, smooth out all the air bubbles from behind the BlockAid® so that you get a good bond when the adhesive cures.

Repeat the steps for the next strip. Measure, Mark, Cut, Trowl, Hang...

7. Repeat the steps for the next strip. Measure, Mark, Cut, Trowl, Hang…

Make sure you line up those seams! push them right up agaist each other. Smooth out the air bubbles, cut out any outles, trim any extra... Let dry!

8. Make sure you line up those seams! push them right up agaist each other. Smooth out the air bubbles, cut out any outles, trim any extra… Let dry!

Good job! Now, take a breather while that dries, and notice how much less sound is passing through the walls.  This is when you will notice that the sounds are now coming from under the door, and through the leaky old window.  These can be taken care of in different ways…. but the easiest way is the same way you deal with keeping the cold out!   Get some weather strip, a door skirt, seal the gaps around the frame of the door, and windows, maybe go out and buy some heavy curtains for the windows… if you have some leftover BlockAid®, you can always get some Industrial Velcro and temporarily stick a piece over the window!

Installing Sound Channels®

1. Remove the Screws from the BLockAid® - if you didn't already... then same as BlockAid®, measure the wall, mark it, measure and cut a piece of Sound Channels® and start troweling on the Chapco!

1. Remove the Screws from the BLockAid® – if you didn’t already… then same as BlockAid®, measure the wall, mark it, measure and cut a piece of Sound Channels® and start troweling on the Chapco!

2. Well, when you get tired, make your friend finish troweling out the adhesive to cover where the panel is going. (You are going to overlap the seams.)

2. Well, when you get tired, make your friend finish troweling out the adhesive to cover where the panel is going. (You are going to overlap the seams.)

3. Starting at the top, hang the Sound Channels® overlapping the seam of the BlockAid under it. Smooth out the air bubbles with your hands. Make sure it lines up well. No screws needed!

3. Starting at the top, hang the Sound Channels® overlapping the seam of the BlockAid® under it. Smooth out the air bubbles with your hands. Make sure it lines up well. No screws needed!

4. Measure and cut the next strip, carefully following a rib in the fabric, while your friend, (who is way better at troweling than you are anyway,) preps the next section with adhesive.

4. Measure and cut the next strip, carefully following a rib in the fabric, while your friend, (who is way better at troweling than you are anyway,) preps the next section with adhesive.

5. Best practice is to run the fabric in the same direction every time. Not just with the ribs, but in the same direction it comes off the roll. So find the top.

5. Best practice is to run the fabric in the same direction every time. Not just with the ribs, but in the same direction it comes off the roll. So find the top.

6. After you find the top, start hanging from the top, lining up the seams and smoothing out the bubbles as you go.

6. After you find the top, start hanging from the top, lining up the seams and smoothing out the bubbles as you go.

7. Keep those seams tight as you go. Keep smoothing... almost done!

7. Keep those seams tight as you go. Keep smoothing… almost done!

8. Trim up the extra and repeat as many times as needed.

8. Trim up the extra and repeat as many times as needed.

That’s it!

Don't forget to trim around those outlets!

Don’t forget to trim around those outlets!

This treatment is a common first step in treating many professional broadcast studios – it gives you extra isolation with the barrier and takes the edge of the sound reflections.  Many professional environments then go back and add some additional treatments such as bass traps, diffusers, and broadband absorber panels – especially if these studios are planning on bringing in any musical guests.

This isn’t just for home studios.  It works great for kids play rooms, bedrooms, home theaters, home gyms, and any place you want to block sound and tame the sound inside the room.

Customize your space as you will, but this treatment is a consistent winner for cost and performance, and is a great way to get started without breaking the bank!

, , , , ,

Leave a comment