Posts Tagged critical listening
Barrett’s Technology Solutions has a Happy Easter
Posted by Acoustics First in Absorption, Customer Feedback, Diffusion, Home Theater, Media Room, Product Applications, Theater, Uncategorized on April 20, 2014
Sometimes at Acoustics First we get a call from someone who is so knowledgeable that we can’t help but be tickled that they called us to help them. We received one such phone call from Pete Heskin at Barrett’s Technology Solutions in Naperville, IL.
Pete and his team were putting together an acoustic treatment for a listening room at their facility and wanted the room’s acoustics to really showcase their lineup of high-end audiophile speakers. No joke here – these guys have over 50 years of experience in the audio industry – and they keep on the bleeding edge of audio and video. This treatment is serious acoustic business – and these are some of the most discriminating ears in audio.
Happy Easter guys!

Happy Easter Guys!
In keeping with their high-standards and cutting edge approach, they were looking for an acoustic treatment that is as visually stunning as it is capable of treating a room containing some of the world’s greatest sound sources. As you can see, the results are simple and elegant.
The room contains an array of Sonora® panels, Silent Pictures® and clusters of ArtDiffusor® Model D‘s to make this space sound as good as it looks. (While all of their gear makes the gear junkies at Acoustics First drool…)
So, if you find yourself near Chicago, or on a “Wayne’s World” pilgrimage, stop into Barrett’s – and if you fancy yourself an audiophile – put your money where your ears are, and hear how discriminating ears listen to music…
… No Stairway to Heaven.
Phones and Scones? I mean… Phons and Sones!
Posted by Acoustics First in Q&A on February 19, 2014
Since it’s been a while, I have received approval to write about phones and scones – yummy! Oh, I misread that… I can talk about phons and sones? Oh boy. I mean… hmm… uh…
Every so often, you get exposed to a term that you’ve never heard; it seems like someone just made it up – and the more you learn about it, the more made up it seems.
(Disclaimer: I swear I didn’t make these up.)
Today, I will introduce you to two of these amazingly real terms, and do my best to explain why these terms exist… prepare to be amazed!
OK. Phons and Sones are two related terms in Psycho-acoustics that refer to how humans perceive the “LOUDNESS” of sounds. These are actual real concepts. (Stop laughing.)
Don’t we all perceive sound differently? YES!
So how can you have an actual measurement based on something that everyone perceives differently? EASY!
Take a bunch of people.
Play a 1Khz sine wave.
Play another frequency.
Ask them if it sounds just as loud.
Repeat. (No kidding.)
OK, this is over simplified… Let’s start by setting some rules that make this a little easier.
For reference – whatever dB level that 1KHz wave is will be the reference for the whole group… compare a bunch of frequencies at different levels to 1Khz at 40 dB – and we’ll call all the ones that sound just as loud the “40 PHON Equal Loudness contour.”
Why? Because they sound just as loud as the 1kHz wave at 40 dB. (I’m not joking!)
Then compare a bunch to a 1KHz wave at 50dB and call all of those that sound as loud, (wait for it)
the “50 PHON Equal Loudness contour.”
Then 60dB, 70dB, 80dB… etc (see a pattern?)
Now, plot all of these from a bunch of people who hear pretty well… take an average and WHAMMO!!!
The PHON Equal Loudness contours!
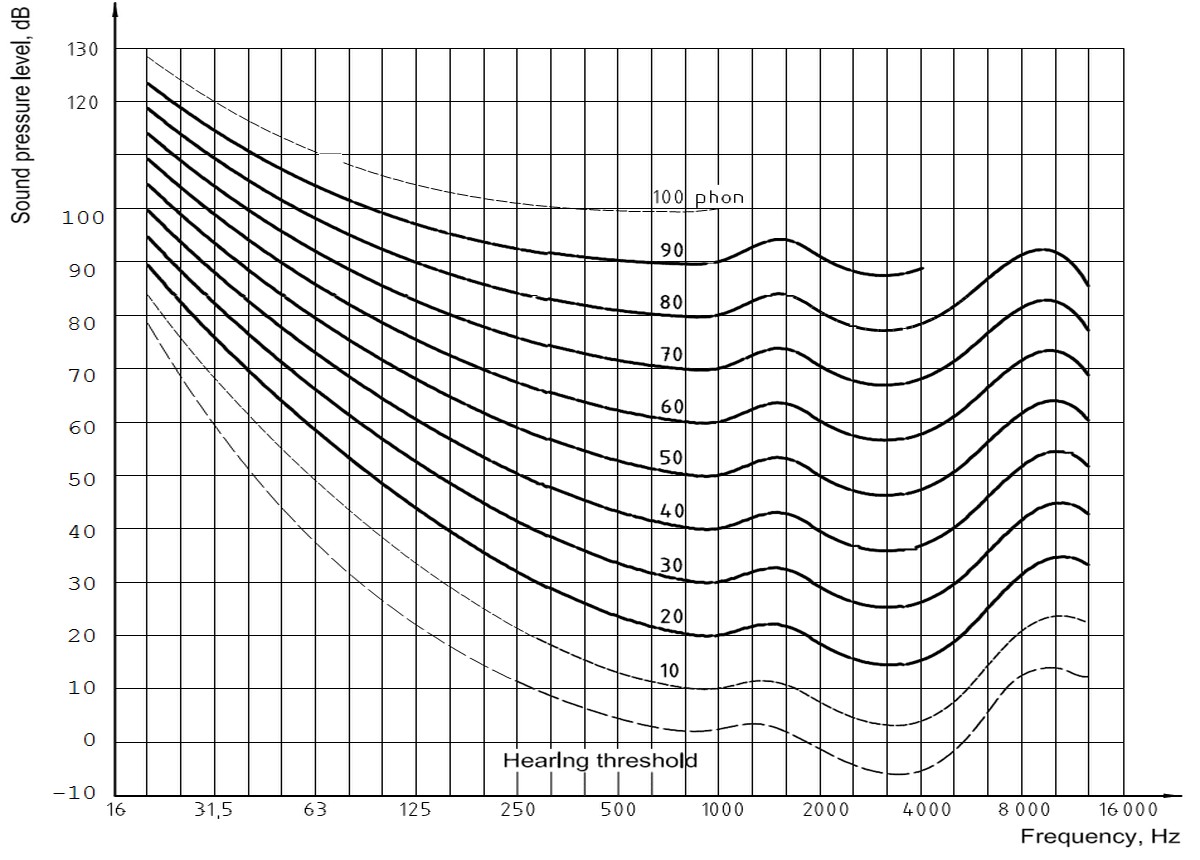
ISO 226:2003 Equal Loudness Contours.
(To be fair this is the data from a bunch of 18-25 year olds who still have reasonably good hearing…)
Remember this is PERCEIVED LOUDNESS. The average of what the test subjects said “yeah, uh, that’s just as loud, Dude.”
It seems strange doesn’t it – that these aren’t nice straight lines? That’s because the human ear is constructed in such a way to be more sensitive to certain frequencies than others.
So according to this chart – a 1KHz wave at 40 dB sounds just as loud as 125 Hz at ~60dB and 3150 Hz at ~35 dB. (All on the 40 Phon contour.)
That’s Psycho-acoustics for you. (Wow.)
So if you’re an average person with average hearing, your bass perception is terrible and over 16KHz you’re basically – well… deaf.
But you hear really well from 2kHz – 5kHz!
Anyway… what’s the point?
Phons measure how loud the human ear perceives sounds at different frequencies. (TADA!)
FINE! – then what are Sones ? To make this simple – Sones are relabeled Phons.
You start with 40 Phon being 1 Sone then double it every 10 Phon.
40 Phon = 1 Sone.
50 Phon = 2 Sones.
60 Phon = 4 Sones.
70 Phon = 8 Sones.
80 Phon = 16 Sones
90 Phon = 32 Sones
100 Phon = 64 Sones
Etc.
(Hmm, thought that would be more complicated? It is – but that’s basically it in a nutshell.)
You will almost never see a phon or a sone. Bathroom exhaust fans and blowers are sometimes rated in Sones – to let you know how quiet they are… The problem is that no one actually knew how quiet that was until now!
I guess it sounds better to say –

Quiet… Only 2.5 Sones!
“This bathroom fan operates at only 2.5 Sones!”
…Than it would be to say…

Quietish… Only loudish in frequencies you can’t hear well. So it’s not bad… Really.
“This bathroom fan resonates at over 80dB,
but it’s in a frequency range that humans don’t hear very well,
so it sounds quieter than it actually is… no… really!”
Human perception of sound is very important to the development of acoustic products – Psycho-acoustics are not a joke.
(Why are you still laughing?)
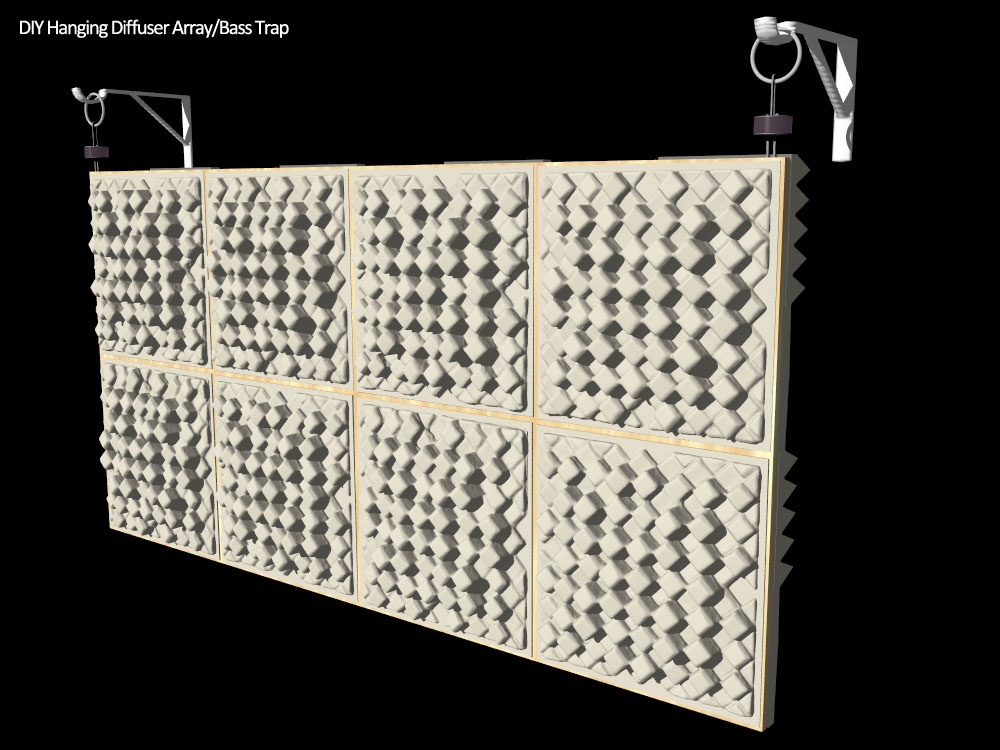
DIY: Back Wall Diffuser Array/Bass Trap
Posted by Acoustics First in Absorption, Auditorium, Broadcast Facilities, Diffusion, DIY, Home Entertainment, Home Theater, HOW TO, Media Room, Multipurpose Rooms, Music Rehearsal Spaces, Music Tracking Room, Product Applications, Products, Recording Facilities, Recording Studio, Restaurants, Studio Control Room, Teleconferencing, Theater, Vocal Booth, Voice Over, Worship Facilities on June 20, 2013
Getting more out of your back wall diffuser array with a simple hanging DIY array/bass trap.
One of the big “back wall” questions people have is “If I have a large diffuser array, how can I get the bass trapping I need?” A great answer to this question is to turn the entire array into a hanging bass absorber. If you are already planning on getting diffusion for your back wall, here is a great way to use that wall space for more than just diffusion.
Stuff you need:
- 4’x 8’ sheet of 3/4” Plywood
- 32 sq/ft of 4” Cutting Wedge® Classic Foam (Or similar absorber)
- 8 x Art Diffusers® – Model C (or Model F, Quadrapyramid™, or other comparable diffuser)
- 2 x IsoHangers
- 2 x Heavy rings (Think big Curtain Rings or Hanging Wire will also work)
- 2x Closet Rod/Shelf Brackets
- 2 x 7/8” wood screws and fender washers
- Construction Adhesive (Make sure it’s safe for Foam)

Assembly instructions
- Screw the two IsoHangers to the plywood, using a fender washer on each screw. These should be about an inch in from each end -drill small pilot holes first. (These will be used to hang the panel, this side will be designated as the back from here on out.)
- Use Construction adhesive to attach the Cutting Wedge® Foam to the back of the panel in a checkerboard pattern (each panel 90° rotated from adjacent)
- Use Construction adhesive again to attach the 8 Diffusers to the front of the Plywood (Follow the installation instructions for adhesive placement)
- Attach the Rings or Wire to the free end of the IsoHangers.
What you have created is a hanging panel that will diffuse mid-high frequencies and trap the lows. The hanging mass absorbs low frequency energy by moving slightly when pushed by the energy of the Low frequency Waves. The rear facing fiberglass also absorbs low frequencies by dampening the panel, but it also absorbs any of the waves that happen to get trapped behind the panel.

Hanging the Diffuser/Trap Assembly
- Measure and attach the Closet Brackets to the Wall – Use appropriate anchors! If you have standard or double wall construction without Resilient Channels, use the studs – The IsoHangers will keep vibrations from transmitting through the wall.
- Hang the panel on the Closet Brackets using the rings/wire with the Diffusers facing you and that’s it!
 This simple DIY project is provided as a way for our customers to learn better ways to use our products and get more value out of the products they buy. For those customers who are planning on purchasing diffusers to make an array, or maybe already have an array and are looking to try a new configuration – this project may be what you’re looking for.
A little History…
If you embark on this little construction project, you will be constructing studio elements that have remained basically unchanged since at least the early 1970’s. Hanging plywood wrapped in studio foam or fiberglass has been used “behind the curtains” of many of the top studios for effective bass control for over 40 years – just no one has ever seen it, as it has been hidden in walls; masked as a false wall of fabric stretched across wooden louvers!
————————————————————————————————————————————————————————————
Acoustics First Corporation supplies acoustical panels and soundproofing materials to control sound and eliminate noise in commercial, residential, government, and institutional applications worldwide. Products include the patented Art Diffusor®, sound absorbers, noise barriers, acoustical fabrics and accessories. Acoustics First® products are sold for O.E.M applications, direct, and through dealers. For more information on acoustical materials and their application, please visit www.AcousticsFirst.com or call Toll Free 1-888-765-2900 (US & Canada).
Acoustics First® featured on the cover of a recording studio construction handbook
Posted by Acoustics First in Company Information, Press Release, Recording Facilities on May 22, 2012

Book: How to Build a Small Budget Recording Studio From Scratch
Acoustics First products are featured on the cover of How to Build a Small Budget Recording Studio From Scratch.
The Model E Art Diffusor® is pictured in the upper left corner.
The Model C Art Diffusor® is pictured in the lower left corner.
The Double Duty Diffuser™ is pictured in the lower right corner.
These are just a few models in the Acoustics First diffuser line.
This book has been referenced for basic studio design for many years now and offers advice for professional and hobbyist audio engineers. Many of the principles contained in this book can also be used to create critical listening environments for home listening or home theaters. Be sure to pick up a copy before you begin studio construction. When designing and building a studio facility, proper planning can save loads of time and money. When designing any facility, always think Acoustics First!
————————————————————————————————————————
Acoustics First Corporation supplies acoustical panels and soundproofing materials to control sound and eliminate noise in commercial, residential, government, and institutional applications worldwide. Products include the patented Art Diffusor®, sound absorbers, noise barriers, acoustical fabrics and accessories. Acoustics First® products are sold for O.E.M applications, direct, and through dealers. For more information on acoustical materials and their application, please visit www.AcousticsFirst.com or call Toll Free 1-888-765-2900 (US & Canada).

You must be logged in to post a comment.