Archive for category Products
Demystifying Acoustic Data: Part 2 – Test Material Mounting
Posted by Acoustics First in Absorption, Home Entertainment, Home Theater, Products, Recording Facilities, Theater on October 13, 2016
For anyone new to the world of acoustics, there is a multitude of terms, coefficients and numbers that are thrown around. This flood of information can seem intimidating, especially to beginners. In this series, acoustician Cameron Girard of Acoustics First® hopes to help you distinguish between what’s useful and what’s not.
Part 2: How Mounting in Testing Affects Sound Absorption Data
As I discussed in my previous article, the best way to compare the performance of sound absorbing panels is by referencing the Sound Absorption Coefficient (SAC) and Noise Reduction Coefficient (NRC). However, these coefficients are often used as marketing tools. Be on the lookout for companies that list absorption coefficients and NRCs without mention of a particular testing standard or mounting method. It’s vital to check for this information, as direct comparisons to competitors and other materials can only be made if their testing procedures are the same.
The sound absorption of a material that covers a flat surface not only depends on the physical qualities of the material but also on how the material is mounted during installation. The mountings specified in laboratory tests are intended to simulate conditions that exist in normal use, such as direct wall mounting and installation into a ceiling grid.

Many materials for treatment of walls or ceiling are tested using what is called Type ”A” mounting. Type ”A” mounting means the test specimen was placed directly on the test surface of the reverberation chamber. Lay-in ceiling tiles, on the other hand, are often tested using ”E400” mounting. The ”E” designates a sealed air space behind the specimen (simulating the air gap between a dropped tile ceiling and the structural ceiling) and the number after the ”E” is the depth of the airspace in millimeters. The airspace behind the acoustic material affects the sound absorption by acting as a bass trap. The deeper the cavity behind the panels is, the lower the fundamental of the “trapped” frequencies will be.

To see what this look like in terms of actual numbers, let’s take a look at how different mounting methods effect the sound absorption coefficients of Acoustics First’s HiPer® Panel (a low-profile, composite absorber/diffuser panel).
Since the HiPer® Panel can be used effectively in multiple applications; we had it tested in accordance to the two most-common mounting procedures, Type E-400 and Type A. The results of the laboratory tests are as follows:
|
Product Info |
Sound Absorption Coefficients |
||||||||
| Product Name | Thickness | Mounting | 125Hz | 250Hz | 500Hz | 1kHz | 2kHz | 4kHz |
NRC |
| 1″ HiPer® Panel | 1″ | E-400 | 0.43 | 0.28 | 0.51 | 0.76 | 0.99 | 1.10 | 0.65 |
| 1″ HiPer® Panel | 1″ | A | 0.09 | 0.28 | 0.78 | 0.75 | 0.94 | 0.85 | 0.70 |
As you can see from the chart, the sound absorption coefficient at 125 Hz varies greatly between E-400 mounting (SAC of .43) and Type-A mounting (SAC of .09). If mounting the HiPer® Panel in a ceiling grid, with a sizable airspace, you can expect significant low-frequency absorption, but mounting it on a wall (Type-A) will result in much less absorption at 125Hz.
Other mounting methods are available, but are not used as frequently. Here are some of the basic mounting designations (See ASTM E795 for more information.)
Type A mounting – Test specimen laid directly against the test surface (wall panel on drywall).
Type B mounting – Test specimen cemented directly against the test surface. Type B mounting is intended to simulate acoustical ceiling tiles or other sound-absorptive products adhered to a hard surface with an adhesive.
Type C Mounting—Test specimen comprising sound-absorptive material behind a perforated, expanded, open facing or other porous material.
Type D Mounting—Test specimen mounted on wood furring strips.
Type E Mounting—Test specimen mounted with an air space behind it (dropped tile ceiling).
As we’ve discussed, acoustical data can vary greatly depending on the mounting method used during testing. Acoustics First tries to include as much information about testing procedures as possible, because we feel an informed client makes the best client.
Contact Acoustics First for your all your sound control needs!
Tone Tiles™ = COOL!
Posted by Acoustics First in Absorption, Fitness, Gymnasium, Multipurpose Rooms, Product Applications, Products on September 13, 2016
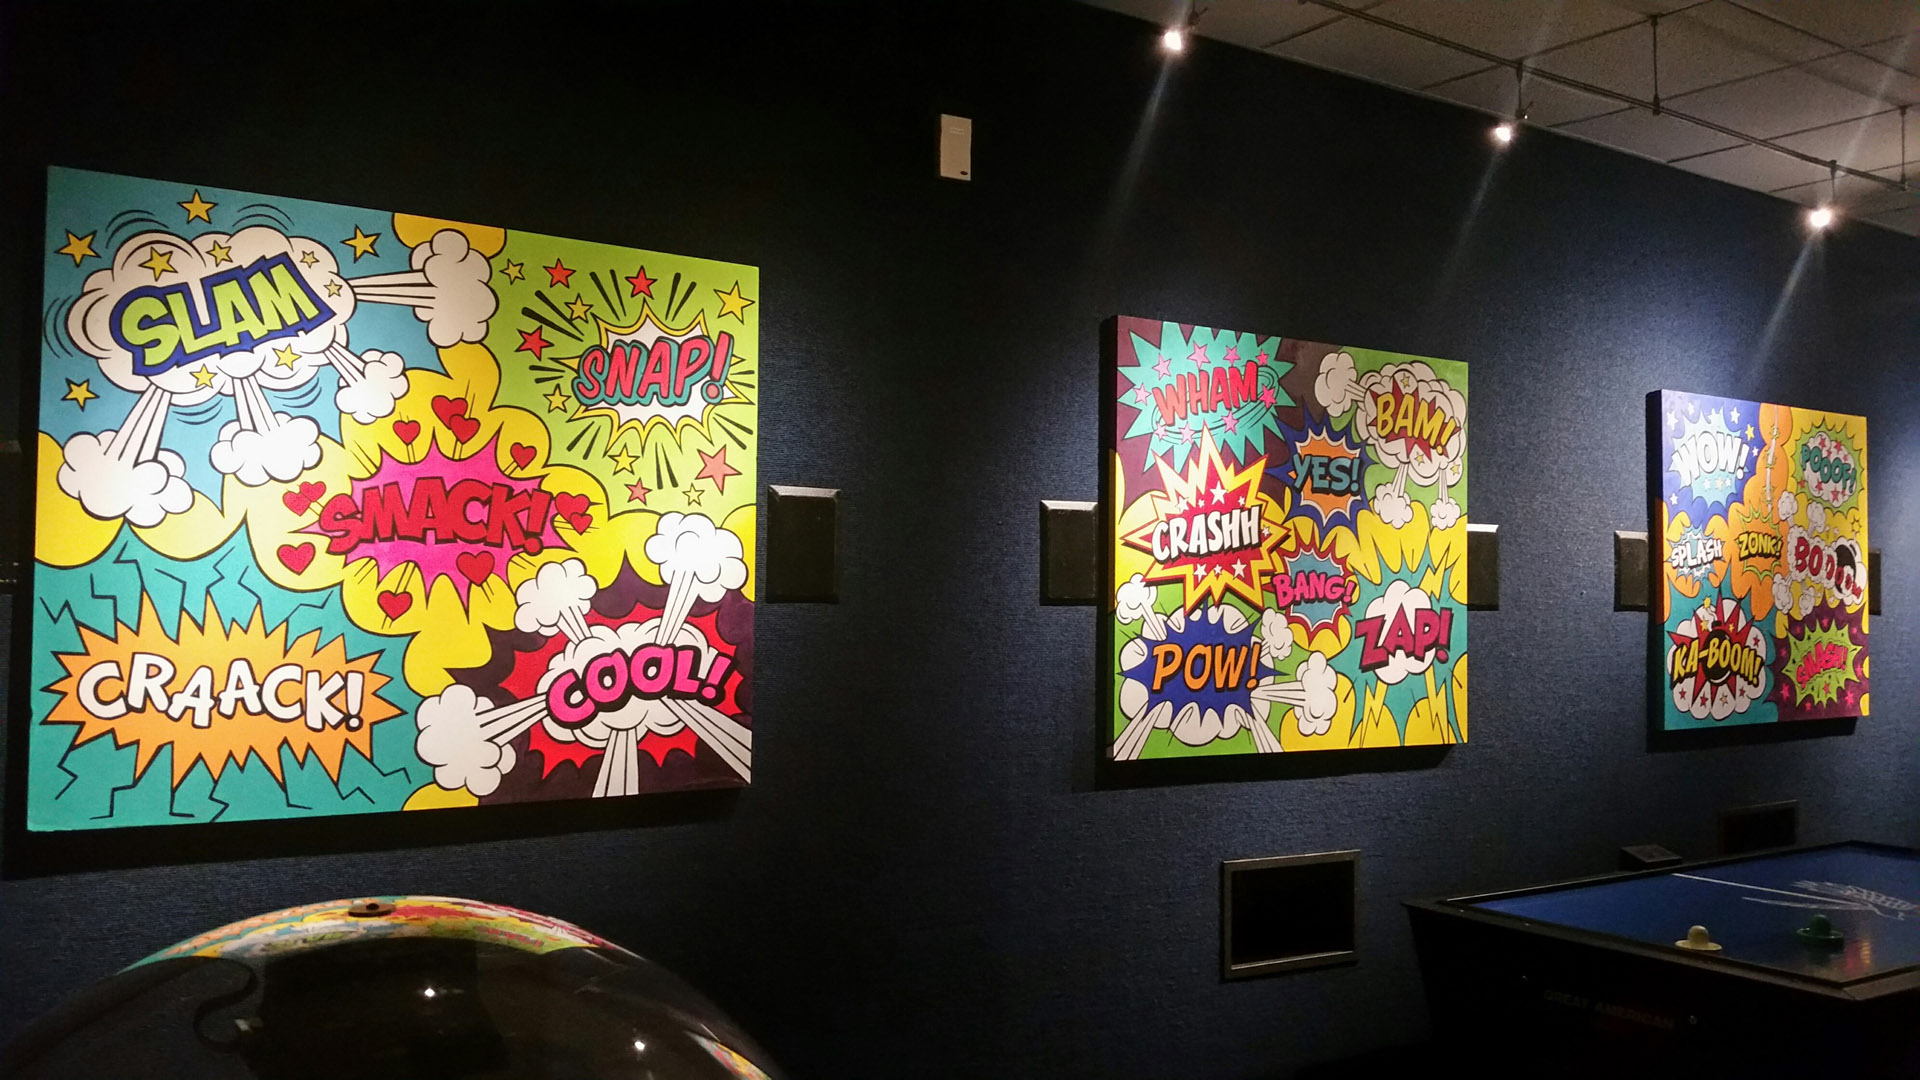
 Hello Folks! We decided to share a few more eye popping pictures of our popular ToneTile™ product line. These paintable/printable panels can make for some of the most interesting and exciting visual accents to a space, in addition to their acoustical benefits. These painted ToneTiles™ were part of a larger installation for an Athletic Club in Delaware.

We think they turned out great!
Demystifying Acoustic Data: Part 1 – Absorption vs Isolation
Posted by Acoustics First in Absorption, Articles, Product Applications, Products, Sound proofing, Video on August 16, 2016
For anyone new to the world of acoustics, there is a multitude of terms, coefficients and numbers that are thrown around. This flood of information can seem intimidating, especially to beginners. In this series, acoustician Cameron Girard of Acoustics First® hopes to help you distinguish between what’s useful and what’s not.

Part 1: Acoustic Terminology – Sound Absorption vs Sound Isolation
In order to make informed decisions about acoustical treatment, it is vital to know the difference between materials that are meant to absorb sound within a room and materials that are meant to block sound from leaving or entering it. In an overly reverberant auditorium, absorptive treatment is needed to reduce echoes and improve speech intelligibility. If the problem is sound passing in between spaces, like offices or apartments, then isolation treatment is required. These are two separate acoustic issues which require separate solutions.
In both scenarios, it is important to know which data is relevant and helpful. Also, given sheer volume of information available on the internet, it is perhaps unavoidable that some info will be incomplete or simply incorrect. It should not be assumed that something which sounds technical is, in fact, backed up by proper testing.
Terms for Sound Absorption
We recently encountered an acoustical ceiling tile which was said to “absorb 50% of sound”. On the surface this sounds like an extremely efficient product. However, let’s delve in closer and decipher what is actually usable information, and what is just marketing.
When sound waves meet a room surface such as a wall, ceiling or floor, some of the sound energy is reflected back into the room and the rest is considered to be “absorbed”. The absorbed sound energy has not vanished, it’s actually been converted into kinetic (vibration of a solid material) and thermal energy (heat due to friction within a porous material) or has simply passed right through the material (transmission). The more surface area a certain material has the better absorber it will likely be. “Soft” materials, like heavy blankets, fabric and fiberglass, have loads of nooks and crannies, which sound tries to “fill”. These porous materials are great for reducing reverberation within a room, but will only marginally reduce the sound that leaves it (but more on that later).

Sonora® wall and ceiling panels are used for absorbing sound within a space.
When comparing sound absorbing products, there is a particular set of terms you should look for: The Sound Absorption Coefficient (SAC) and Noise Reduction Coefficient (NRC). These are used to specify the fraction of incident sound that a material absorbs per 1’x1’ area. An NRC of 1.0 indicates perfect absorption (an open 1’x1’ window) and a value of 0.0 represents perfect reflection (polished concrete has an NRC of .02).
To measure sound absorption, a large sample of the material is placed in a reverberation room with all other surfaces being hard and reflective. The time it takes a test sound signal to decay by 60dB (rough point of inaudibility) after the source of sound is stopped is measured first with the sample in the room and again with the room empty. The difference in decay time defines the efficiency of the absorbing material and thus the absorption coefficients. Large spaces with low-NRC materials (tile, drywall, etc.) have longer reverberation times, while small rooms furnished with high-NRC materials sound much more “dead”.
Clearly, a single 2’x2’ ceiling tile is not going to reduce the reverberation in a real-world space by 50%. So is the above claim false? Not exactly… The ceiling panels do have an NRC rating of .50, so the tile does absorb 50% of incident sound. However, one might assume a much more drastic improvement based on the “50%” claim. In reality you’d need a large square footage of these ceiling tiles to cut the amount of total reflected sound in half. Always be sure to check the NRC number!
Terms for Sound Isolation
Our customers often call with issues related to neighbor noise or office-to-office privacy and are looking for “sound proofing” treatment. Unfortunately, many do not realize that simply installing acoustic foam or fiberglass panels will not appreciably reduce the level noise entering and leaving their space. These absorptive materials are great at reducing unwanted reflections within a room because they are porous and air/sound energy can flow through them. That being said, they are generally poor sound barriers for this exact reason. They will help to reduce noise buildup in a room and improve the ‘acoustics’, but will do very little to “block” sound coming in or out.

BlockAid® is a heavy, impermeable barrier for stopping the transmission of sound.
Sound is like water; it will “flow” into an adjacent space if everything isn’t sealed up. Materials that are air tight and heavy, like our BlockAid® sound barrier, provide the most relief of air-born sound transmission. Continuous coverage of floors/ceilings or walls is necessary to ensure that sound doesn’t ‘flank’ around these barriers. Multiple layers of varying materials, the use of resilient clips or channels, and additional walls will provide even more control. For a demonstration of how different materials affect sound isolation, check out our video http://acousticsfirst.com/educational-videos-the-barrier-and-the-bell.htm
Like NRC for sound absorption, there is also a laboratory tested figure that can be used to compare the sound “blocking” properties of acoustic barriers and wall constructions: Transmission Loss (TL) and Sound Transmission Class (STC). These describe how much air-born sound is attenuated through a given material.
In the lab, the material to be tested is mounted over an opening between two completely separated rooms, one with a speaker (source) and the other with a microphone (receiver). Save for the open “window”, these rooms are completely isolated with thick and massive walls, so virtually all the sound energy transmitted between rooms will be through the test specimen. The difference between sound levels in the source room and the receiving room is the transmission loss (TL). The TL is measured at multiple frequencies, which is fitted to a Sound Transmission Class (STC) “curve” at speech frequencies (125Hz-4kHz). The STC of the material is the TL value of the fitted curve at 500 Hz. For example, a material with an STC of 27 typically “blocks” 27dB of sound. Keep in mind though, the STC’s of materials do not add up linearly; in other words, adding a material with an STC of 27 to an existing wall with an STC 45 will not result in an STC of 72.
As always, Acoustics First is here answer questions and help you find the best solutions.
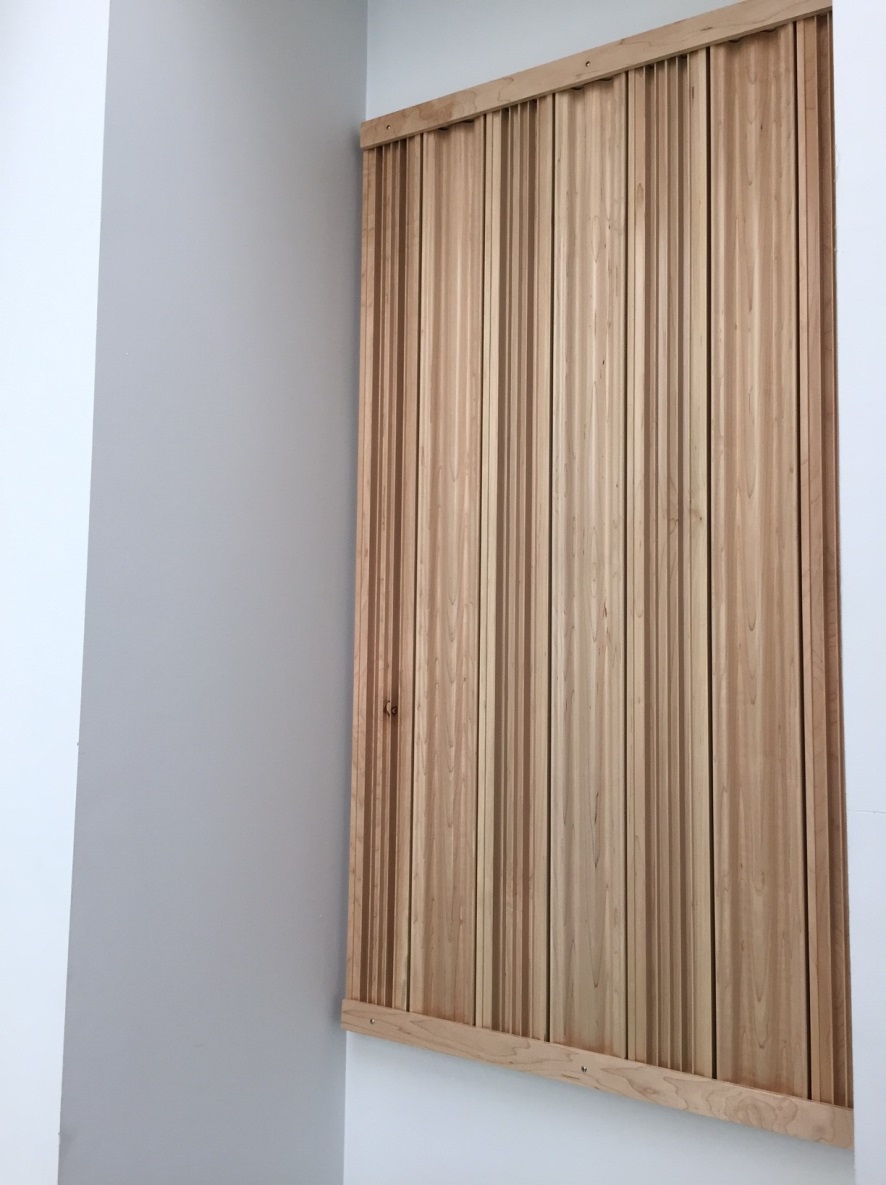
DIY Wood Diffusion Panel – ArtDiffusor® Trim
Posted by Acoustics First in Diffusion, DIY, HOW TO, Products on April 13, 2016

DIY Wood Diffuser Panel – Using ArtDiffusor Trim
Here at Acoustics First®, we are often asked about wood acoustic treatment for spaces ranging from recording studios and auditoriums to churches and home theaters. Although the acoustic properties of wood are comparable to other reflective materials like gypsum and thermoplastic, wood’s superior aesthetic makes it a desirable treatment (wood is often perceived to “sound better” simply because of its visual properties).

Two different profiles that work together!
Our newest wood acoustic treatment, ArtDiffusor® Trim, is a versatile, high frequency quadratic diffuser that can help improve the clarity of speech and music. Both Profiles (Type A & B) offer diffusion in similar ranges and allow for customizable installations. The different profiles can be used individually or together to modify the aesthetics of a room, while achieving the desired acoustic performance. In fact, in recent tests of ArtDiffusor® Trim, alternating the A and B profiles resulted in the best diffusion. Some examples of different installations include:
- Back wall Diffusion for a theater, listening or mixing studio.
- Slatted Ceiling Absorber.
- Installation over or behind stretch wall
- Chair rail, door and window molding.
ArtDiffusor® Trim can come in lengths up to 8’ and is available in Maple (other woods can be quoted). Later in this article we’ll walk you through how to build your very own diffusion panel using 4’ lengths of ArtDiffusor® Trim.
Diffusion at a Glance
Where typical fiberglass and foam panels absorb sound by transferring sonic energy into kinetic and thermal energy, diffusers act to scatter the energy, creating ambiance and a sense of open space. The function of sound diffusers is not to remove energy from your room, but to redistribute it, accurately reinforcing the sound source by controlling standing waves and flutter echoes, while retaining the room’s “liveliness”.
As is the case with any sound absorbing panels and diffusers, the treatment needs to cover enough critical surface area to make a noticeable impact. Simply installing a single piece of ArtDiffusor® Trim will not significantly improve the acoustics of a room. One way to ensure enough improvement is by using ArtDiffusor® Trim to build a series of diffusion panels and installing them as you would sound absorbing panels.
Building a Diffusion Panel – A step by step guide
- Plan out your Panel: Find out how many ArtDiffusor® Trim boards you want in your panel assembly. Our diffusion panel was to occupy an alcove that was 29” wide and each board has a width of just about 4”, so we opted for 7, 4’ boards. Remember, alternate type A and B profiles for optimal diffusion.

Plan your Layout.
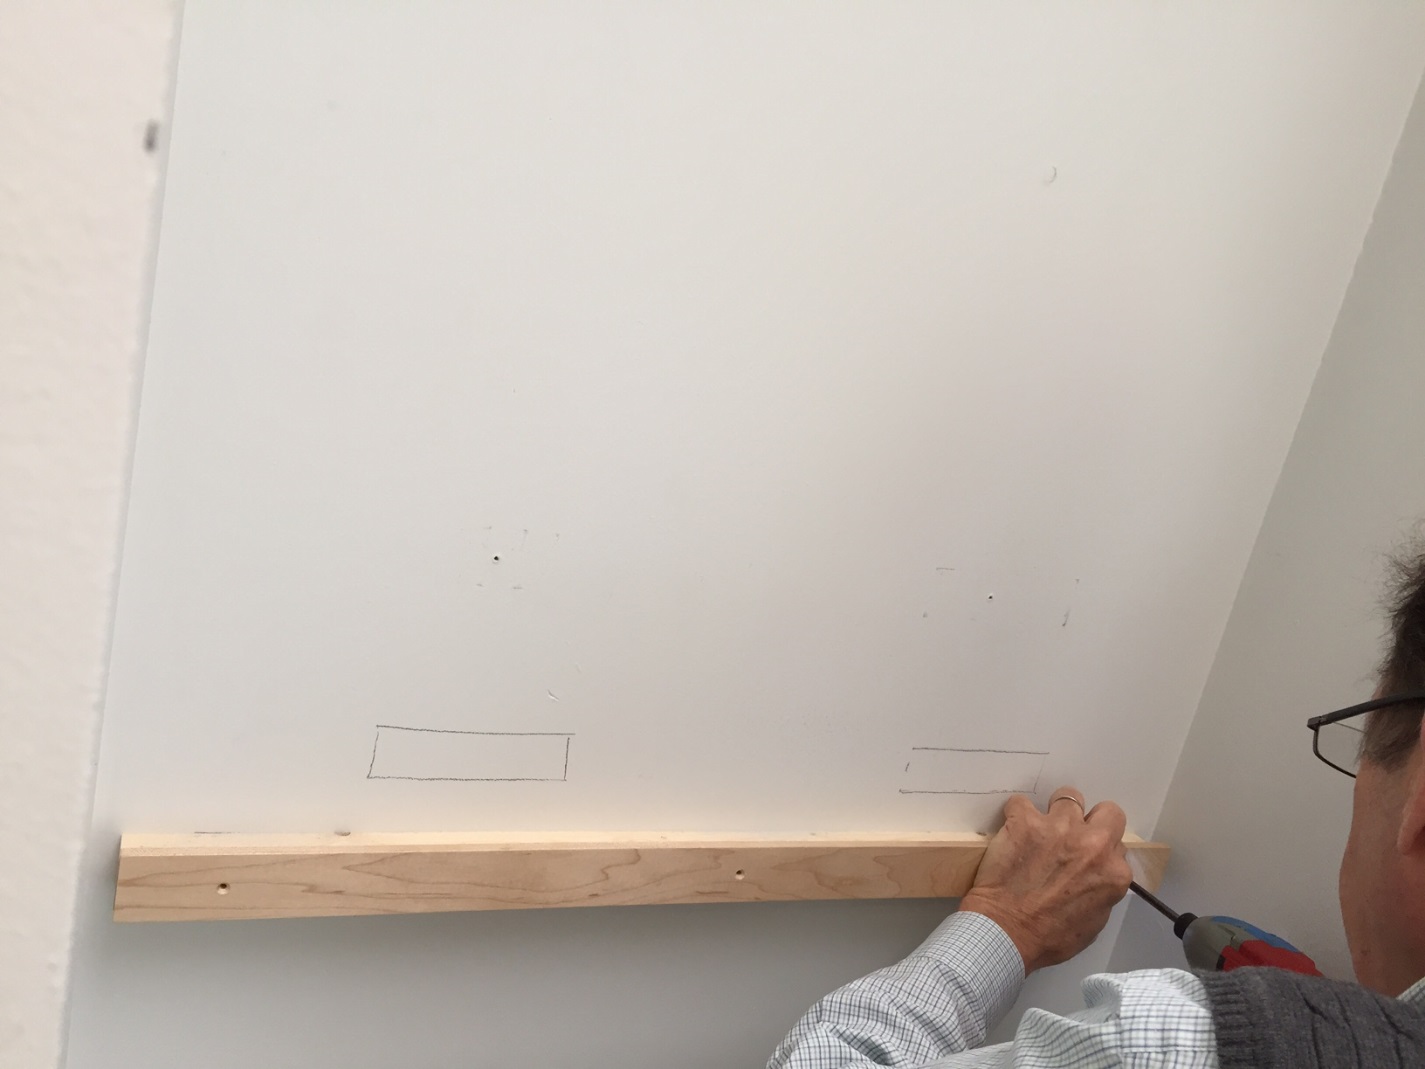
- Install the lower support board: This is what the ArtDiffusor® Trim boards will “stand” on. It is best to install acoustic treatment above chair rail height (3’-4’), to ensure that it’s effective around ear height. Measure and use a level to mark where the support board will go, install drywall anchors for a sure hold into the drywall, then drill and screw the support board into place. Be sure to countersink the holes so the facing strip has a flat surface to rest against.

Install the Lower Support.

Install the upper support board: This time using the ArtDiffusor ® Trim boards as a guide, measure, level and mark the location of the upper support board. Again, using drywall anchors, mount the upper support board (don’t forget to countersink!).The picture shows both support boards installed.
———————————————————————————————–>>>- Attach lower facing strip: Use facing strip that is approximately a ½” wider than the support board. Line up the facing strip next to the support board and mark your screw locations ensuring that they won’t run into the support board screws. Drill the holes and counter sink, lining up the boards so the ½” overlaps on the top, and screw into place.

Lower facing strip installed.
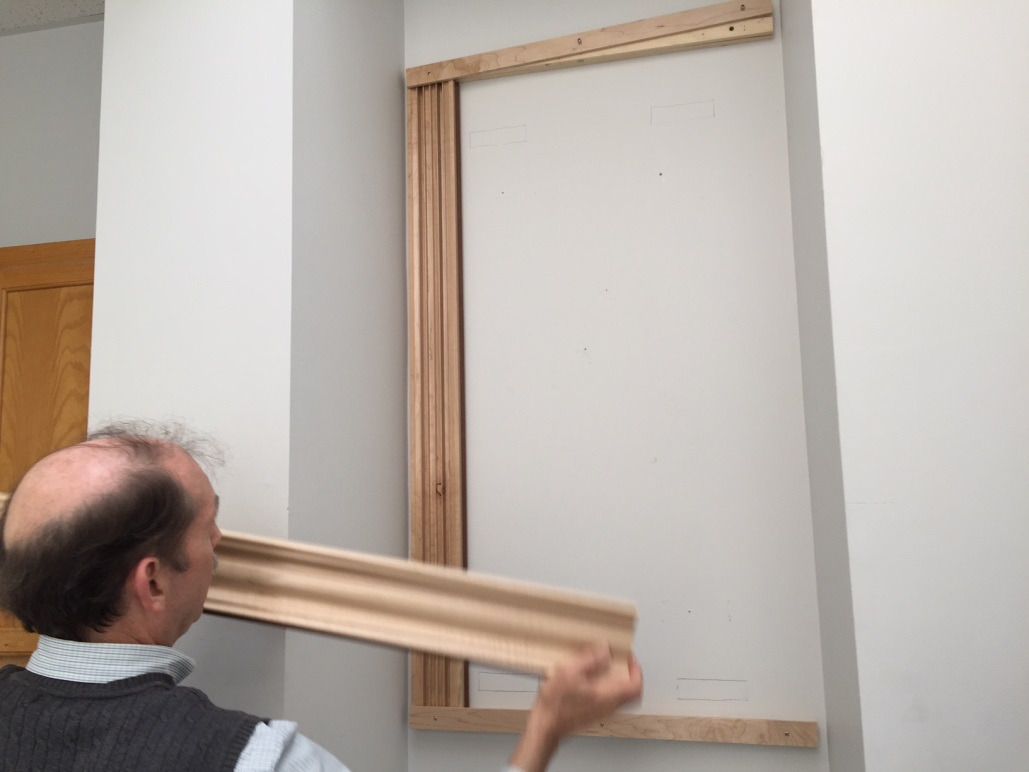
- Partially attach upper facing strip: Same as the lower facing strip, but mount so the ½” overlap is on the bottom, and only screw one side in so it’s easier to slide in the ArtDiffusor ® Trim boards later.

Partially attach top facing strip.
- Slide in Art Trim: Slide in the ArtDiffusor® Trim behind the facing strip and use biscuits to fit the boards together. We decided to position the boards with an approximately 1/8” spacing.

Slide in ArtDiffusor® Trim panels.
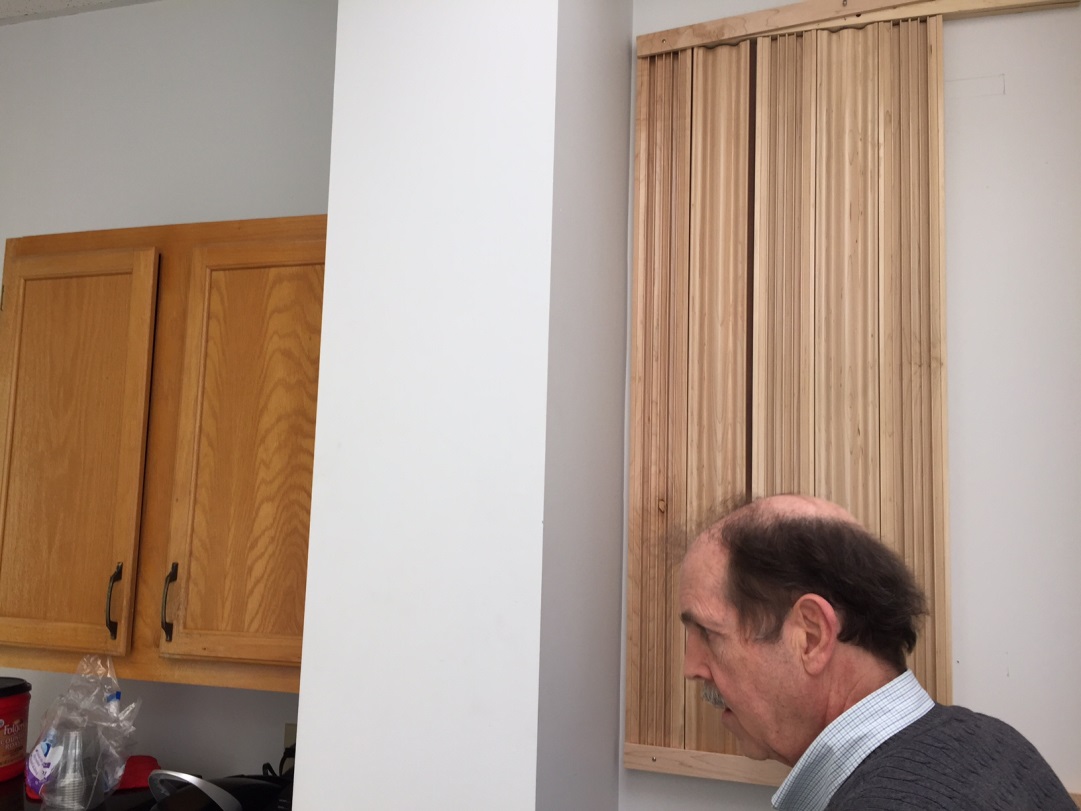
- Finish attaching upper facing strip & admire your new DIY Diffusion Panel!

Final DIY Diffusing Wall Panel with ArtDiffusor® Trim!


Exploring Green Acoustic Treatment: Sound Channels® Acoustical Wall Fabric
Posted by Acoustics First in Absorption, Press Release, Products, Sound proofing on March 15, 2016
Sound Channels® Acoustical Wall Treatment – Made from Plastic Bottles?
Buzz words like “renewable”, “100% recycled” and “eco-friendly” seem to be everywhere we look, from coffee cups to building codes. This preoccupation with all things “green” has long passed the point of being just another fad. The desire for environmentally responsible products has shifted from being simply in vogue to being firmly requisite.
Leadership in Energy and Environmental Design (LEED) certification has become a standard benchmark for most modern buildings. To achieve the most points towards a LEED certified building, many architects are looking for “green” materials that show a commitment to the environment and responsible, eco-friendly practices. This includes the focus on materials that go beyond how much is used; to get a better understanding of what’s in the materials they specify for buildings and the effect those components have on human health and the environment. LEED certification also requires a more performance-based approach to indoor environmental quality to ensure improved occupant comfort. Specifying Sound Channels® acoustic wall fabric can help designers realize the above goals.
Obviously, specifying acoustic materials that use recycled content gets big points towards LEED certification. That said, the use of recycled content for acoustical products is not necessarily unique. For example, the fiberglass substrate for our Sonora Panels are made of 52 percent pre-consumer and 5 percent post-consumer recycled content. What is truly unique is the extent that Sound Channels® utilizes the waste product of one of our most widespread habits: the use of plastic water bottles.
Sound Channels – Recycled Textiles by the Numbers:
One yard of Sound Channels® acoustic wall fabric utilizes 15 post consumer plastic bottles. Recycling one ton of plastic from bottles saves approximately 7.4 cubic yards of landfill space. This means that 36.5 million pounds of Sound Channels® fiber saves 365 million bottles from landfills, 91,250 barrels of oil and over 64,000 tons of emissions!
How does a discarded plastic bottle become wall fabric? Let’s take a look at the process…
First, bottles are picked up at recycling centers then sorted by type and color. Then labels and caps are removed; the bottles are washed, crushed and chopped into very small pieces called “flakes”. These flakes are melted down and color is added. Lastly, anti-microbial technology is added before the product is made into Sound Channels® acoustical wall fabric. Sound Channels® then can be recycled back into fiber at the end of its life cycle.
Besides the “green” benefits, there are performance advantages with Sound Channels® acoustic wall fabric. The anti-microbial technology incorporates silver and copper ions into the root fiber which naturally attack microbes. This technology works against the types of airborne bacteria that we are most concerned about, making this product ideal for hospitals and classrooms.
Recently, an improved design has increased its sound absorption by 25% (NRC of .25). The uniform coverage you get with treating the walls with Sound Channels® eliminates the flutter/slap from reflective parallel walls, while helping to control excessive reverberation and noise buildup.
Whatever your application, Sound Channels® acoustical wall fabric and Acoustics First can help you towards your “green” goals!

You must be logged in to post a comment.