Posts Tagged diy
S.A.M.M.™ – Smart Sound Management
Posted by Acoustics First in Absorption, DIY, Mentions, Products, Uncategorized on April 1, 2021

S.A.M.M.™
Sound Attenuation Matrix Management
by Acoustics First®
20 Years ago, John W. Gardner developed the ASP™ Panel Technology to maintain optimal acoustic performance of our acoustic absorber product lines – like the Sonora® Wall Panels. Recent developments have been made to augment this earlier technology, and our Research & Development team has evolved this technology into the “information age.”

Meet S.A.M.M.™, the smart way to manage your panel maintenance tasks.
S.A.M.M.™ Panels analyze the acoustic environment and use this information to track their exposure to sound pressure levels. This can be monitored real-time, either directly through the energy efficient OLED screen, or using any device with a web browser.
This technology allows more than just monitoring the acoustic environment. The S.A.M.M.™ Enabled panels have a HAL BIOS which runs a webserver daemon that gives you full-control of your panels and the acoustic environment…

… but this isn’t only for S.A.M.M.™ Enabled Panels!
After a simple firmware upgrade to your ASP™ panels, you will have full control over your entire acoustic environment – from anywhere in the world.
I am flattered that you have taken the time to reevaluate one of my lifetime projects. I owe all of my minimal knowledge… to my first professor… I LIRPA.
Dr. John Wesley Gardner
Watch the following video to see the history of the ASP™ panels developed by the irreverent, John W. Gardner, and their evolution into the Sound Attenuation Matrix Management Technology known as… S.A.M.M.™
S.A.M.M.™ is Open Source
Acoustics First® values innovation, and we can all stand on the shoulders of giants. Customers can build their own implementations and create the ideal solution for their environment. While you can use whichever hardware that you have access to, here is the hardware our research team used to develop our in house integration.
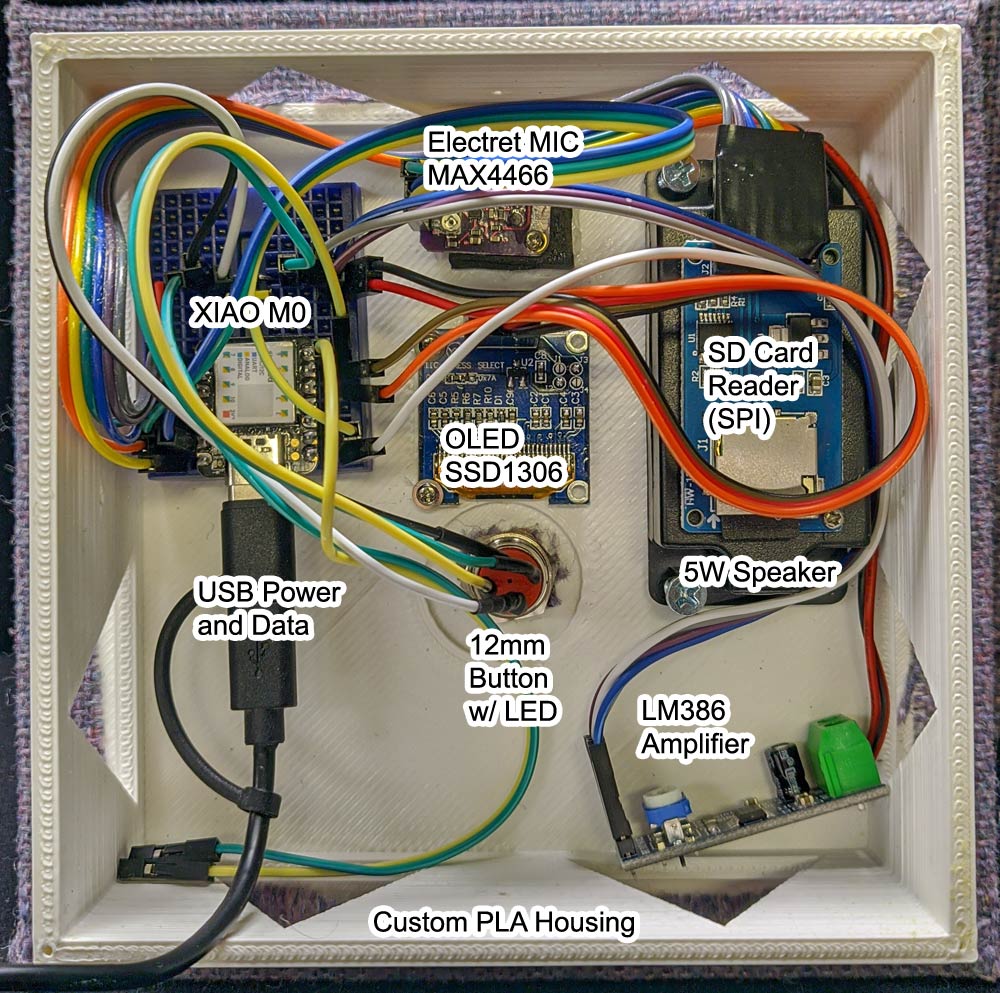
Components:
Custom 3D Printed Housing (PLA)
SEEEDuino XIAO M0+ (MCU)
128×64 OLED (SSD1306)
SD Card Reader (SPI)
Electret MIC w/Adj. Gain (MAX4466)
LM386 Amplifier
5 Watt/8 Ohm Speaker
12mm Momentary Switch (Red LED)
Optional – 10000mah USB Battery
(Click the image to enlarge)

Source Code:
The S.A.M.M.™ Source code was written in PlatformIO to be compatible with the Arduino Platform. The MCU is the SEEEDuino XIAO M0+ with the ARM Cortex M0 processor.
The libraries used in this project may need to be changed based on your hardware selections.

S.A.M.M.™ Web Console
Experience the S.A.M.M.™ Web Console interface. View the real-time output of the first S.A.M.M.™ unit, installed in the Acoustics First® R&D LAB. You can view the current capacity of the panel, as well as the average sound intensity – and as a bonus – we allow users to PURGE the panel remotely!
Stay up-to-date with cutting edge advances in acoustics with Acoustics First®.
DIY – Nouveau™ Home Theater Back Wall
Posted by Acoustics First in Diffusion, DIY, Home Theater, Products, Studio Control Room, Uncategorized on August 7, 2020

It wasn’t a difficult install, but these Nouveaus made this space sing.
Adding Nouveau™ wood diffusers to a home theater is not as daunting a task as it may seem, and can be done with a little planning and a few tools. This install used an ingenious mounting method to ease the final install. Instead of mounting the z-track to the wall directly, it was mounted to sheets of plywood which were hung with Gorilla/Hercules hooks.
The first task was to pick a stain. You can use the back of a plank to get an idea of how the poplar will respond to the different options. Poplar has a very interesting and varied structure that will take stain differently than some other woods. Darker stains may be more consistent, but don’t reveal the character and variation in the wood. This install chose a Smoke Gray which grayed out soft areas and browned the harder heart wood. A semi-gloss clear coat was used to finish.
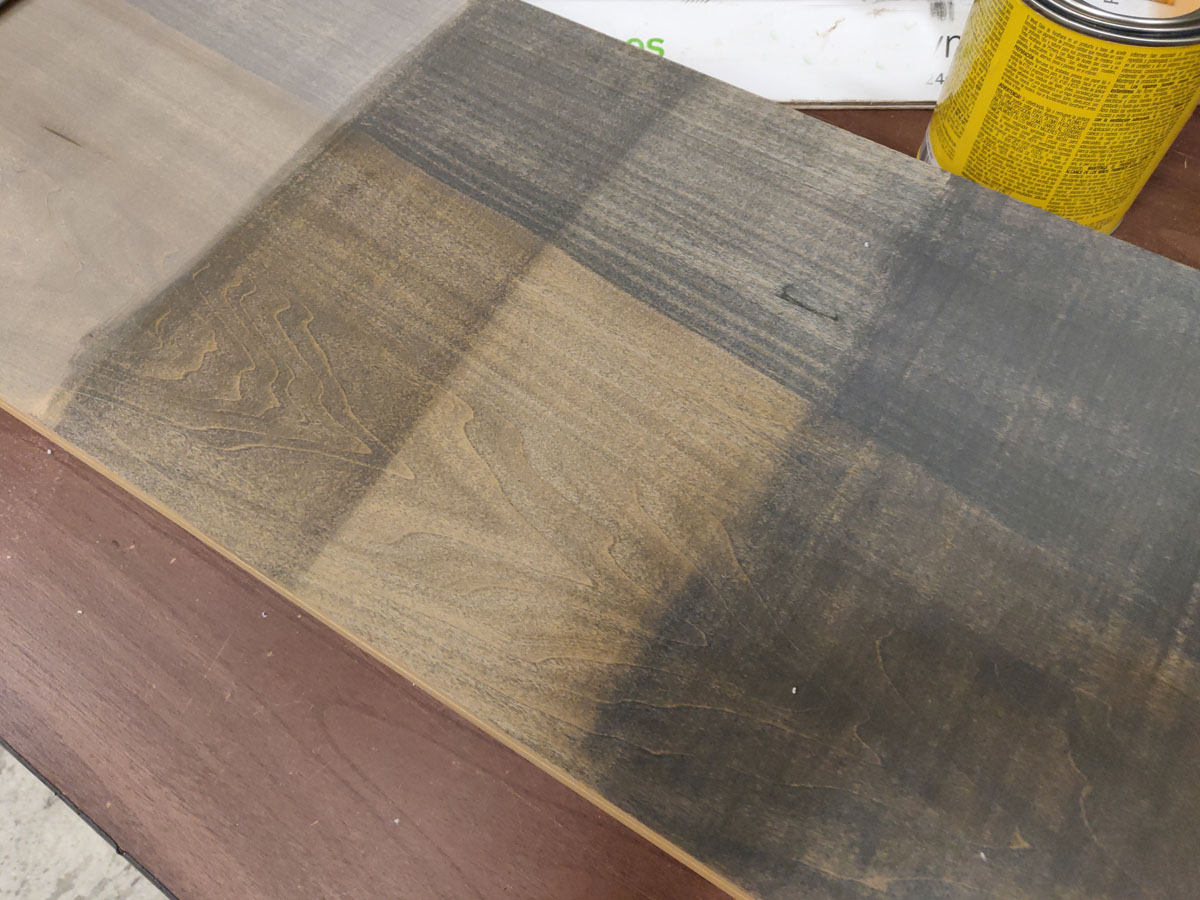
Using the back of the Nouveau™, you can see how the stains will “take.”
While the stain dried, the mounting plywood was cut down to hide behind the planks. Four hanging straps with eye-loops were then added to the top edge of each of the plywood sections, and spaced to avoid studs.
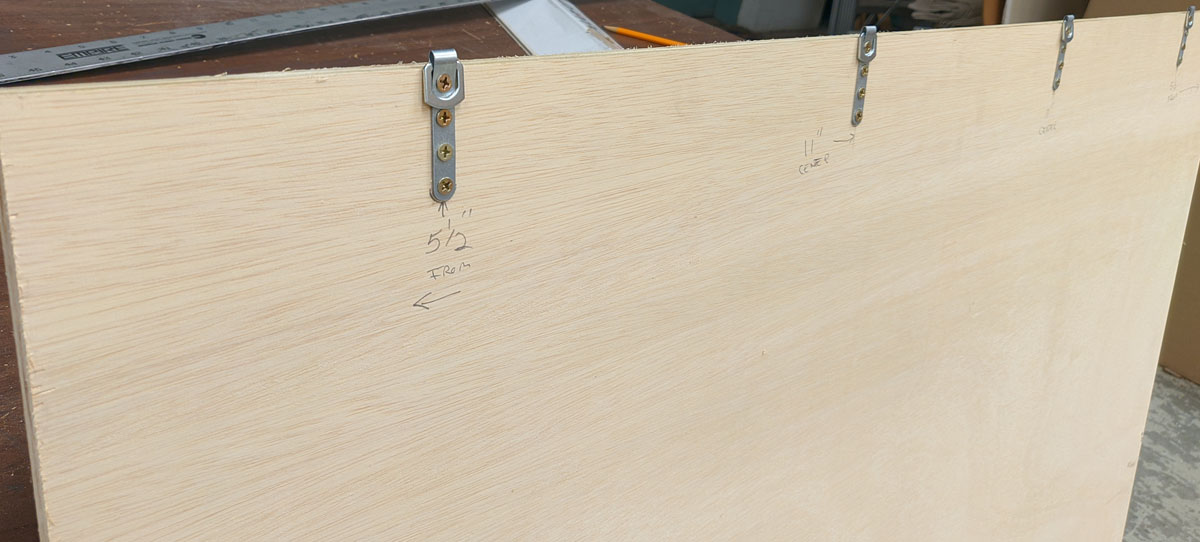
Industrial hanging eyelets were added to the top edge of the sheets to make them easy to level and hang with the Gorilla Hooks.
The Z-track that would normally be installed on the wall was installed on the opposite side of the plywood. This will make it easy to hang the Nouveaus onto the sheet after it’s on the wall.

Z-Bar track was added to the top and bottom of the plywood sheet to accept the z-bars that are going on the back of the finished Nouveau™ planks.
After the Nouveau™ planks are finished with the staining, and left to cure for a few days, they are ready to have the mating Z-bars attached to the back. They are installed with the same spacing as the Z-tracks on the plywood sheets. This will make it easy to align them after the plywood is hung on the wall.

The z-bars are measured, marked, and installed at the same spacing as the z-tracks on the plywood.
The Gorilla/Hercules Anchor hooks are rated to around 50-60 lbs each. The Nouveau™ planks are roughly 25lbs each (at 48 inches) and each section has 4 hooks supporting 4 planks plus the weight of the 3/8″ plywood. The hooks are installed so that the plywood will hang level – with the weight distributed evenly across all four hooks.

When installed properly and leveled, each of these hooks will hold up to about 50-60lbs each. In this configuration, they should only need to support about half that.
Finally, the Nouveau™ planks are installed into the Z-Tracks on the plywood, and moved into position. Because the z-bars were installed square and level, there is no shifting, and they hang true. The undersized plywood sections disappear behind the planks leaving the impression that the planks are floating slightly off the wall.

The install doesn’t look much different from a direct mount z-track installation, with a small gap against the wall.
While this mounting method may not be ideal for every scenario, this was an effective way to install 8 Nouveau™ planks with only 8 small hook holes in the wall. These can now be installed in apartments or temporary environments with minimal damage to the existing walls – and once you are done, they’re easy to take down and reinstall somewhere else. You just need a level!
DIY – Custom Absorber using Sonora® Black Tiles
Posted by Acoustics First in Absorption, DIY, Home Entertainment, HOW TO, Product Applications, Products, Recording Facilities on July 8, 2020
Let’s say you need some Sonora® Black scrim ceiling tiles for a home theater project, and you order a few extra – “just in case.” Now that the install is done (and you have a few left) you can do something with them… like making a cool absorber panel with lights!

With some DIY knowledge, you can make an absorber masterpiece!
Everyone will have a different vision, but the basic supplies are…
- Acoustic Absorber Material (ex. Sonora® Black Scrim Ceiling Tiles)
- Wood for frame
- Acoustically transparent material/fabric (This one uses a polyester fabric map)
- Material to enclose the back (fabric scrim)
- Wood to mount lighting (This is a 1″x 4″ with espresso stain)
- Lights (here are custom, black-pipe light fixtures, but use other lights if desired)
- Wiring (Wirenuts, electrical tape, lamp cord, etc.)
- Assorted screws, staples, hanging hardware, PPE and tools.
Note: This is not a detailed DIY, as everyone will have a different set of materials and project goals, but these will show the basic steps to create a panel like the one above…. Here we go!
Cut the wood and make a frame that will hold the acoustic material, and the fabric to enclose it. Make the frame big enough to hold the material, and still be covered by the fabric. Make the frame as rigid as possible. Predrill your holes and make it square. Make it tight enough to hold the acoustic material with friction, but without crushing it.
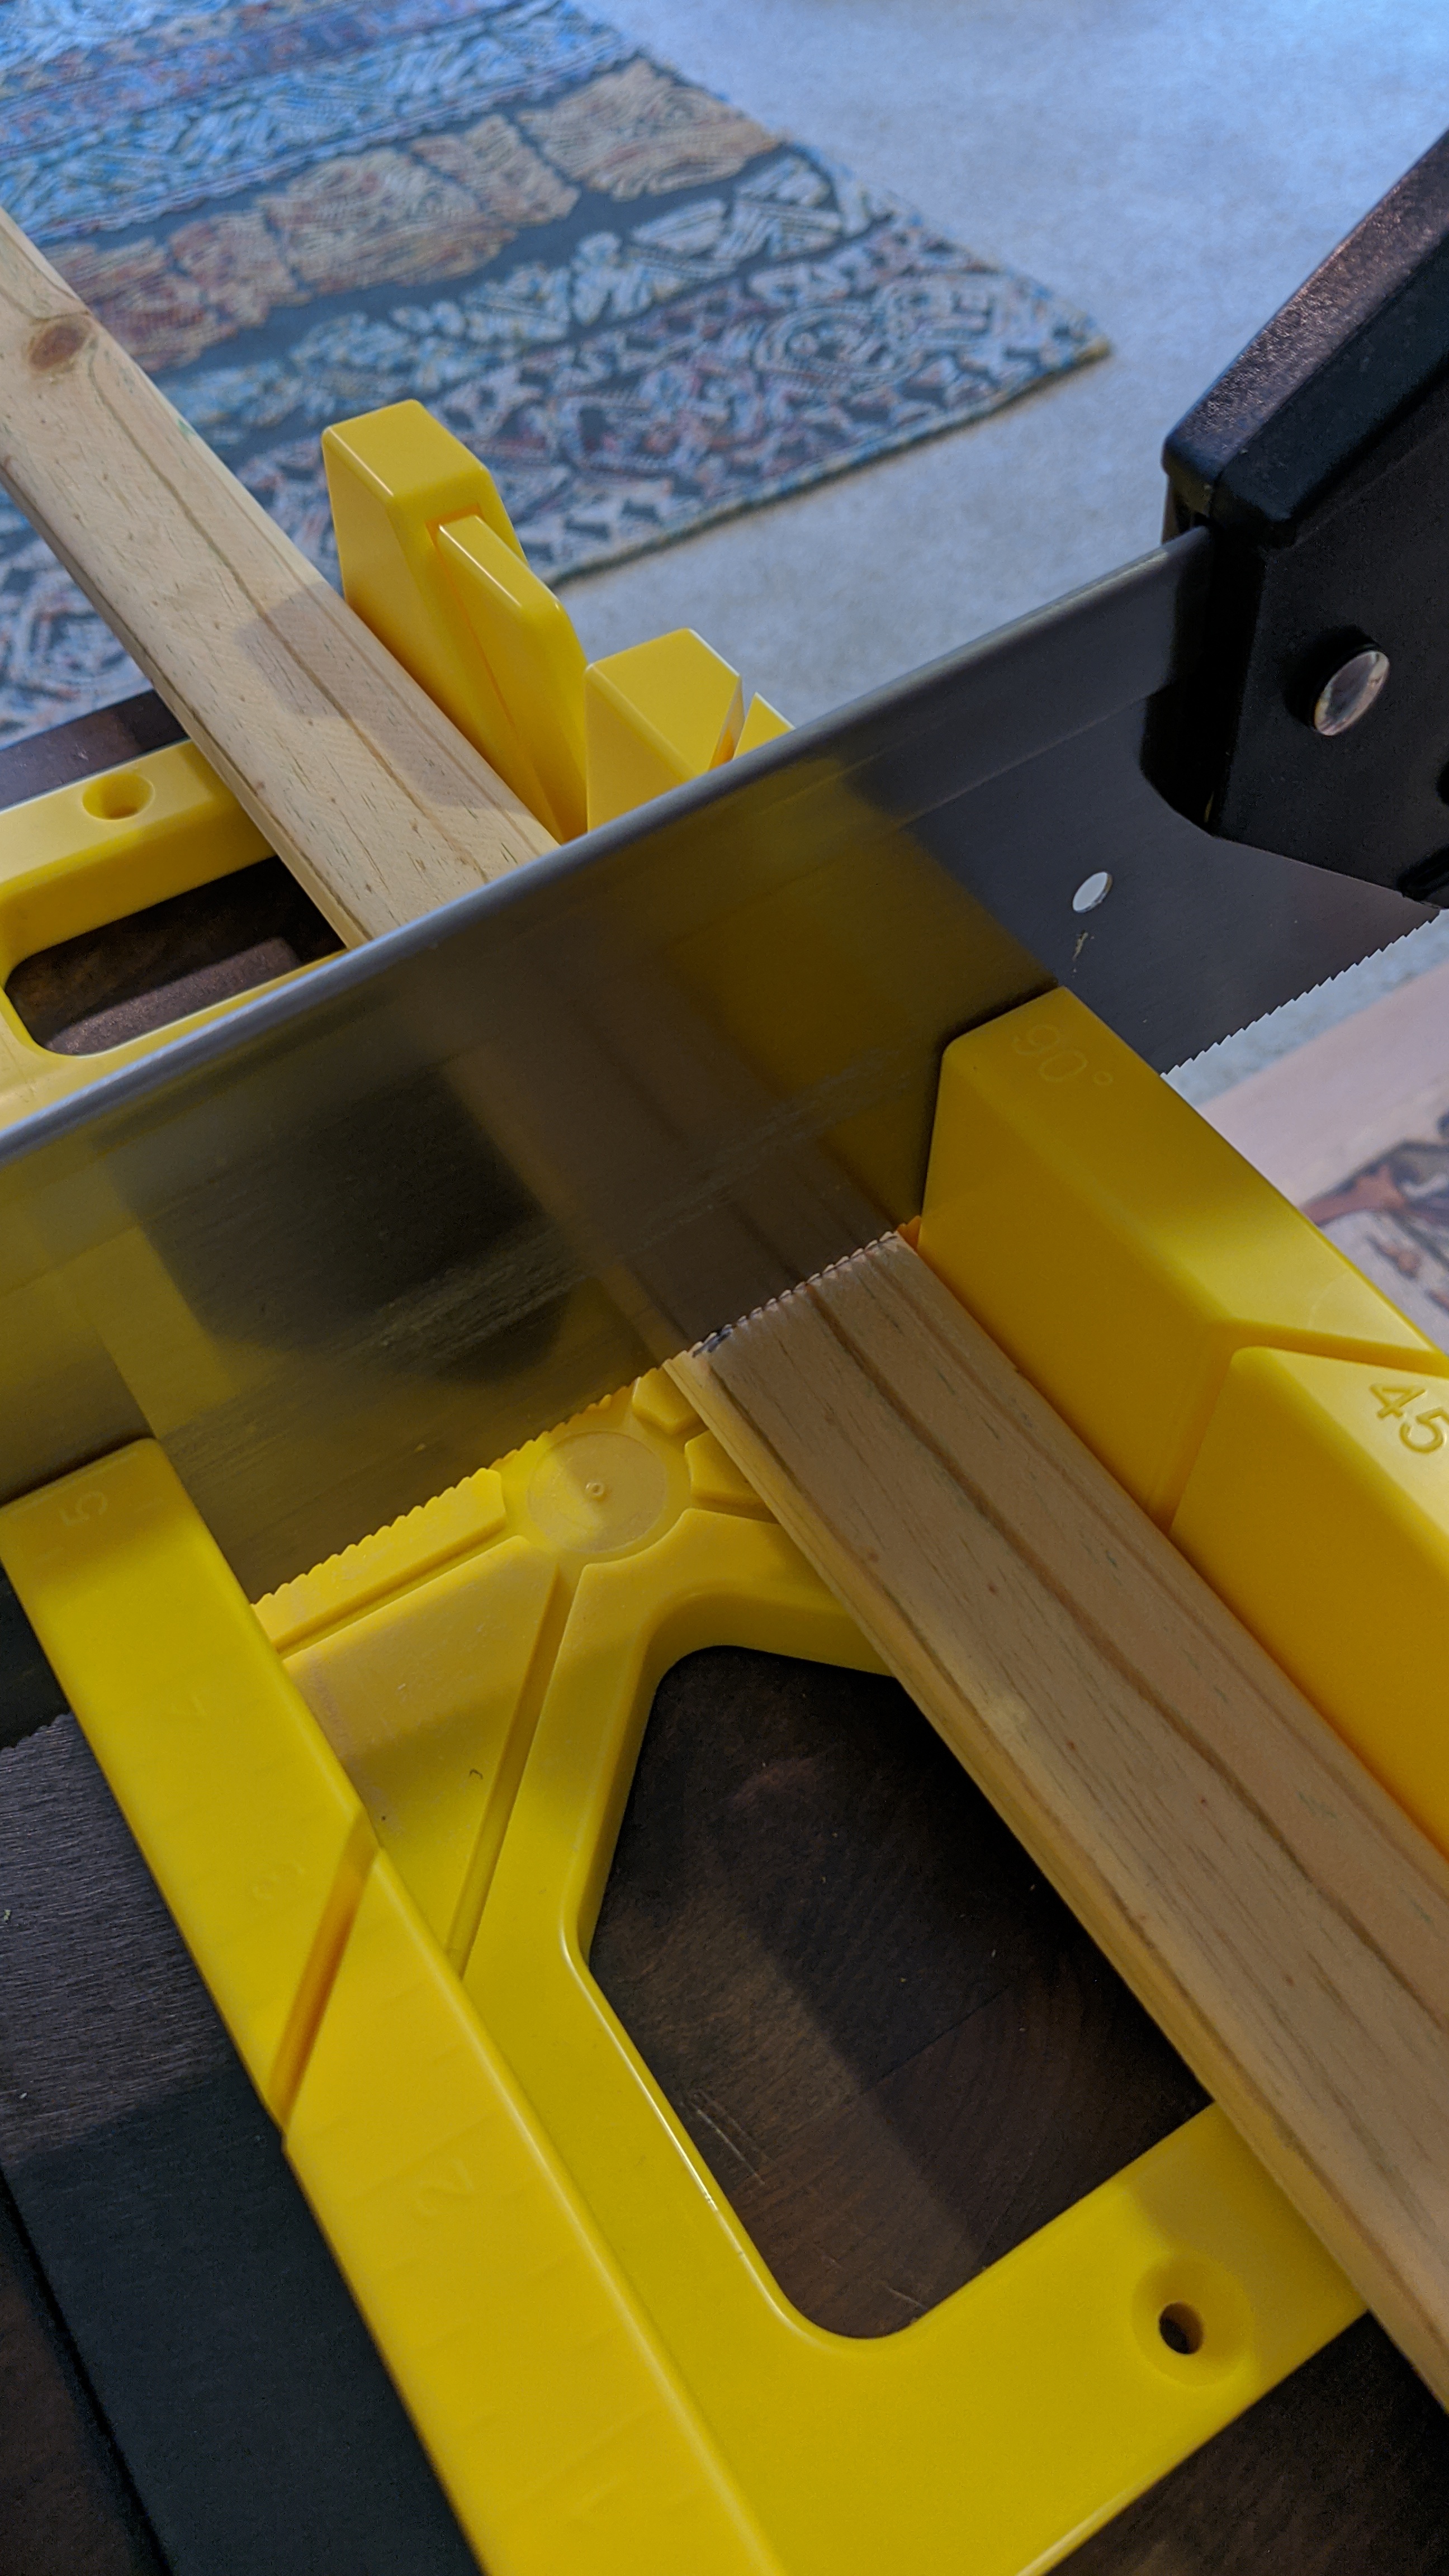
Cutting frame material using a miter box.
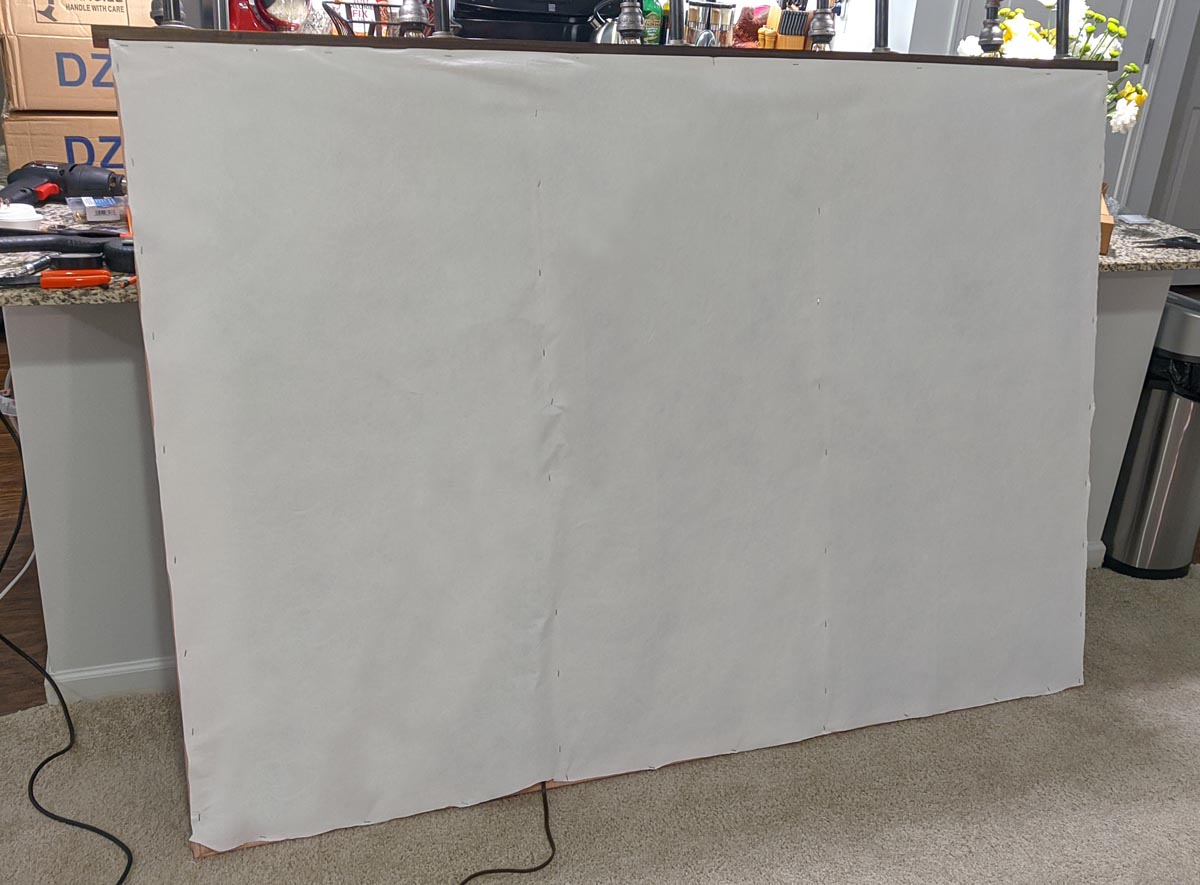
This design is an old map that was printed on a lightweight, polyester fabric banner material. This one is roughly 4′ x 6′ with extra material around the edge to wrap it around the back of the frame. It’s best to have your starting fabric oversize – the graphics sized to the frame, with a boarder wide enough to wrap to the back for fastening. (In this case we will simply staple it to the back of the frame.)
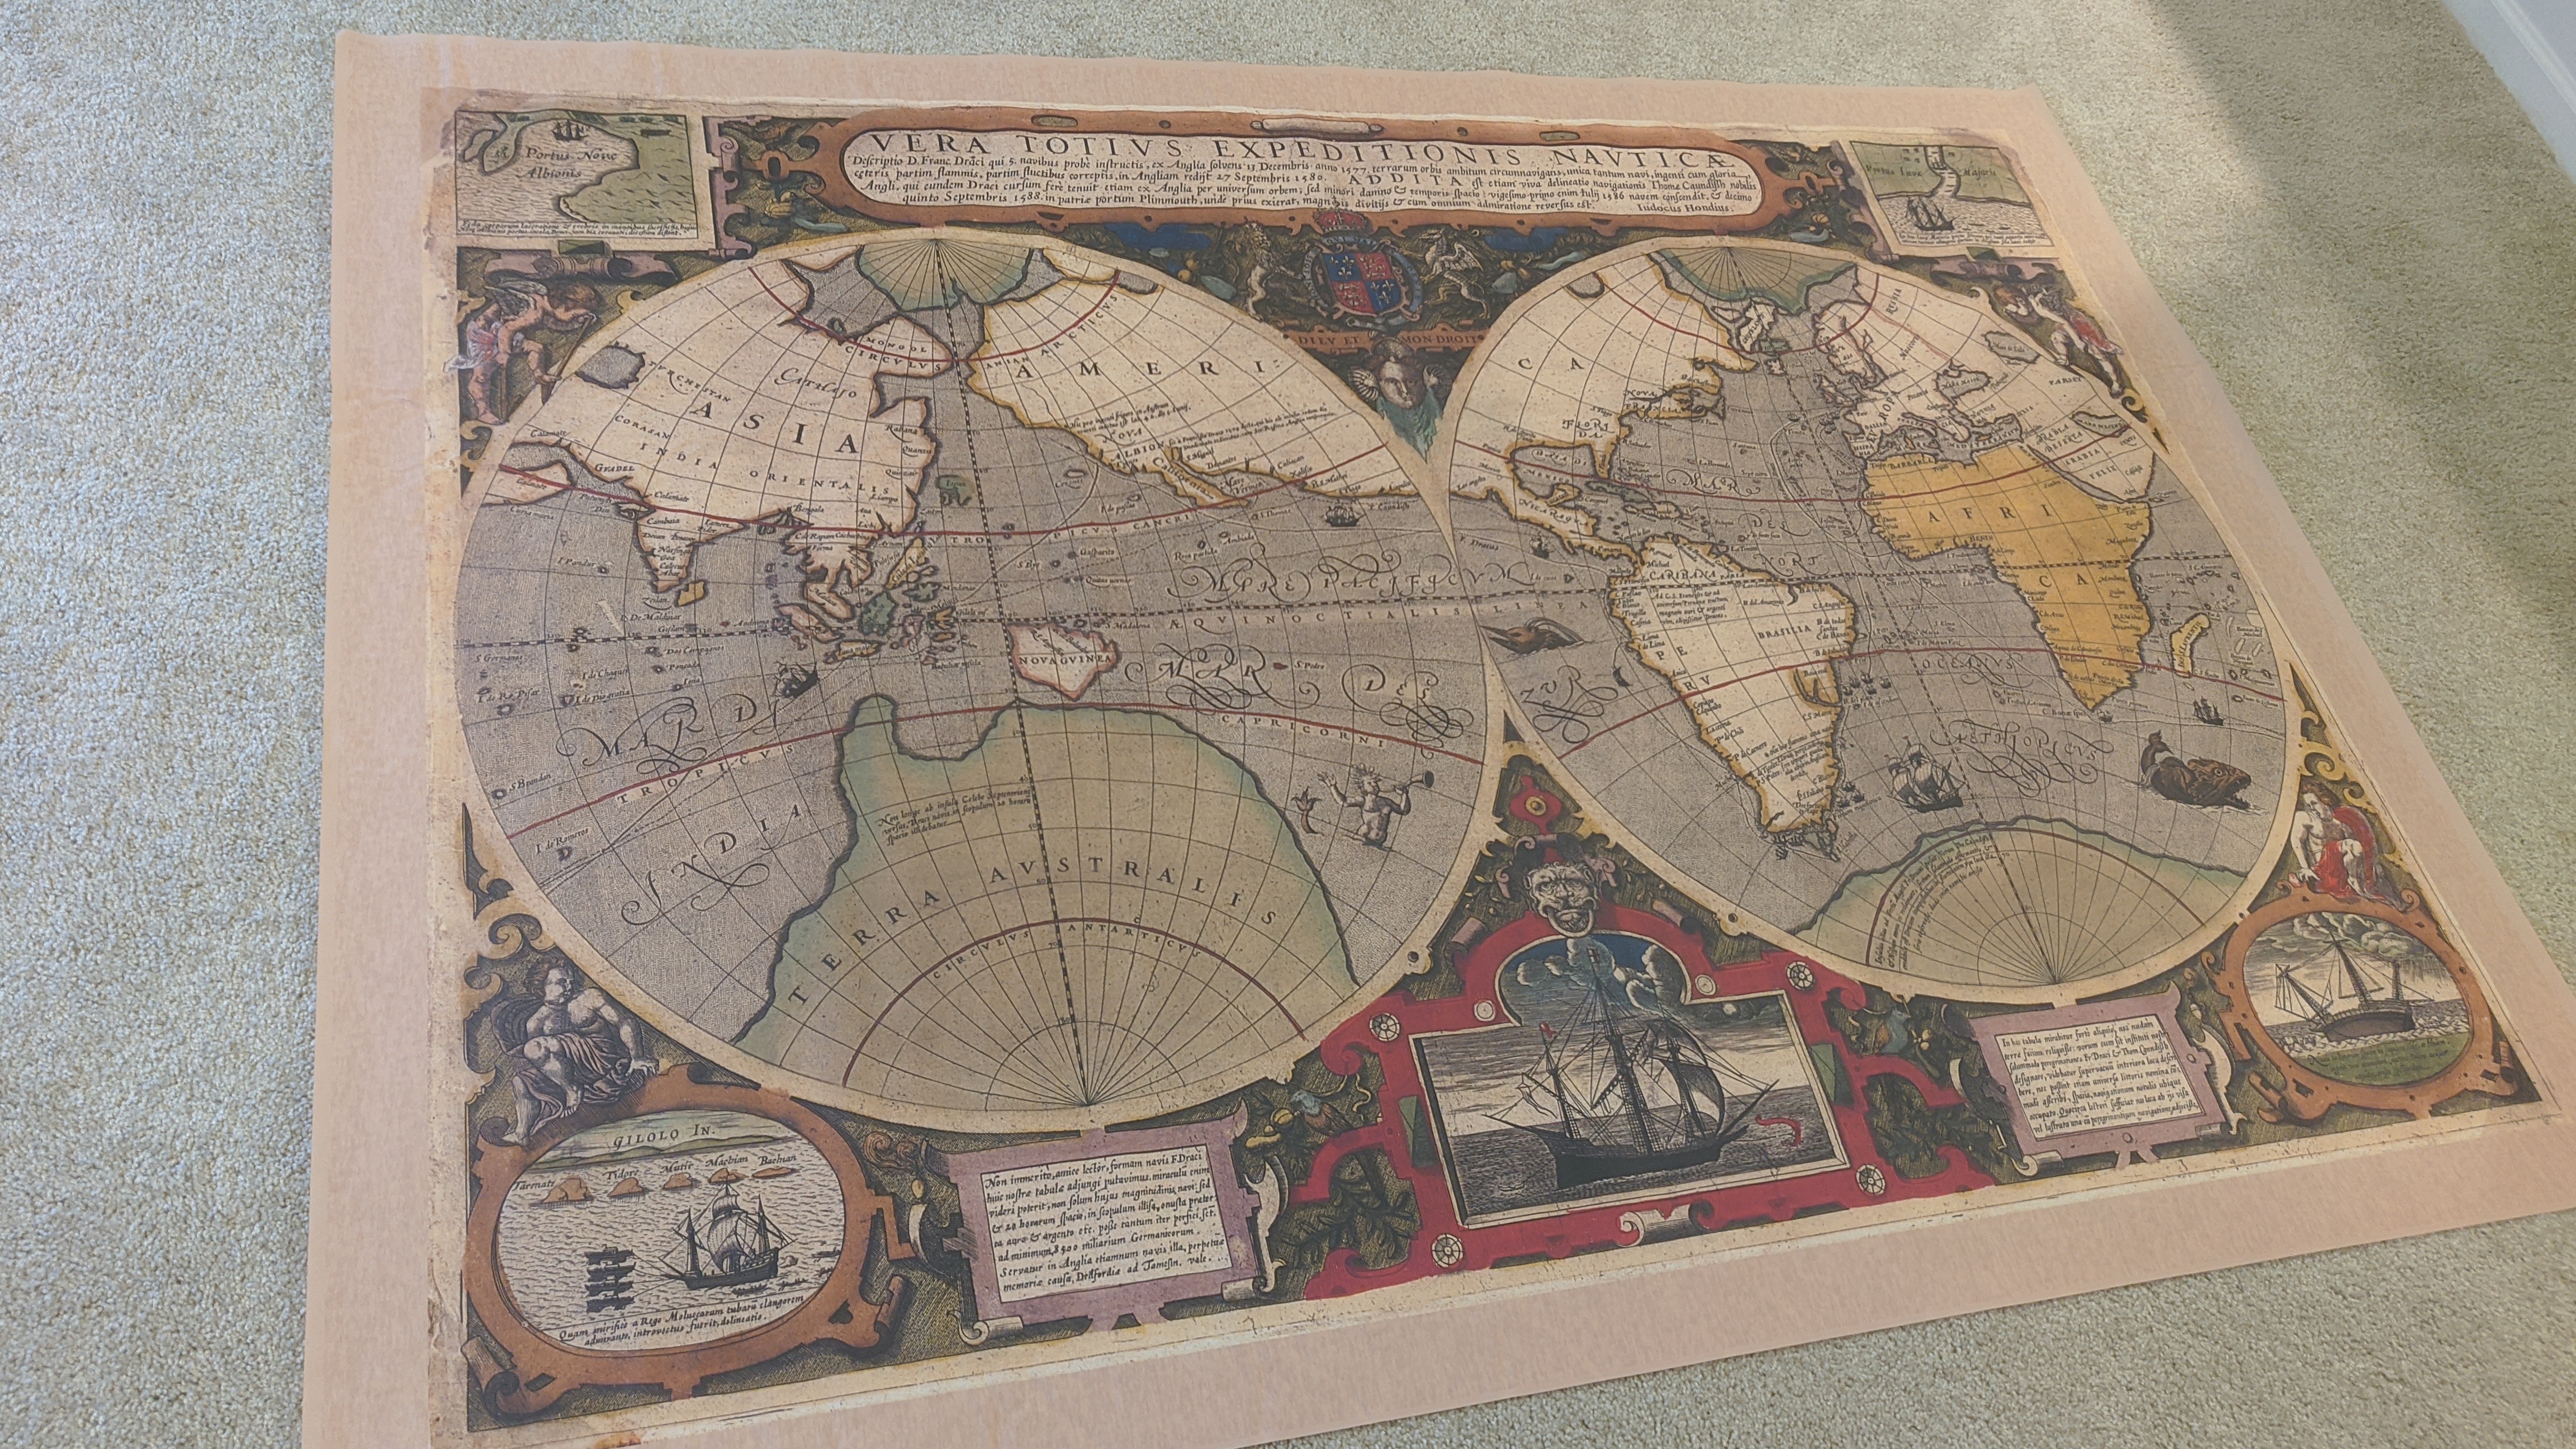
This is the printed fabric material that will be the face of the absorber.
Lay out the material and attach it to the frame. Be careful when putting the frame on the material. Take care in lining up the graphic to the frame, and keep an eye out for wrinkles and folds.

Put the face material face down.

Lay the frame onto the fabric, wrap the fabric to the back, and staple it to the frame.

Make the corners as neat as you can. Don’t spend too much time, this will be covered.
Fastening doesn’t need to be perfect on the back, but you do want it to be secure. Trim up the excess material if needed, and then flip it around and see what it looks like.
Now that you’ve attached it to the frame, let’s focus on the lights!
You could just fill it with the material and hang it like this if you didn’t want the lights, but this project is going the extra mile! We will attach a board to the top of the frame and attach the lights to that. This board will support the lights as well as the the frame. The hanging straps and rings will be attached to this as well, so don’t select a board that is too thin or flimsy.

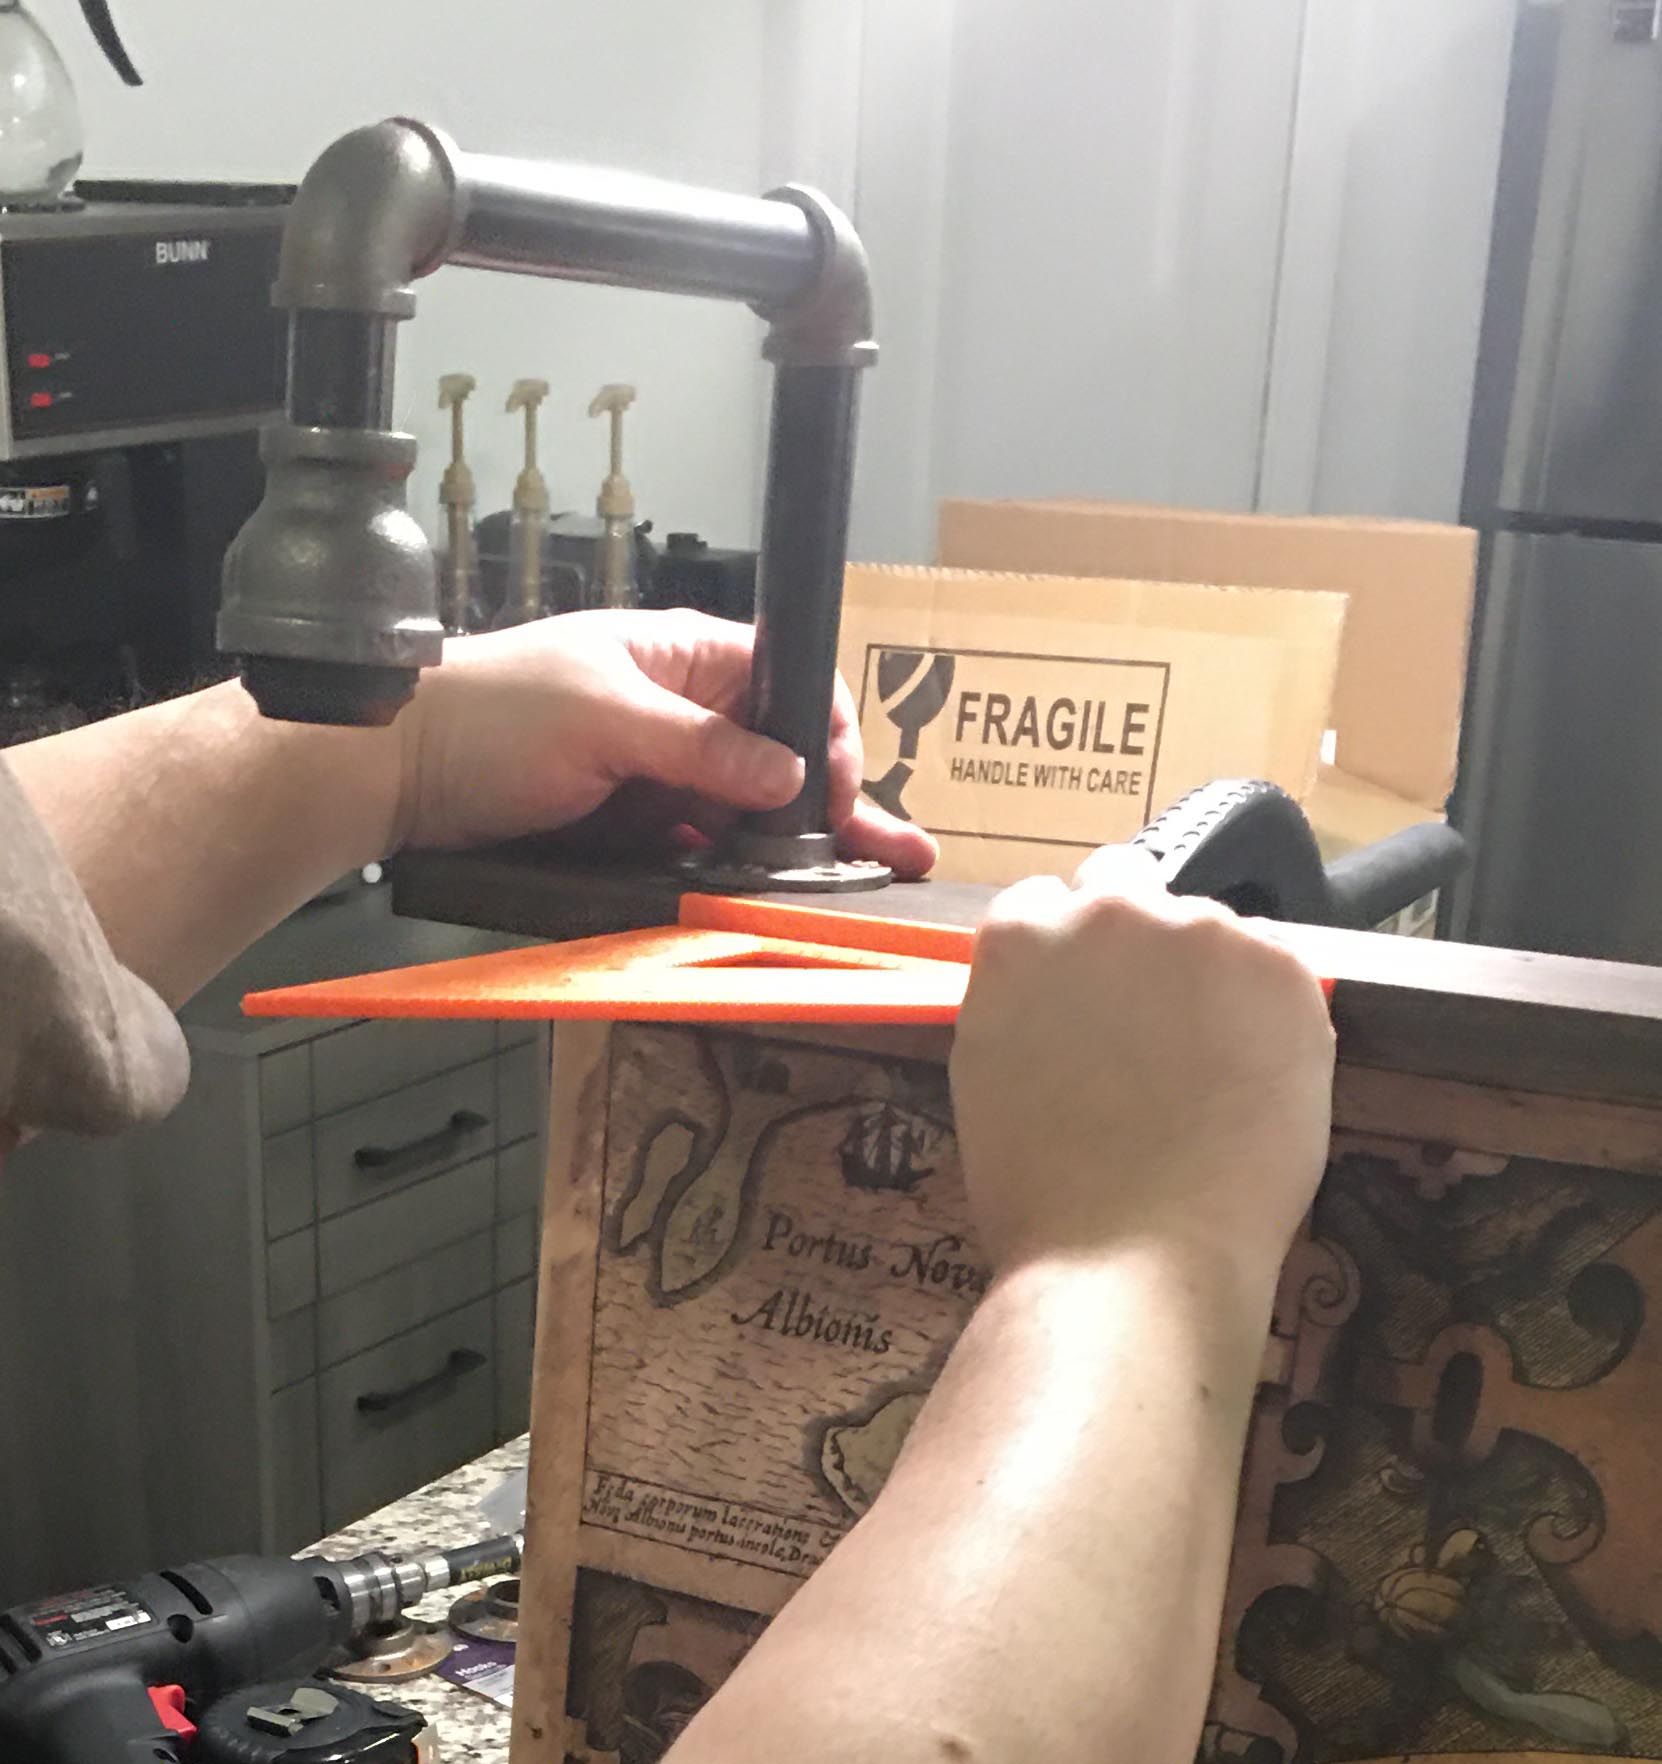
Clamp a piece of wood to the top, like a mantle, and screw it to the frame.
How you mount the lights to the board and run the wires will be different if you are using different fixtures. This was made with 5 custom, black-pipe fixtures, that are basically just a flange, two 90° elbows, some pipe, and a lamp fixture mounted in a 1 1/4″ pipe reducer/coupler. Wire was stranded lamp wire (black and white), and it was left long to assist routing the wiring inside the panel.
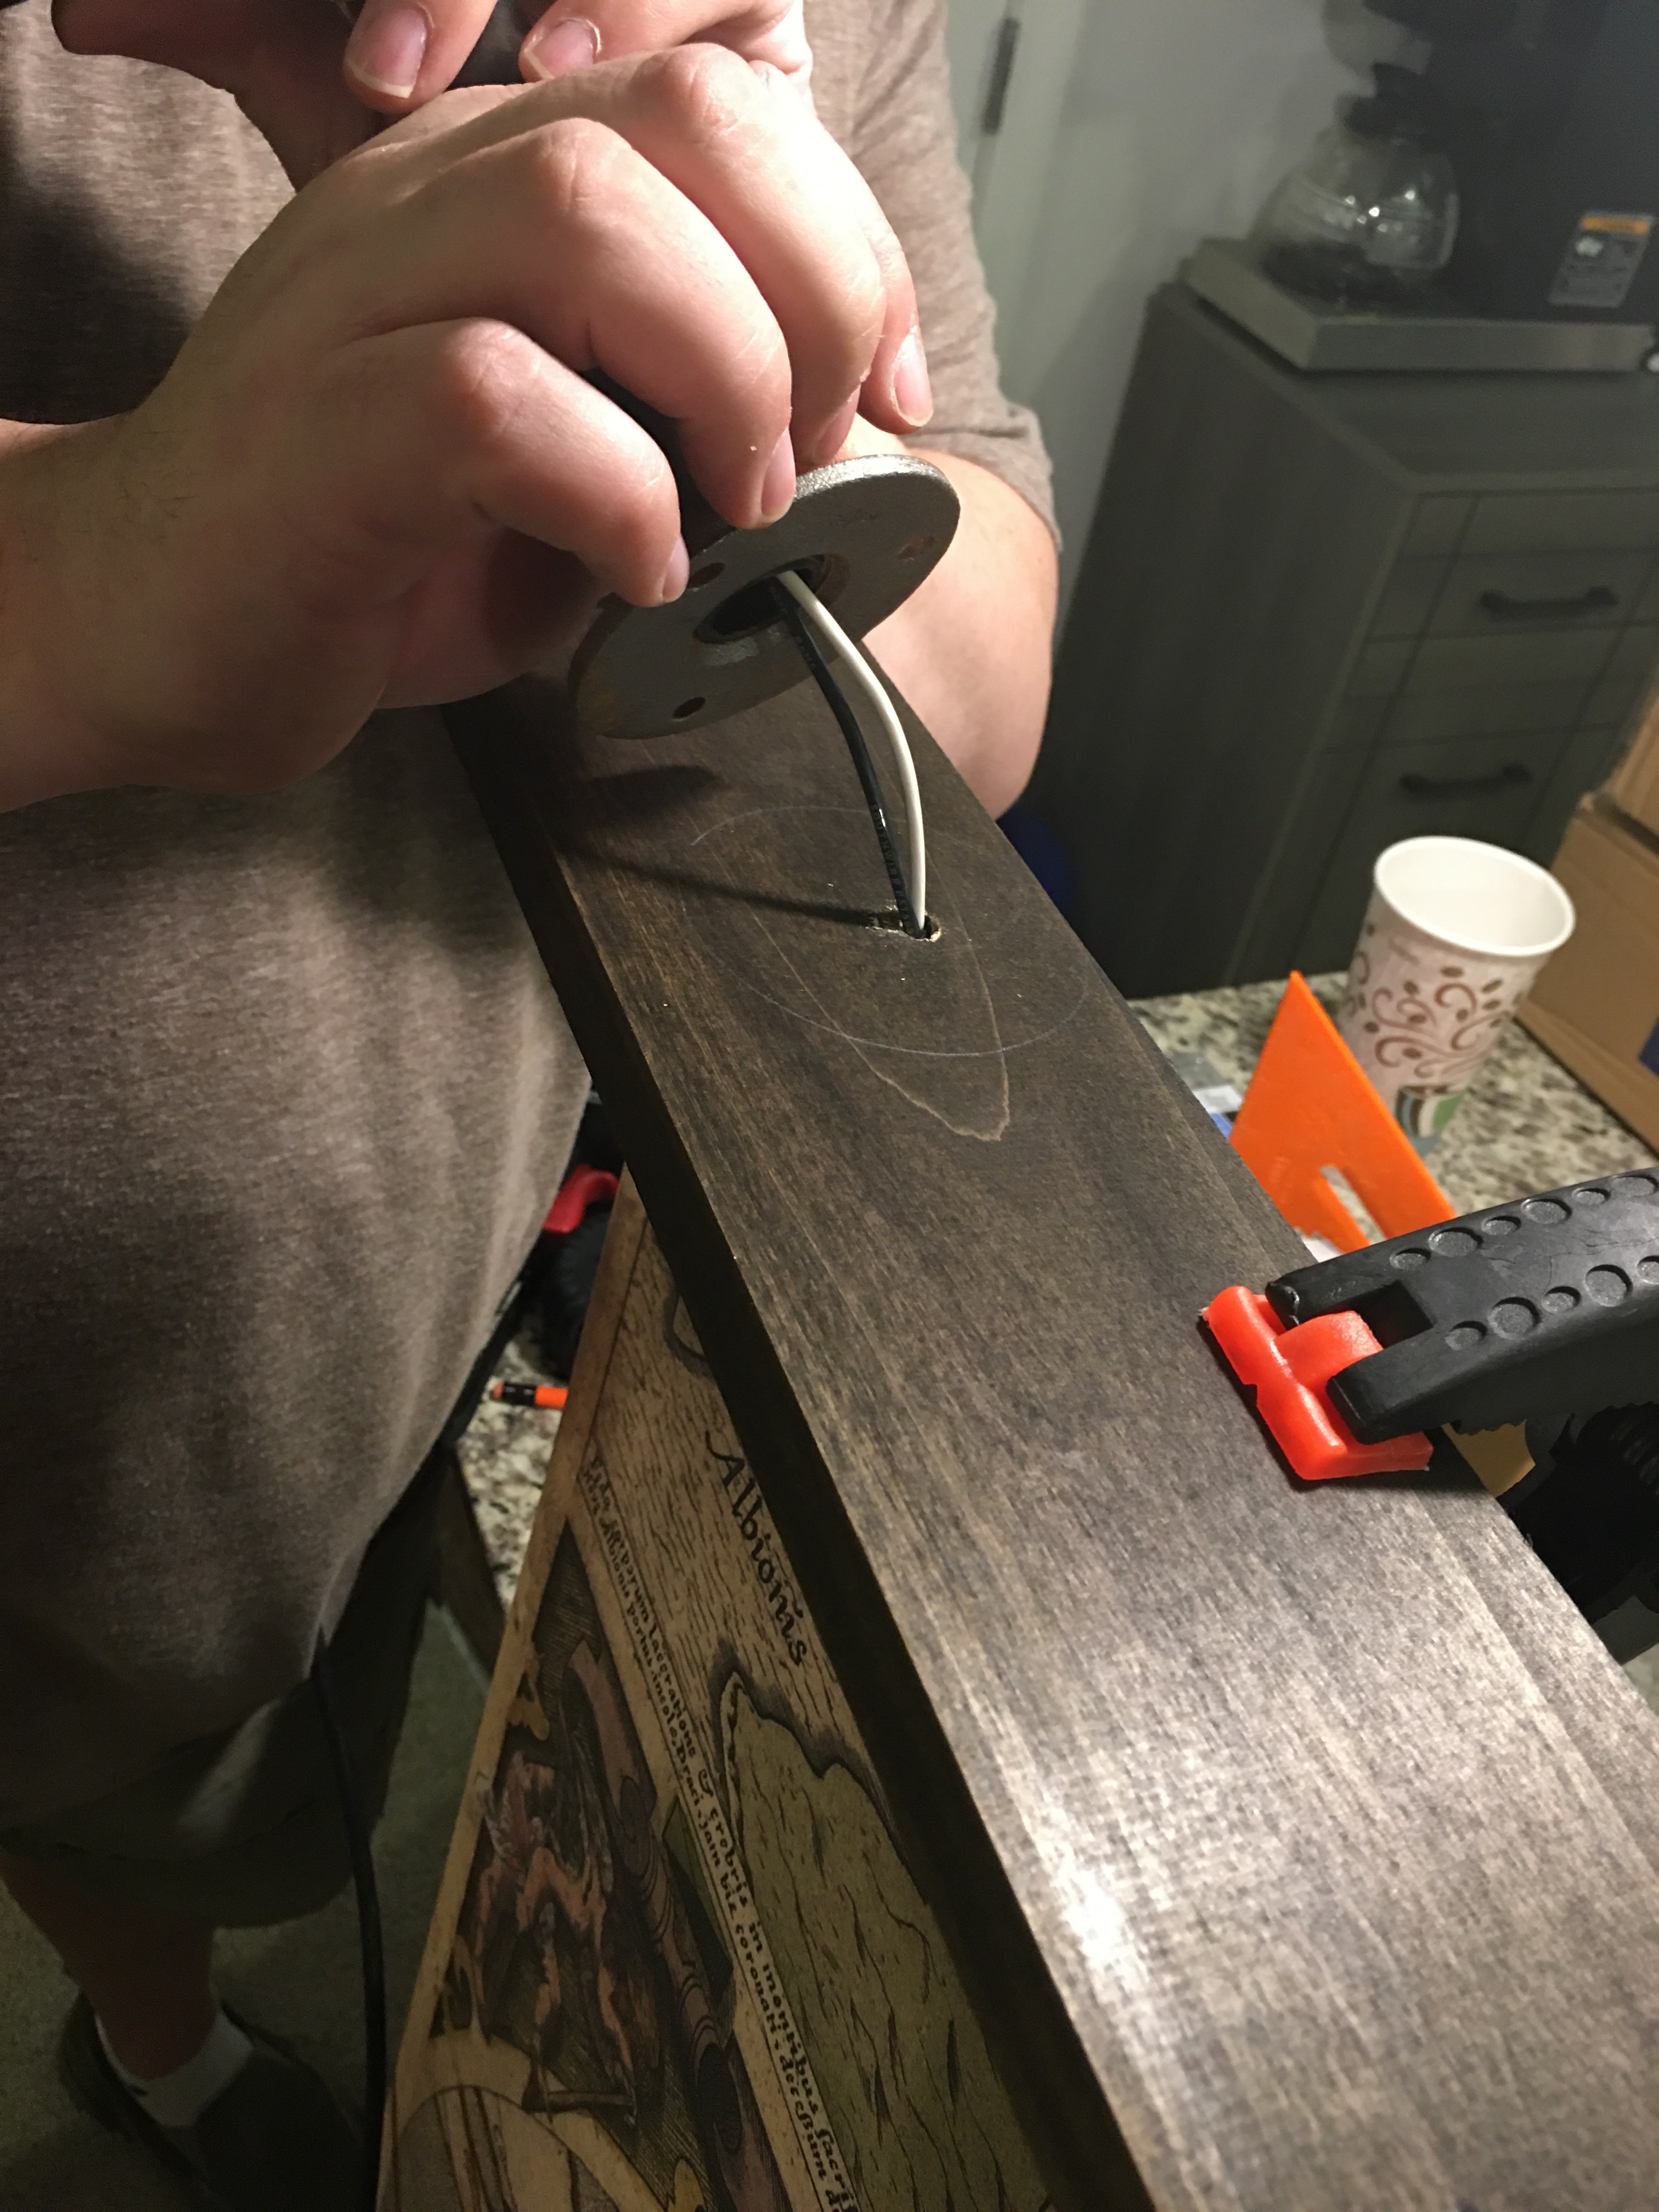
Mark the fixture location and drill a hole for the wire. Run the wire through the hole.
Orient the fixture and attach.
The flange on these lights had 3 screw holes. Some washers and wood screws were used to attach them to the frame. The remaining fixtures were then measured and mounted – paying close attention to keeping consistent spacing and orientation of the lamps.
Note: This will vary depending on the type and number of lamps you use.

Measure for the next fixture and repeat until all the fixtures are installed.
Now that we have all the fixtures mounted, let’s finish the wiring and put in the material!
(WARNING: If you are not comfortable with wiring – this is the point where you call in a friend, electrician, Wikipedia, or whatever other resource you use to make sure you don’t electrocute yourself, burn down the house, etc. Acoustics First assumes no responsibility for your DIY projects – but we wish you good luck!)

Flip the panel around to get at the wiring… hopefully you remembered to use long pieces!

Using wire nuts and electrical tape, wire all the black wires together and all the white wires together.
This wiring was all attached to a lamp cord that had a pre-molded plug, and readily recognizable hot (black) and neutral (white) wires. This entire fixture is being controlled by a smart outlet (“Alexa… Turn on the Awesome World Map.”), but could just as easily be hard wired to a junction box, or wired with an inline switch.
This is a good opportunity to test the lights and wiring, before installing the acoustic material and covering the back.
Now we can insert the acoustic material. Sonora® Black Scrim Ceiling tiles are easily trimmed to fit with a sharp knife. They are fiberglass! So… wear gloves minimize exposure to the fibers.

Test the lights then insert the acoustic material into the frame (Sonora® Black Scrim ceiling tiles) and organize your wires.
Covering the back of the panel will keep the Sonora® tiles in place, and keep any stray fibers from escaping. This will also make the panel easier to move in the future – without worrying about the tiles falling out or snagging on the wires.
Trim the excess off. It doesn’t need to be pretty back here, remember this will be up against the wall.

Cover the back of the panel with material and staple it into place.
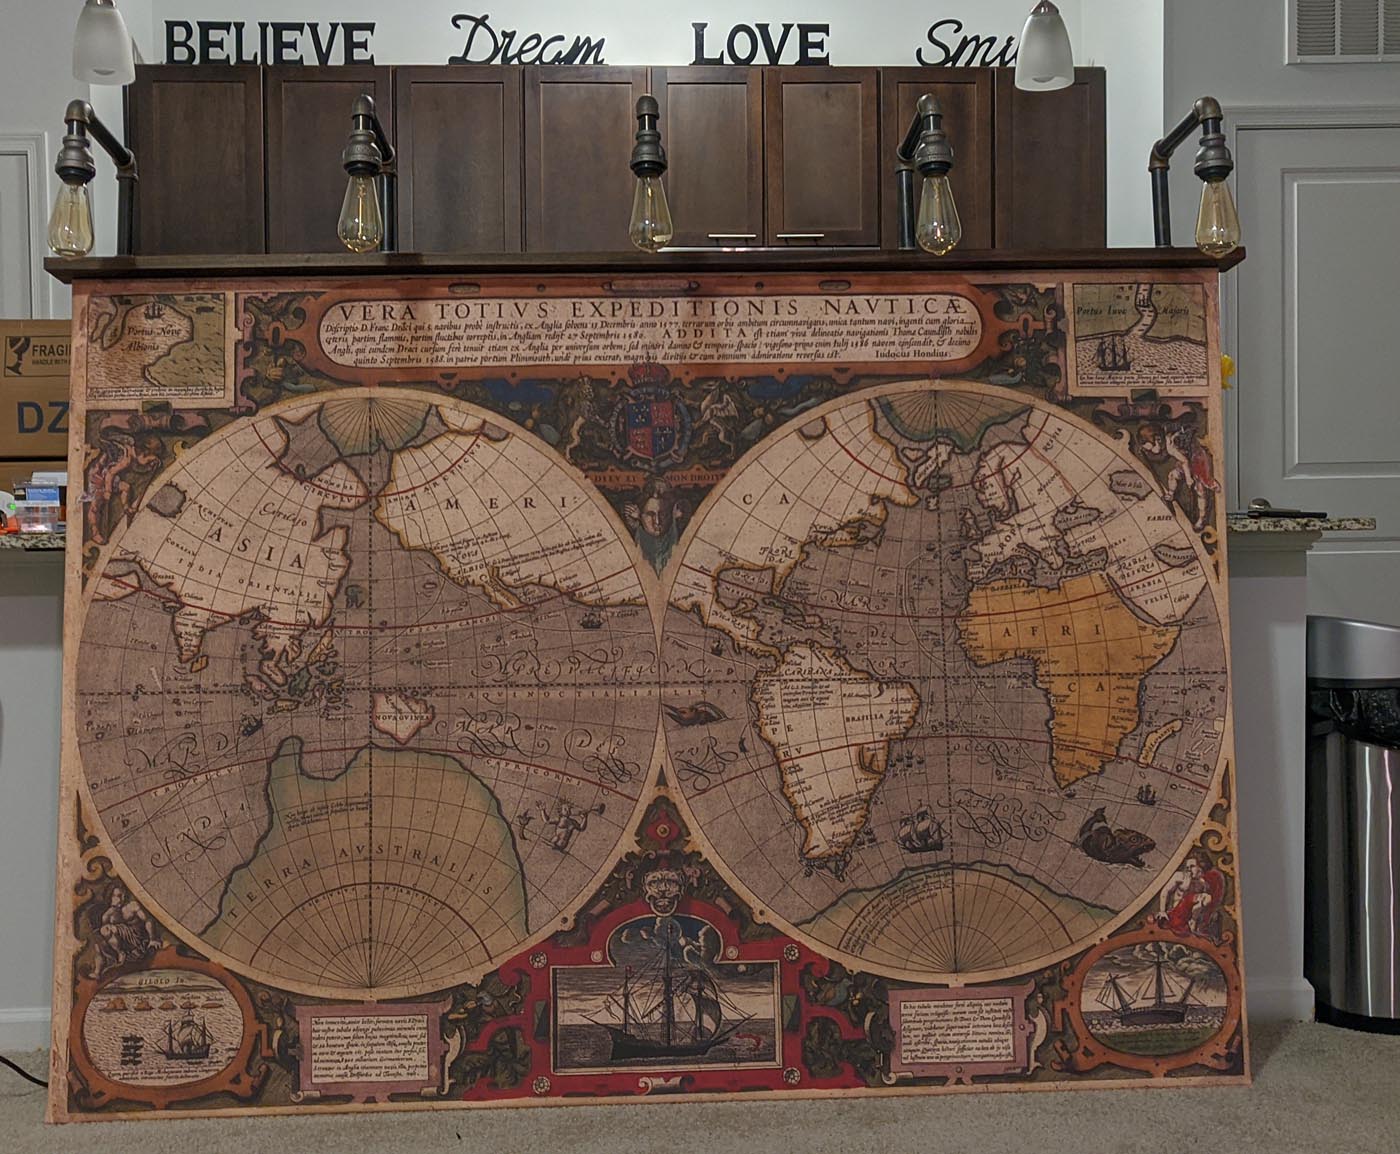
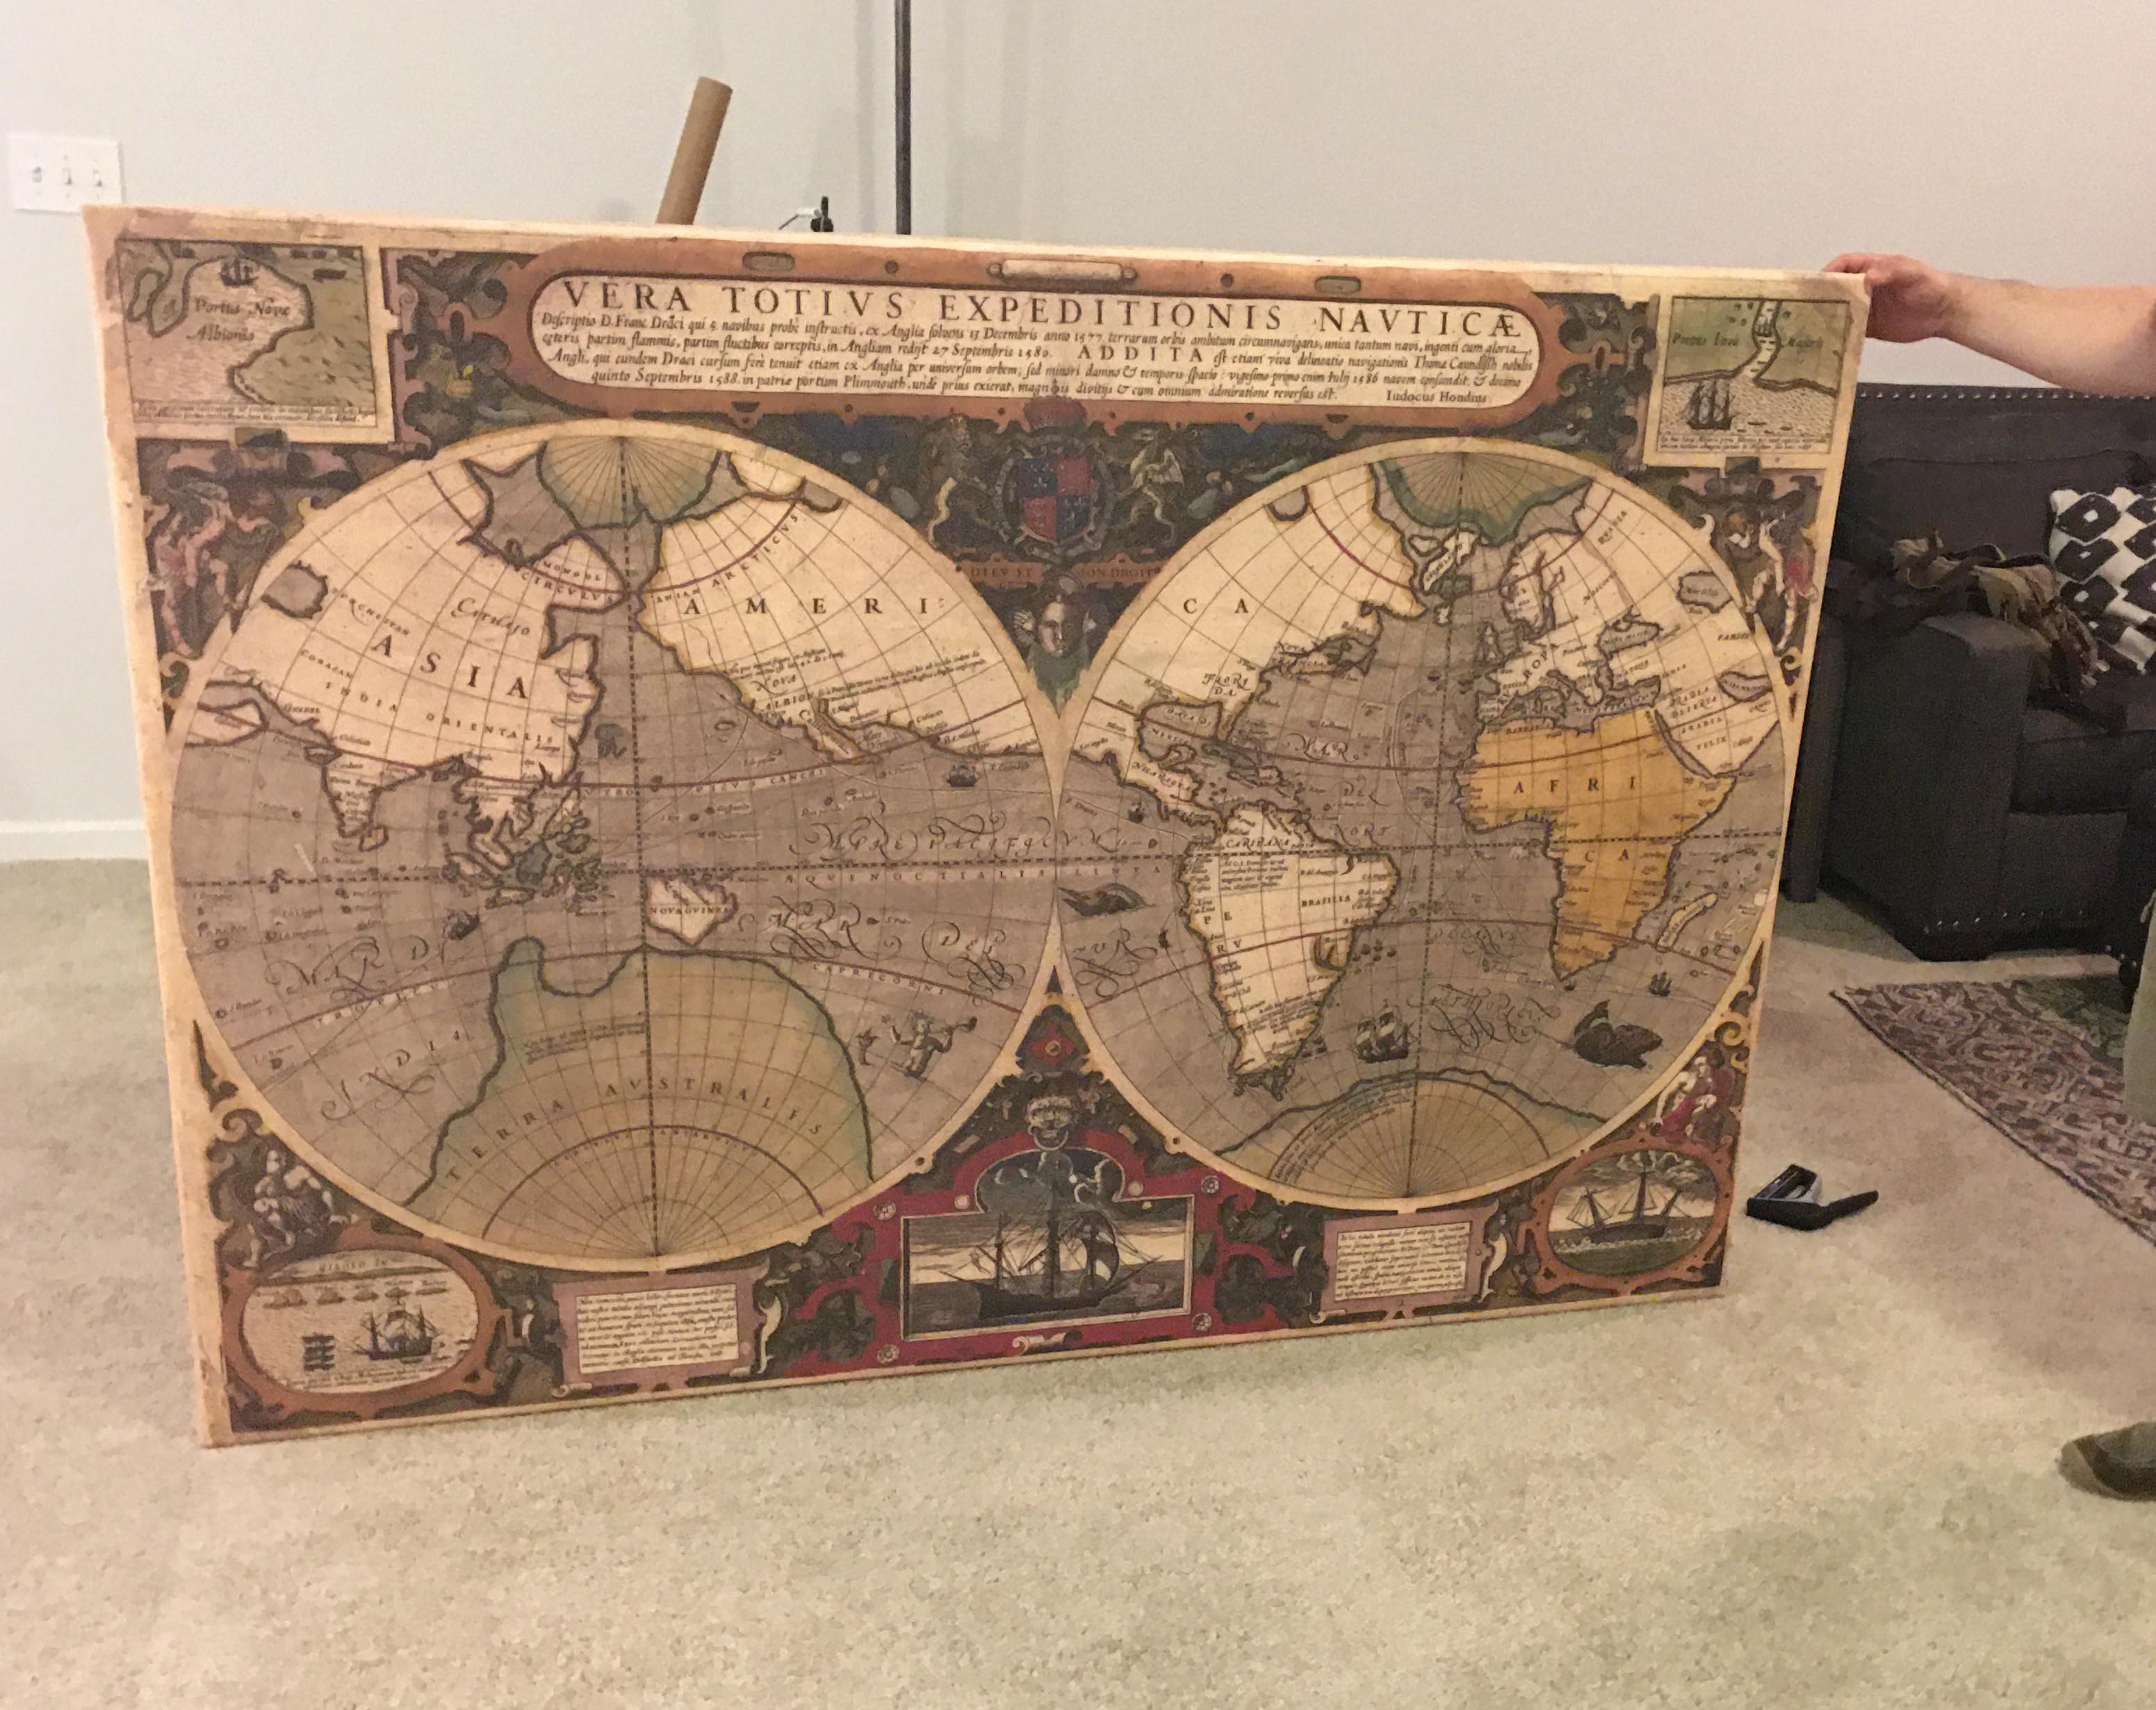
Spin the map around…

…and enjoy the glow…
The hardware used to hang the panel will depend on a few different factors – wall construction, stud availability, final panel weight, etc. Make sure you use appropriate hardware for your environment. In this case the final panel weighed less than 30 lbs, and the decision was made to use drywall anchor hooks and industrial hanging eye loops.

Making sure the panel is level, and hang it on the wall! Then, sit back and enjoy the great looks and improved acoustics!
Now is a great time to get up and do some creative home improvement projects! Improve the acoustics of your home theater, living room, or home office… and have a cool new focal point for your space.
DIY Wood Diffusion Panel – ArtDiffusor® Trim
Posted by Acoustics First in Diffusion, DIY, HOW TO, Products on April 13, 2016

DIY Wood Diffuser Panel – Using ArtDiffusor Trim
Here at Acoustics First®, we are often asked about wood acoustic treatment for spaces ranging from recording studios and auditoriums to churches and home theaters. Although the acoustic properties of wood are comparable to other reflective materials like gypsum and thermoplastic, wood’s superior aesthetic makes it a desirable treatment (wood is often perceived to “sound better” simply because of its visual properties).

Two different profiles that work together!
Our newest wood acoustic treatment, ArtDiffusor® Trim, is a versatile, high frequency quadratic diffuser that can help improve the clarity of speech and music. Both Profiles (Type A & B) offer diffusion in similar ranges and allow for customizable installations. The different profiles can be used individually or together to modify the aesthetics of a room, while achieving the desired acoustic performance. In fact, in recent tests of ArtDiffusor® Trim, alternating the A and B profiles resulted in the best diffusion. Some examples of different installations include:
- Back wall Diffusion for a theater, listening or mixing studio.
- Slatted Ceiling Absorber.
- Installation over or behind stretch wall
- Chair rail, door and window molding.
ArtDiffusor® Trim can come in lengths up to 8’ and is available in Maple (other woods can be quoted). Later in this article we’ll walk you through how to build your very own diffusion panel using 4’ lengths of ArtDiffusor® Trim.
Diffusion at a Glance
Where typical fiberglass and foam panels absorb sound by transferring sonic energy into kinetic and thermal energy, diffusers act to scatter the energy, creating ambiance and a sense of open space. The function of sound diffusers is not to remove energy from your room, but to redistribute it, accurately reinforcing the sound source by controlling standing waves and flutter echoes, while retaining the room’s “liveliness”.
As is the case with any sound absorbing panels and diffusers, the treatment needs to cover enough critical surface area to make a noticeable impact. Simply installing a single piece of ArtDiffusor® Trim will not significantly improve the acoustics of a room. One way to ensure enough improvement is by using ArtDiffusor® Trim to build a series of diffusion panels and installing them as you would sound absorbing panels.
Building a Diffusion Panel – A step by step guide
- Plan out your Panel: Find out how many ArtDiffusor® Trim boards you want in your panel assembly. Our diffusion panel was to occupy an alcove that was 29” wide and each board has a width of just about 4”, so we opted for 7, 4’ boards. Remember, alternate type A and B profiles for optimal diffusion.

Plan your Layout.
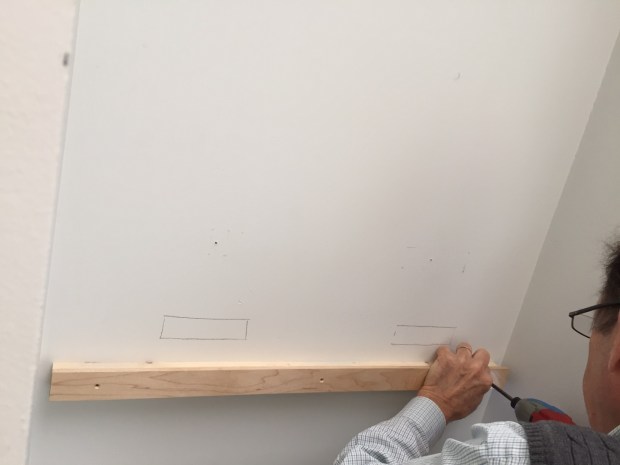
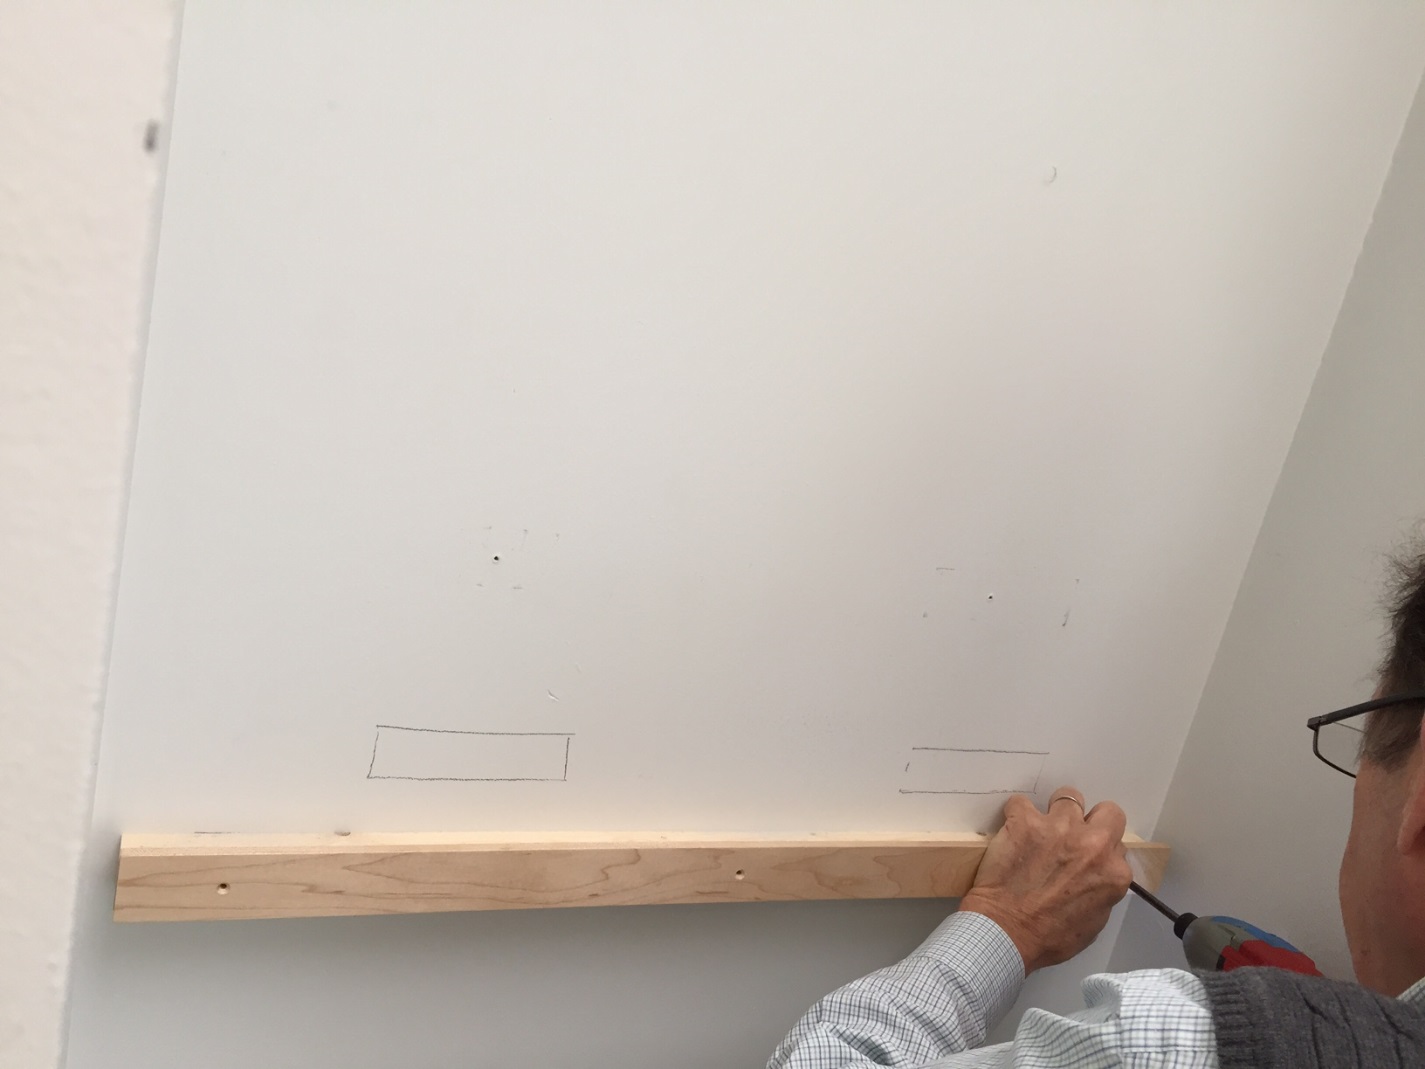
- Install the lower support board: This is what the ArtDiffusor® Trim boards will “stand” on. It is best to install acoustic treatment above chair rail height (3’-4’), to ensure that it’s effective around ear height. Measure and use a level to mark where the support board will go, install drywall anchors for a sure hold into the drywall, then drill and screw the support board into place. Be sure to countersink the holes so the facing strip has a flat surface to rest against.

Install the Lower Support.

Install the upper support board: This time using the ArtDiffusor ® Trim boards as a guide, measure, level and mark the location of the upper support board. Again, using drywall anchors, mount the upper support board (don’t forget to countersink!).The picture shows both support boards installed.
———————————————————————————————–>>>- Attach lower facing strip: Use facing strip that is approximately a ½” wider than the support board. Line up the facing strip next to the support board and mark your screw locations ensuring that they won’t run into the support board screws. Drill the holes and counter sink, lining up the boards so the ½” overlaps on the top, and screw into place.
Lower facing strip installed.
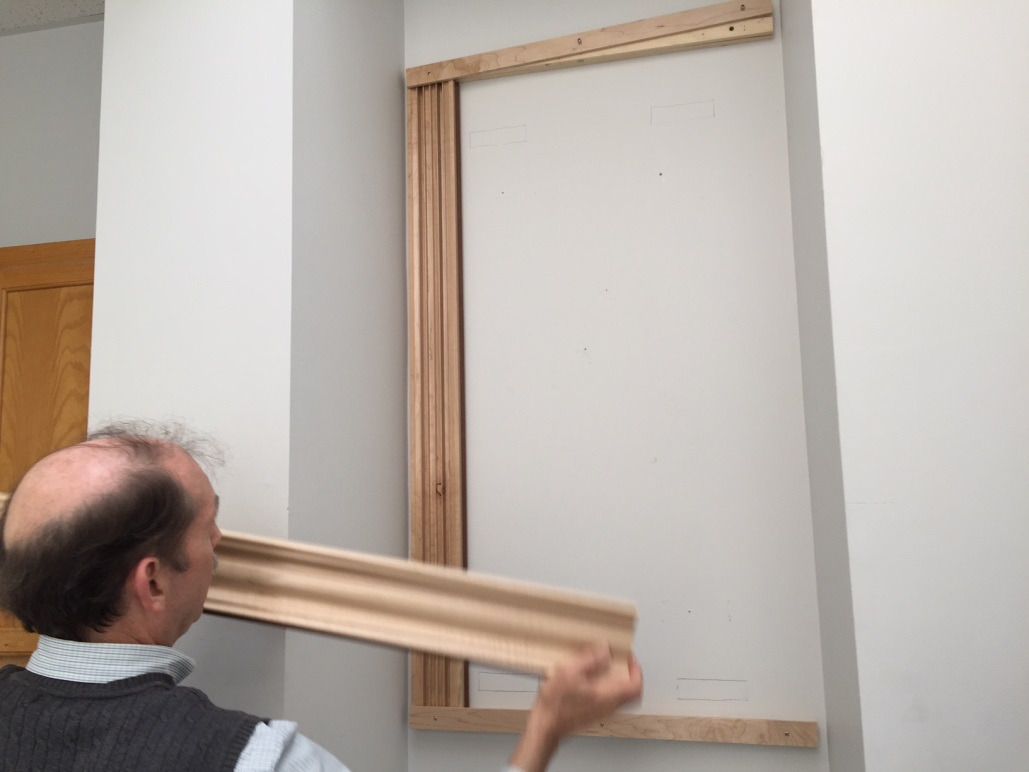
- Partially attach upper facing strip: Same as the lower facing strip, but mount so the ½” overlap is on the bottom, and only screw one side in so it’s easier to slide in the ArtDiffusor ® Trim boards later.

Partially attach top facing strip.
- Slide in Art Trim: Slide in the ArtDiffusor® Trim behind the facing strip and use biscuits to fit the boards together. We decided to position the boards with an approximately 1/8” spacing.

Slide in ArtDiffusor® Trim panels.
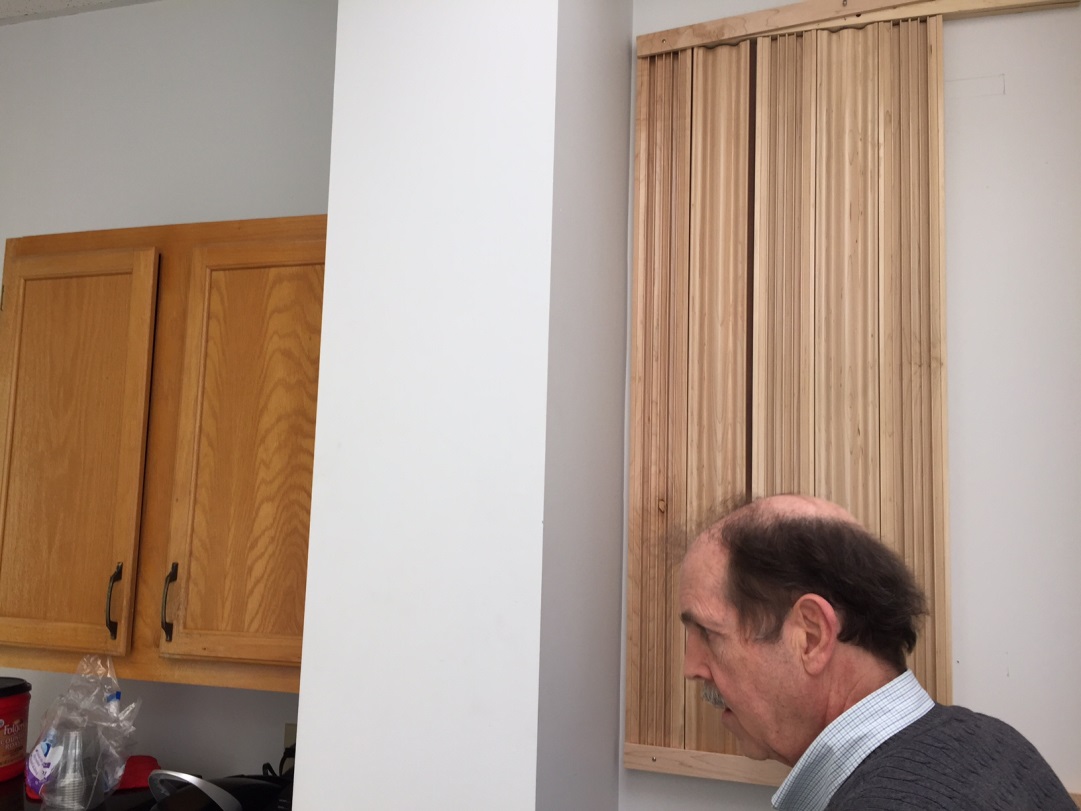
- Finish attaching upper facing strip & admire your new DIY Diffusion Panel!
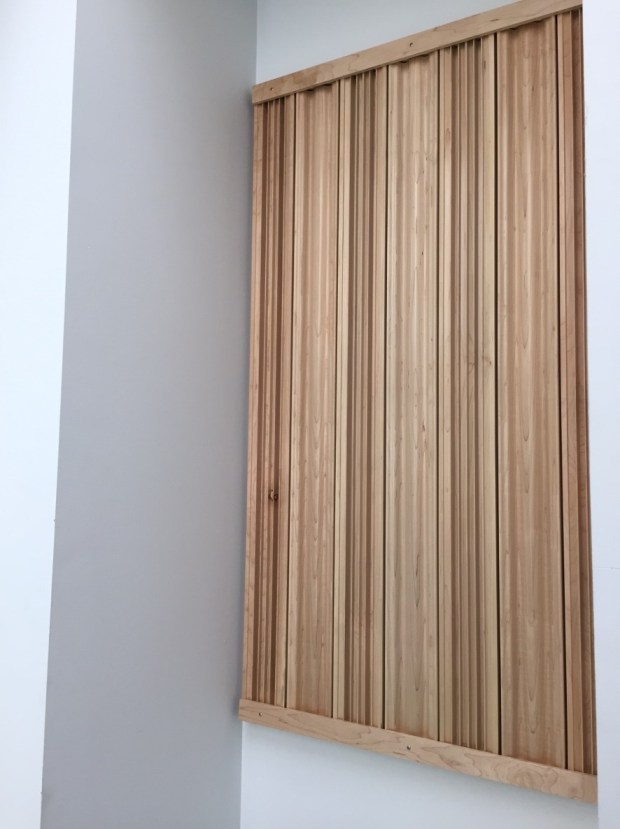
Final DIY Diffusing Wall Panel with ArtDiffusor® Trim!


Season’s Greetings from Acoustics First – 2014
Posted by Acoustics First in Absorption, DIY, Home Entertainment, Home Theater, HOW TO, Media Room, Offices, Product Applications, Products on December 9, 2014
Season’s Greetings from Acoustics First!

DIY Gift idea using Tone Tiles™ and some Creativity!
Acoustics First would like to offer this Do-It-Yourself gift idea to all of our readers this year.
If you’ve got a creative painting habit, give a customized gift that not only shows your creative talents, but also helps to improve the sound of the room!
Above is a festive holiday painting on one of our 1’x2′ Tone Tiles™.
Want to go a little bigger? We also have 2’x3′ Tone Tiles™ in Stock.

2′ x 3′ panel Photo from iPhone
A Second Idea is to get a photo printed on a Tone Tile™.
How about “posting” that photo to the “wall” of your living room, and have a great conversation piece as well as improved acoustics – at the same time !
Season’s Greetings and Happy Gift Giving!
– Acoustics First
* Don’t forget to ask your local printer if they have flatbed printing capabilities.

You must be logged in to post a comment.