Archive for category Voice Over
Then and now… Diffusers and Don Juan.
Posted by Acoustics First in Auditorium, Broadcast Facilities, Classrooms, Diffusion, Home Entertainment, Home Theater, Media Room, Multipurpose Rooms, Music Rehearsal Spaces, Music Tracking Room, Recording Facilities, Recording Studio, Studio Control Room, Teaching Rooms, Teleconferencing, Uncategorized, Vocal Booth, Voice Over on July 4, 2013
 Four score and seven years ago (1926), movies had just begun integrating sound along with the visuals, as Warner Brothers released Don Juan – syncing a 33 1/2 rpm audio disc to the video as part of the new Vitaphone system. The era of talkies had arrived, as did a new era of fake accents.
While we still have those fake accents from the days of yore (and Johnny Depp as Don Juan), we have new technologies to bring us our entertainment – high-definition video on big screens with 10.2 digital surround sound, playing in home theaters that rival the best public theatrical venues.
While we have seen (and heard) the technological evolution of movies to what they are today, we have also seen (and heard) the evolution of acoustics – and the one area I’m going to discuss today is one of the fastest evolving acoustic disciplines – Diffusion.
Diffuser design has come far from the early days of scattering sound by changing the angle of your wall, or the shape of the room to negate, dilute, or diffuse unwanted or undesirable acoustic waves. Today, acoustic diffusers are mathematical and scientific wonders, designed to be elements that are inserted into your listening environment to create an acoustic space that is open and airy.
During this evolution of diffusion we have seen the rise of many shapes; The Pyramid, the Barrel, the Binary Arrays, Flat Panel, 1D and 2D QRDs, and more… a veritable cornucopia of geometric shapes and mathematically produced profiles, which are scientifically sound, but fundamentally, inorganic.
The notes on the instruments we play, are based on math and physics, but the music we play ebbs and flows from the pounding of drums to the smooth bass lines, from the intimate vocals to screaming, and from the heavy metal acts to classical symphonies (with or without a heavy metal act). Diffusers have followed suit, changing their shape along with the changing industry – making advances as new discoveries are made.
Diffusers have become important acoustic treatments in listening rooms, recording rooms, sound stages, and theaters – embrace the diffusers! Embrace the future Don Juan’s and their terrible accents… ok… just diffusers… fine.
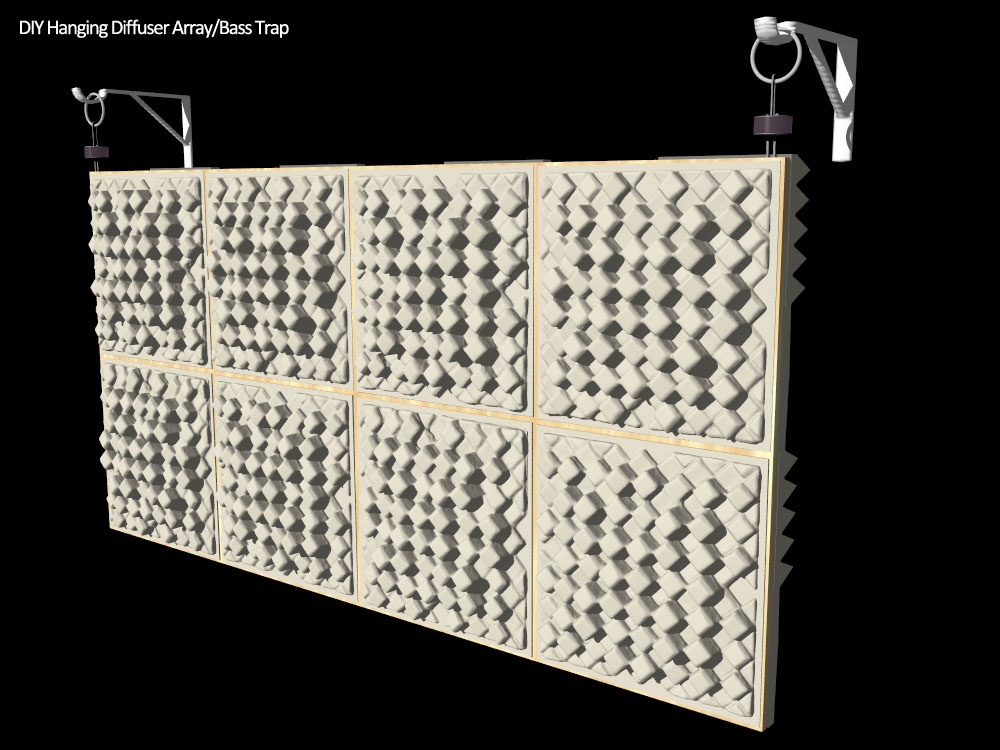
DIY: Back Wall Diffuser Array/Bass Trap
Posted by Acoustics First in Absorption, Auditorium, Broadcast Facilities, Diffusion, DIY, Home Entertainment, Home Theater, HOW TO, Media Room, Multipurpose Rooms, Music Rehearsal Spaces, Music Tracking Room, Product Applications, Products, Recording Facilities, Recording Studio, Restaurants, Studio Control Room, Teleconferencing, Theater, Vocal Booth, Voice Over, Worship Facilities on June 20, 2013
Getting more out of your back wall diffuser array with a simple hanging DIY array/bass trap.
One of the big “back wall” questions people have is “If I have a large diffuser array, how can I get the bass trapping I need?” A great answer to this question is to turn the entire array into a hanging bass absorber. If you are already planning on getting diffusion for your back wall, here is a great way to use that wall space for more than just diffusion.
Stuff you need:
- 4’x 8’ sheet of 3/4” Plywood
- 32 sq/ft of 4” Cutting Wedge® Classic Foam (Or similar absorber)
- 8 x Art Diffusers® – Model C (or Model F, Quadrapyramid™, or other comparable diffuser)
- 2 x IsoHangers
- 2 x Heavy rings (Think big Curtain Rings or Hanging Wire will also work)
- 2x Closet Rod/Shelf Brackets
- 2 x 7/8” wood screws and fender washers
- Construction Adhesive (Make sure it’s safe for Foam)

Assembly instructions
- Screw the two IsoHangers to the plywood, using a fender washer on each screw. These should be about an inch in from each end -drill small pilot holes first. (These will be used to hang the panel, this side will be designated as the back from here on out.)
- Use Construction adhesive to attach the Cutting Wedge® Foam to the back of the panel in a checkerboard pattern (each panel 90° rotated from adjacent)
- Use Construction adhesive again to attach the 8 Diffusers to the front of the Plywood (Follow the installation instructions for adhesive placement)
- Attach the Rings or Wire to the free end of the IsoHangers.
What you have created is a hanging panel that will diffuse mid-high frequencies and trap the lows. The hanging mass absorbs low frequency energy by moving slightly when pushed by the energy of the Low frequency Waves. The rear facing fiberglass also absorbs low frequencies by dampening the panel, but it also absorbs any of the waves that happen to get trapped behind the panel.

Hanging the Diffuser/Trap Assembly
- Measure and attach the Closet Brackets to the Wall – Use appropriate anchors! If you have standard or double wall construction without Resilient Channels, use the studs – The IsoHangers will keep vibrations from transmitting through the wall.
- Hang the panel on the Closet Brackets using the rings/wire with the Diffusers facing you and that’s it!
 This simple DIY project is provided as a way for our customers to learn better ways to use our products and get more value out of the products they buy. For those customers who are planning on purchasing diffusers to make an array, or maybe already have an array and are looking to try a new configuration – this project may be what you’re looking for.
A little History…
If you embark on this little construction project, you will be constructing studio elements that have remained basically unchanged since at least the early 1970’s. Hanging plywood wrapped in studio foam or fiberglass has been used “behind the curtains” of many of the top studios for effective bass control for over 40 years – just no one has ever seen it, as it has been hidden in walls; masked as a false wall of fabric stretched across wooden louvers!
————————————————————————————————————————————————————————————
Acoustics First Corporation supplies acoustical panels and soundproofing materials to control sound and eliminate noise in commercial, residential, government, and institutional applications worldwide. Products include the patented Art Diffusor®, sound absorbers, noise barriers, acoustical fabrics and accessories. Acoustics First® products are sold for O.E.M applications, direct, and through dealers. For more information on acoustical materials and their application, please visit www.AcousticsFirst.com or call Toll Free 1-888-765-2900 (US & Canada).
DIY: StratiQuilt™ Room Treatment
Posted by Acoustics First in Absorption, Animal Shelters, Articles, Broadcast Facilities, Construction Sites, DIY, Home Entertainment, Home Theater, HOW TO, Music Rehearsal Spaces, Music Tracking Room, Product Applications, Products, Recording Facilities, Recording Studio, Sound proofing, Studio Control Room, Vocal Booth, Voice Over on June 6, 2013
There are some situations where people are looking for a more temporary (yet still durable and effective) room treatment. Maybe you have a garage, or a practice space, or a place where you are looking for a usable solution that isn’t a permanent installation. Here is a great (not to mention tax deductible) treatment that can address many of the isolation and absorption issues of a space, while remaining durable (Washable), and easy to remove and reuse.

Stuff you need:
- Enough StratiQuilt™ Double-Faced Barrier Blanket to cover all of the wall and ceiling surfaces of the room you need to treat.
- 2”x4” lumber for the edges (Used to attach the barrier to the walls and maintaining an air gap.)
- Short Lag bolts and Washers
- Misc. hardware to attach 2”x4” lumber to walls.
Here’s what you do.
Attach the 2”x4” lumber to the walls with enough spacing to line up the grommets on two overlapped edges of the StratiQuilt™ blankets – if you have purchased the roll, the finished edges are 4 feet wide. Leave enough room to overlap the edges and bolt the quilts to the 2”x4” lumber as shown in the diagram above. Continue around the room, overlapping the edges of the StratiQuilt™ blankets to seal off the room. The blankets can be left loose over doors to allow for entry and egress while maintaining a good acoustic seal.

If desired, continue the process across the ceiling to “lock in” the room acoustics. This treatment may be considered by some to be a little on the “dead” side (High Absorption); however, The benefits of the treatment far outweigh this issue, which can be compensated for by adding a few acoustically reflective surfaces to the room (Drum Kit, Amplifiers, Racks, Diffusers, etc.)
Why use this system?
Other than it being very simple to install, take down and move with minor modifications to the structure, it performs a few vital acoustic tasks – all with one product. The StratiQuilt™ design is two layers of quilted acoustic fiberglass with a layer of BlockAid® barrier in the middle. The BlockAid® help the soundproofing of the room by it’s STC of 29, which will add significant isolation to the room. Mounting on the 2”x4” lumber is not just done for ease – adding the air gap behind the barrier increases both its STC and NRC allowing it to work as a limp mass barrier/absorber. The material absorbs on both sides (being double-faced), forcing in-room reflections to be attenuated immensely through the many layers of material it must pass through.
And on a final note, this economical start-up solution has the benefit of not being a “Building Material” for tax purposes, allowing for its immediate deduction as an expense.
Record your garage band without sounding like you’re in a garage, Try StratiQuilt™.
This simple DIY project is provided as a way for our customers to learn better ways to use our products and get more value out of the products they buy. If you are looking for more ways to use the products you have, look to Acoustics First for Ideas. http://www.acousticsfirst.com
————————————————————————————————————————————————————————————
Acoustics First Corporation supplies acoustical panels and soundproofing materials to control sound and eliminate noise in commercial, residential, government, and institutional applications worldwide. Products include the patented Art Diffusor®, sound absorbers, noise barriers, acoustical fabrics and accessories. Acoustics First® products are sold for O.E.M applications, direct, and through dealers. For more information on acoustical materials and their application, please visit www.AcousticsFirst.com or call Toll Free 1-888-765-2900 (US & Canada).
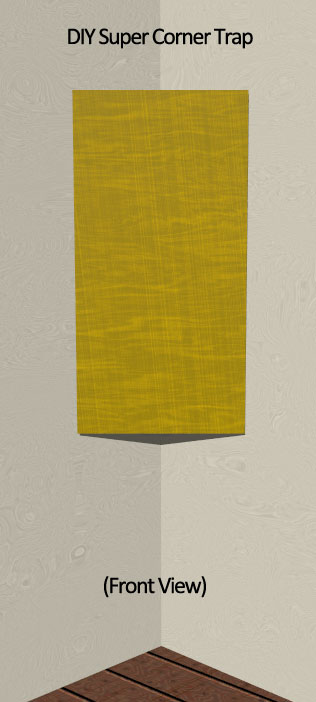
DIY: Super Bass Trap
Posted by Acoustics First in Absorption, Art Galleries, Articles, Classrooms, DIY, Home Entertainment, Home Theater, HOW TO, Music Tracking Room, Product Applications, Products, Recording Facilities, Recording Studio, School & Educational Facilities, Studio Control Room, Teaching Rooms, Teleconferencing, Theater, Universities, Vocal Booth, Voice Over, Worship Facilities on May 16, 2013
Take a couple of products and make your corner into a super trap!

One of the most pervasive problems in recording and listening environments is the problem of bass build up in the corners. If you want to get the most out of your room, try making your corner into a DIY super trap!
Stuff you’ll need:
- 2’x4’x4” (or 2”)Back-Beveled Sonora® Wall Panel (beveled on the rear to fit corners or a standard panel with angle brackets)
- 48” Bermuda Triangle Trap® or 2 PhaseFOAM™ Bass traps (or a 1’x4’x1” raw fiberglass panel hung across the corner.)
- Foam Adhesive
- Sonora® Mounting brackets
Simple installation instructions:
- Use the adhesive to attach the Foam Bass trap to the wall
- Use the brackets to attach the Sonora® Panel across the corner over the trap
Super simple. Super effective.
As simple as it seems, this method of installing these products is an ideal way to get extra trapping in your corners. This solution changes the corner density multiple times as the sound waves pass through it –as well as introduces a layer of air space. This installation method takes the strengths of the two products and has them working together to eliminate that build-up of energy in the corners – it literally sucks it up like a sponge!

This simple DIY project is provided as a way for our customers to learn better ways to use our products and get more value out of the products they buy. If you are looking for more ways to use the products you have, look to Acoustics First for Ideas. http://www.acousticsfirst.com
————————————————————————————————————————————————————————————
Acoustics First Corporation supplies acoustical panels and soundproofing materials to control sound and eliminate noise in commercial, residential, government, and institutional applications worldwide. Products include the patented Art Diffusor®, sound absorbers, noise barriers, acoustical fabrics and accessories. Acoustics First® products are sold for O.E.M applications, direct, and through dealers. For more information on acoustical materials and their application, please visit www.AcousticsFirst.com or call Toll Free 1-888-765-2900 (US & Canada).
DIY: How to build a Studio GoBo
Posted by Acoustics First in Absorption, Articles, Broadcast Facilities, Diffusion, DIY, HOW TO, Multipurpose Rooms, Music Tracking Room, Product Applications, Recording Facilities, Recording Studio, Studio Control Room, Vocal Booth, Voice Over on April 18, 2013
DIY Project: Diffuser Array/Absorber GOBO
By: James DeGrandis
Mobile DIY option for creating new spaces with GOBOs!
As studio spaces get smaller, and budgets get tighter, we like to find new ways to maximize our budgets and our spaces, without removing quality. One issue with small room recording is getting sufficient separation between instruments – and here’s one DIY project to help you master your space without compromise.
Stuff you need:
4’x 6’ sheet of 3/4” Plywood (This can be scaled up or down depending on need.)
32 sq/ft of 4” Cutting Wedge® Classic Acoustical Foam (Or similar absorber)
4 x Art Diffusors® – Model C (or Model F, Quadrapyramid™, or other comparable diffuser)
Construction adhesive
6-8 Hook and loop straps (To attach to Mic Stands – one option)
2x Mic Stands (unless building frame)
2”x4”x10’ wood for frame construction (optional)
3 x Low profile Casters for rolling frame (optional)

Assembly instructions
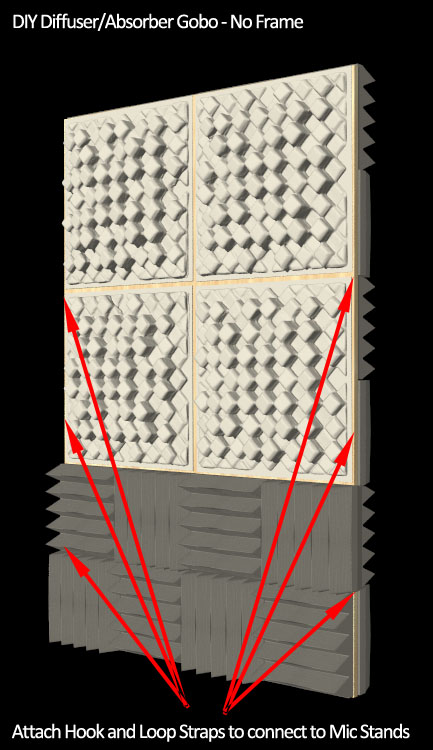 A simple “no-frame” construction method is first described to give you the quick and easy option of just attaching some straps to a couple mic stands.
Use Construction adhesive to attach the Cutting Wedge® Foam to the back of the panel in a checkerboard pattern (each panel 90° rotated from adjacent.) Then flip the panel and attach the 8 Cutting Wedge® panels to the bottom of the front. (the bottom of the gobo creates a corner with the floor, we want to put absorption there to limit the bass.)
Use Construction adhesive again to attach the 4 Diffusers to the top and front of the Plywood (Follow the installation instructions for adhesive placement)
If you with to attach to mic stands, just attach the hook and loop straps to the panel along the edge, roughly where the diagram to the right is indicating, and you are done…
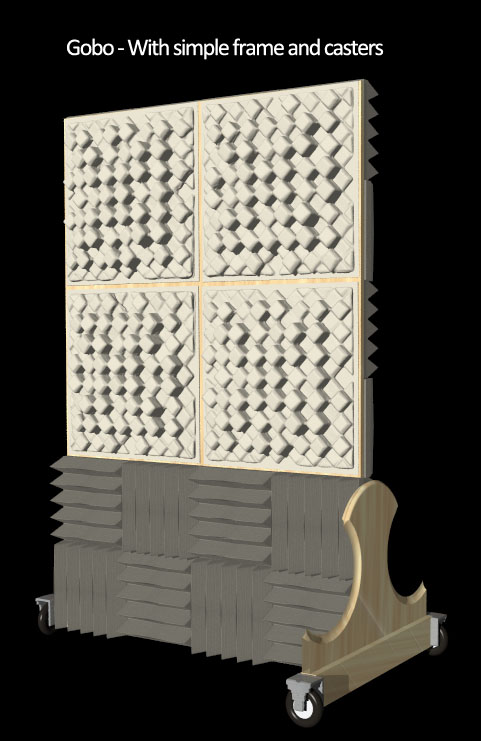
If you would like to create a simple rolling frame, a design for one is shown in the bottom diagram on the right. Other frame designs can be used; they can even be hung from the ceiling if you are going to keep reusing the same configuration, or if the configuration is going to be used long term.
One of the great benefits of building gobos is the flexibility you have in your use and placement of them. They can allow for your space to seem much larger, by creating separation between instruments. They are easily made, easy and quick to set up, they can be stored away, or just lean up against a wall or corner to provide more acoustic treatment when not in use.
 Create a mini vocal booth.
Use as a giant corner bass trap.
Enclose your noisy drummer.
Gobos have hundreds of uses.
Make your own today!
This simple DIY project is provided as a way for our customers to learn better ways to use our products and get more value out of the products they buy. If you are looking for more ways to use the products you have, look to Acoustics First for Ideas. http://www.acousticsfirst.com
A little History…
If you embark on this little construction project, you will be constructing studio elements that have remained basically unchanged since at least the early 1970’s. Handmade Gobos have been used in many of the top studios for effective noise control for over 40 years – These versions pay homage to those early pioneers who built what they needed, because it was the only way to get exactly what they needed.

————————————————————————————————————————————————————————————
Acoustics First Corporation supplies acoustical panels and soundproofing materials to control sound and eliminate noise in commercial, residential, government, and institutional applications worldwide. Products include the patented Art Diffusor®, sound absorbers, noise barriers, acoustical fabrics and accessories. Acoustics First® products are sold for O.E.M applications, direct, and through dealers. For more information on acoustical materials and their application, please visit www.AcousticsFirst.com or call Toll Free 1-888-765-2900 (US & Canada).

You must be logged in to post a comment.