Archive for category Recording Facilities
DIY: How to quiet down that noisy equipment rack
Posted by Acoustics First in Absorption, Auditorium, Broadcast Facilities, Data Centers, DIY, Government, Home Entertainment, Home Theater, HOW TO, Media Room, Music Rehearsal Spaces, Music Tracking Room, Product Applications, Recording Facilities, Recording Studio, Sound proofing, Studio Control Room, Vocal Booth on May 2, 2013
 DIY Project – Rack issues
Take a few seconds and DIY fix some of the common problems with using equipment racks!
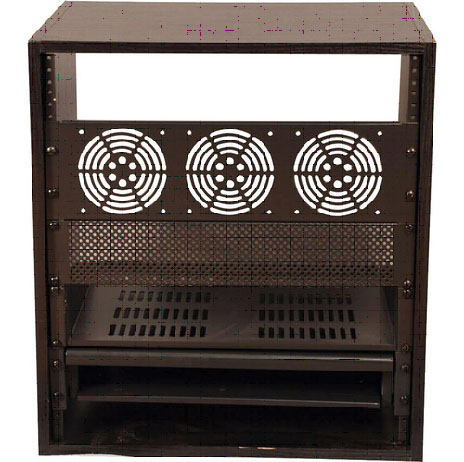
Not too many people think about their equipment racks, but many of us use them. Usually it’s something like what you see to the right – the great, sturdy, utilitarian box. Unfortunately, there are a couple inherent problems with these:
- Ringing – The metal resonates causing a ringing effect – may be masked by program material.
- Reflections – many times your rack is near sound sources causing reflections off the hard surfaces.
- Noise – Fans and other devices in the rack can make noises that are disruptive to recording.
Here are a few DIY fixes for these common problems.
- Composite foam with adhesive backing is perfect for stopping the ringing of filler panels.
- FireFlex™ acoustical foam the inside of your rack to keep the noise down.


- Use some Composite Foam to line your trays, drawers and shelves to keep items from rattling around inside the case.
- Cover your rack in Sound Channels® fabric to keep the case from causing harsh reflections.
- Make a temporary cover for the front and back with BlockAid® sound barrier with minimal ventilation cut-outs to use during takes if rack-borne noise is problematic.
This simple DIY project is provided as a way for our customers to learn better ways to use our products and get more value out of the products they buy. If you are looking for more ways to use the products you have, look to Acoustics First for Ideas. http://www.acousticsfirst.com
————————————————————————————————————————————————————————————
Acoustics First Corporation supplies acoustical panels and soundproofing materials to control sound and eliminate noise in commercial, residential, government, and institutional applications worldwide. Products include the patented Art Diffusor®, sound absorbers, noise barriers, acoustical fabrics and accessories. Acoustics First® products are sold for O.E.M applications, direct, and through dealers. For more information on acoustical materials and their application, please visit www.AcousticsFirst.com or call Toll Free 1-888-765-2900 (US & Canada).
DIY: How to build a Studio GoBo
Posted by Acoustics First in Absorption, Articles, Broadcast Facilities, Diffusion, DIY, HOW TO, Multipurpose Rooms, Music Tracking Room, Product Applications, Recording Facilities, Recording Studio, Studio Control Room, Vocal Booth, Voice Over on April 18, 2013
DIY Project: Diffuser Array/Absorber GOBO
By: James DeGrandis
Mobile DIY option for creating new spaces with GOBOs!
As studio spaces get smaller, and budgets get tighter, we like to find new ways to maximize our budgets and our spaces, without removing quality. One issue with small room recording is getting sufficient separation between instruments – and here’s one DIY project to help you master your space without compromise.
Stuff you need:
4’x 6’ sheet of 3/4” Plywood (This can be scaled up or down depending on need.)
32 sq/ft of 4” Cutting Wedge® Classic Acoustical Foam (Or similar absorber)
4 x Art Diffusors® – Model C (or Model F, Quadrapyramid™, or other comparable diffuser)
Construction adhesive
6-8 Hook and loop straps (To attach to Mic Stands – one option)
2x Mic Stands (unless building frame)
2”x4”x10’ wood for frame construction (optional)
3 x Low profile Casters for rolling frame (optional)

Assembly instructions
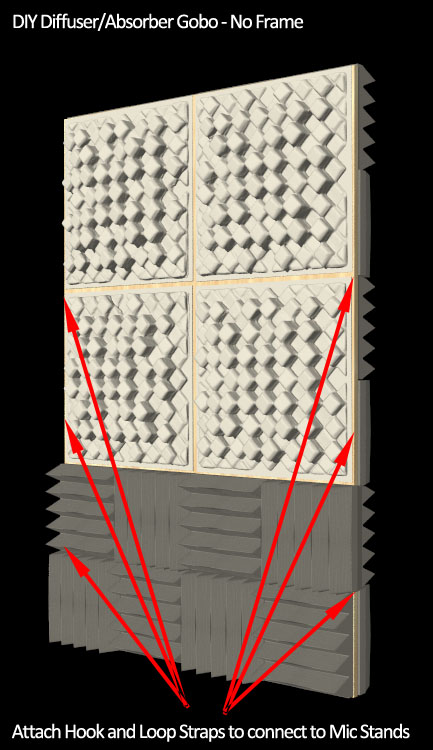 A simple “no-frame” construction method is first described to give you the quick and easy option of just attaching some straps to a couple mic stands.
Use Construction adhesive to attach the Cutting Wedge® Foam to the back of the panel in a checkerboard pattern (each panel 90° rotated from adjacent.) Then flip the panel and attach the 8 Cutting Wedge® panels to the bottom of the front. (the bottom of the gobo creates a corner with the floor, we want to put absorption there to limit the bass.)
Use Construction adhesive again to attach the 4 Diffusers to the top and front of the Plywood (Follow the installation instructions for adhesive placement)
If you with to attach to mic stands, just attach the hook and loop straps to the panel along the edge, roughly where the diagram to the right is indicating, and you are done…
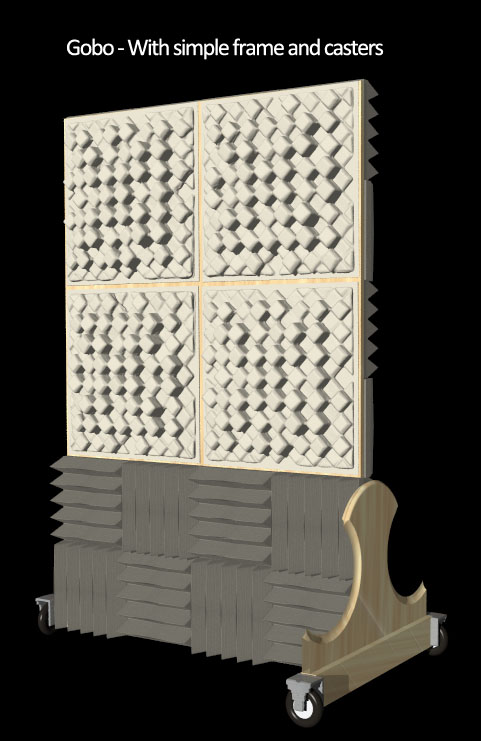
If you would like to create a simple rolling frame, a design for one is shown in the bottom diagram on the right. Other frame designs can be used; they can even be hung from the ceiling if you are going to keep reusing the same configuration, or if the configuration is going to be used long term.
One of the great benefits of building gobos is the flexibility you have in your use and placement of them. They can allow for your space to seem much larger, by creating separation between instruments. They are easily made, easy and quick to set up, they can be stored away, or just lean up against a wall or corner to provide more acoustic treatment when not in use.
 Create a mini vocal booth.
Use as a giant corner bass trap.
Enclose your noisy drummer.
Gobos have hundreds of uses.
Make your own today!
This simple DIY project is provided as a way for our customers to learn better ways to use our products and get more value out of the products they buy. If you are looking for more ways to use the products you have, look to Acoustics First for Ideas. http://www.acousticsfirst.com
A little History…
If you embark on this little construction project, you will be constructing studio elements that have remained basically unchanged since at least the early 1970’s. Handmade Gobos have been used in many of the top studios for effective noise control for over 40 years – These versions pay homage to those early pioneers who built what they needed, because it was the only way to get exactly what they needed.

————————————————————————————————————————————————————————————
Acoustics First Corporation supplies acoustical panels and soundproofing materials to control sound and eliminate noise in commercial, residential, government, and institutional applications worldwide. Products include the patented Art Diffusor®, sound absorbers, noise barriers, acoustical fabrics and accessories. Acoustics First® products are sold for O.E.M applications, direct, and through dealers. For more information on acoustical materials and their application, please visit www.AcousticsFirst.com or call Toll Free 1-888-765-2900 (US & Canada).
DIY: Fix Music Stand Ringing and Reflection
Posted by Acoustics First in Absorption, Articles, Broadcast Facilities, DIY, HOW TO, Music Rehearsal Spaces, Music Tracking Room, Product Applications, Recording Facilities, Recording Studio, Studio Control Room, Vocal Booth, Voice Over on April 4, 2013
DIY Project – Music/Copy Stand Cover
Take a few seconds and DIY fix some of the common problems with using metal music stands!
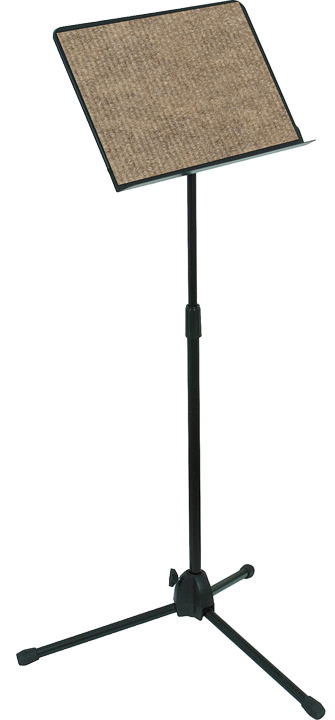 Not too many people think about their music stands, but we all have them somewhere. Usually it’s one of those you see to the right – the great, sturdy, utilitarian devices that they are. Unfortunately, there are a couple inherent problems with these:
- Ringing – The metal resonates causing a ringing effect.
- Reflections – many times you are using a stand close to a microphone and getting early reflections off the stand.
Here’s a few DIY fixes for these common problems.
- 1 yard of Sound Channels® acoustical fabric will reduce reflections back to the microphone – for up to 4 stands!
- 3 Linear feet of BlockAid® Sound Barrier will reduce ringing and resonance.
- a few feet of composite foam will give you both reflection and ringing fixes
The ultimate suggestion would be the Composite Foam/Barrier adhered directly to the stand, then covered with Sound Channels® fabric – This would turn your stand into a mini absorber.
Do the front and back! Make a slip cover for a temporary/removable solution.
This simple DIY project is provided as a way for our customers to learn better ways to use our products and get more value out of the products they buy. If you are looking for more ways to use the products you have, look to Acoustics First for Ideas. http://www.acousticsfirst.com
————————————————————————————————————————————————————————————
Acoustics First Corporation supplies acoustical panels and soundproofing materials to control sound and eliminate noise in commercial, residential, government, and institutional applications worldwide. Products include the patented Art Diffusor®, sound absorbers, noise barriers, acoustical fabrics and accessories. Acoustics First® products are sold for O.E.M applications, direct, and through dealers. For more information on acoustical materials and their application, please visit www.AcousticsFirst.com or call Toll Free 1-888-765-2900 (US & Canada).
Acoustic First Ceiling Tiles get a face lift for the perfect fit to any application
Posted by Acoustics First in Absorption, Art Galleries, Auditorium, Broadcast Facilities, Classrooms, Fitness, Government, Home Entertainment, Home Theater, Hospitals, Media Room, Museums, Offices, Press Release, Product Applications, Recording Facilities, Restaurants, School & Educational Facilities, Studio Control Room, Teaching Rooms, Teleconferencing, Theater, Universities, Vocal Booth, Voice Over, Worship Facilities on March 28, 2013
For Immediate Release
Acoustic First Ceiling Tiles get a face lift for the perfect fit to any application.
 Acoustics First® has expanded their line of acoustical ceiling tiles allowing you to dress up any ceiling grid with a generous number of finish options. The legacy line of Sonora® ceiling tiles includes fabric faced ceiling tiles in either the standard square edge or a tegular edge that reveals below the grid. These tiles are available in a multitude of fabric colors and can be utilized in a wide range of applications to provide an upscale ceiling system that looks as good as it sounds. If you are looking for the absence of color, there are now two white options. The Sonora® UltraWHITE facing provides a basic smooth white finish while the Sonora® Nubby tile provides a texture white appearance. White ceiling tiles are an excellent choice for areas where a seamless look is desired and maintaining a room that is both bright and vibrant. Alternatively, if your application requires the ceiling to disappear, a black scrim version is also available. These black scrim ceiling tiles are a popular choice for public theaters, home theaters, restaurants or any application where a dark ceiling is desired. Additionally, choose from either a PVC faced or encapsulated ceiling tile if your application requires a wipe-able surface for resistance to liquids and dirt. Test labs, animal shelters, restaurants and similar facilities may require their ceiling tiles to be cleaned on a regular basis. In addition the ample amount of absorptive ceiling tiles, Acoustics First® also carries a wide range of diffusive ceiling tiles including the patented Art Diffusor® Model C and Model F. Product information, specifications and pricing can be found on the website @ http://www.acousticsfirst.com/sonora-ceiling-tiles.htm.
Image Downloads: http://www.mediafire.com/?21id1fsb0btrq
www.AcousticsFirst.com
Acoustics First Corporation
————————————————————————————————————————————————————————————
Acoustics First Corporation supplies acoustical panels and soundproofing materials to control sound and eliminate noise in commercial, residential, government, and institutional applications worldwide. Products include the patented Art Diffusor®, sound absorbers, noise barriers, acoustical fabrics and accessories. Acoustics First® products are sold for O.E.M applications, direct, and through dealers. For more information on acoustical materials and their application, please visit www.AcousticsFirst.com or call Toll Free 1-888-765-2900 (US & Canada).
DIY: Isolation Stand for Speakers and Instrument Amplifiers
Posted by Acoustics First in Articles, Broadcast Facilities, DIY, Home Entertainment, Home Theater, HOW TO, Music Rehearsal Spaces, Music Tracking Room, Product Applications, Recording Facilities, Recording Studio, Studio Control Room on March 21, 2013
DIY Project – Float your Loudspeakers and Monitors
Keep your Amps and Monitors from shaking the house down!
Instrument amplifiers, loudspeakers, and studio monitors all have the potential to cause structural vibrations. These vibrations can have an adverse effect on the listening environments, and can bleed into other microphones and instruments. Here’s an easy DIY project for floating those noisy guitar and bass cabinets (this project can be scaled up or down – from studio monitors to subwoofers).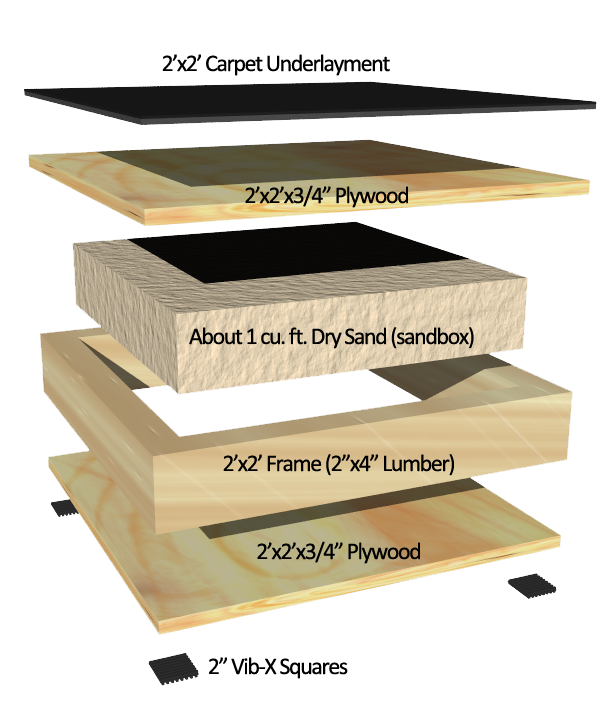
Stuff you will need:
- 2 – 2’x2’x3/4” Plywood (whatever size you want)
- 2’x2’ Carpet Underlayment (Same size as Plywood)
- 2”x4”x8’ Lumber for frame (More if scaling larger)
- About 1 cu.ft. Clean Dry Sand (Sandbox Sand)
- 3’x3’ Industrial Carpet (Enough to cover platform)
- Vib-X Pad to cut at least 4 – 2” Squares for feet
- Construction Adhesive
Simple assembly
- Create Frame and attach to bottom Plywood
- Attach Vib-X feet to bottom
- Fill with Sand
- Attach Plywood top
- Adhere Carpet Underlayment to top
- Carpet Box
 This plan is for a 2’x2’ platform. You can scale these or use more than one. Scale with caution – the sand makes these extremely heavy. What you are building is a floating platform. Keeping the sound from being transmitted into the floor below effectively decouples the speaker, making it “float”. In essence, the vibrations are being absorbed before getting to a solid surface, allowing for a more transparent listening experience and keeping the vibrations from interfering with other instruments in the area.

This simple DIY project is provided as a way for our customers to learn better ways to use our products and get more value out of the products they buy. If you are looking for more ways to use the products you have, look to Acoustics First for Ideas. http://www.acousticsfirst.com
————————————————————————————————————————————————————————————
Acoustics First Corporation supplies acoustical panels and soundproofing materials to control sound and eliminate noise in commercial, residential, government, and institutional applications worldwide. Products include the patented Art Diffusor®, sound absorbers, noise barriers, acoustical fabrics and accessories. Acoustics First® products are sold for O.E.M applications, direct, and through dealers. For more information on acoustical materials and their application, please visit www.AcousticsFirst.com or call Toll Free 1-888-765-2900 (US & Canada).

You must be logged in to post a comment.