Archive for category Articles
The Spellbinding World of Owl Acoustics…
Posted by Acoustics First in Articles, Uncategorized on October 16, 2025
Today we thought we’d take a break from the usual Acoustics First blog topics and talk about owls and the fascinating way in which they experience acoustics. Owls possess some of the sharpest hearing in the animal kingdom. But what makes their hearing so exceptional and how does it differ from our own?
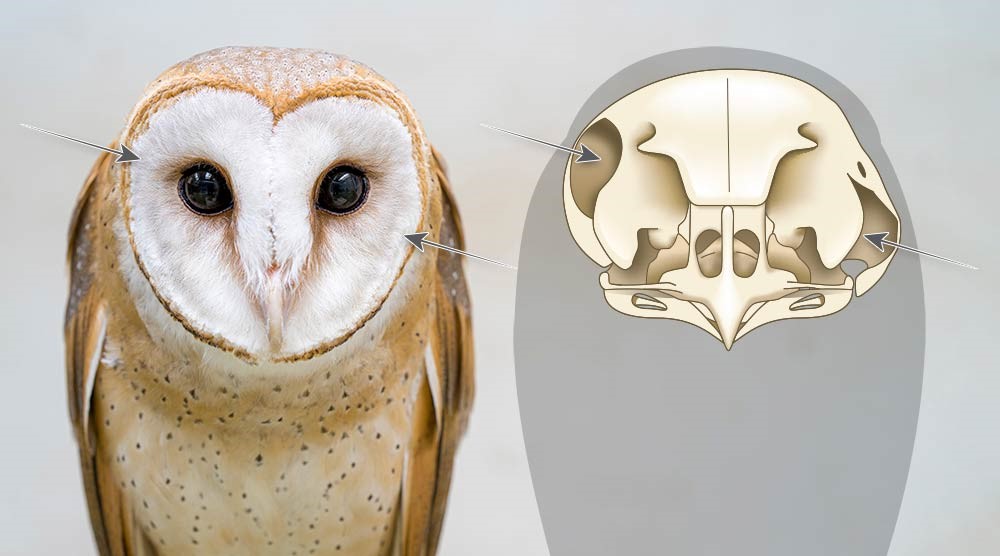
The secret lies in the unique structure of their faces and ears. Owls have flat, circular faces which gives them an incredible ability. Their facial discs, a set of specialized feathers arranged in a ring around their face, act like a natural sound collector, similar to a satellite dish picking up signals. These feathers are flexible, allowing them to adjust their position for optimal sound gathering. The sound they collect is then funneled into their ear openings located on the sides of their head. Imagine if we could move our ears to “zero in” on a particular sound!

Now, you might be wondering about those “ears” that stick up from an owl’s head. These aren’t actually ears at all! Those feathers are called plumicorns, and while they help with camouflage and communication between owls, they don’t contribute to hearing. The true ear openings are located on the sides of the owl’s head, much like humans. These openings are protected by a layer of feathers, and in some species, they even have movable flaps that can cover the ears. These flaps don’t interfere with hearing; they help reduce the sound of air turbulence when the owl is in flight.
What makes an owl’s hearing even more extraordinary is the position of its ear-holes. Unlike most animals, owl ear openings are asymmetrical, meaning one ear sits higher than the other. This unique design allows them to pinpoint sounds not only left or right, but also above or below. Thanks to this setup, owls can triangulate the source of a sound with incredible precision—sometimes within millimeters! This ability allows them to swoop down and catch prey they’ve never seen. The degree of asymmetry varies among owl species—some, like the Northern Saw-Whet, have a noticeable difference in ear placement, while others have more subtle variations. Either way, it’s an impressive adaptation!
Humans, like many other animals, have symmetrical ear-holes, making it more difficult for us to pinpoint whether a sound is coming from above, below or directly in front of us. This is why central clusters of speakers installed above a lectern effectively make the sound feel like it’s coming directly from the orator, not from the ceiling speakers.
Owls also have a “sound-location memory” that further enhances their hearing. When they hear a sound, their brains create a mental map of its location relative to the owl’s position. Special cells in their brain help process sounds from different directions, allowing them to track and locate the sound later.

Finally, like dogs, owls have a broader range of hearing than humans, and they can detect finer details within sounds. According to researchers, owls can hear sounds much faster than we can. While humans process sounds in increments of about 50 milliseconds, birds can discern sounds as short as 5ms. This means that where humans might hear a single note, owls may hear up to 10 distinct notes. Their auditory skills are truly out of this world—and it makes you wonder what we might be missing in our own world of sound!
Sabins, SAC, & NRC — a practical guide.
Posted by Acoustics First in Absorption, Articles, HOW TO on September 18, 2025
When optimizing a room’s acoustics, you’re often balancing how much sound is absorbed (loss) against how much bounces around (reverberation). Some common ways to describe absorption — sabins, SAC, and NRC — look different, but they’re closely related.
Sabins
A sabin is a direct measure of absorption: One sabin equals the sound-absorbing effect of one square foot of a perfectly absorbing surface (like an open window – sound goes out, but doesn’t come back.) In practice, manufacturers or labs will report a component’s equivalent absorption area in sabins at various frequencies. Sabins are additive: add the sabins of all items in a space to get the room’s total absorption for use in reverberation calculations.

SAC
Sound absorption coefficients (SAC) are used to simplify large square footage calculations. Each SAC itself is derived from the measured equivalent sabins of a test sample divided by the sample’s area. This allows you to multiply the square footage of a certain material by the SAC and it will tell you how many sabins it will absorb at a certain frequency. You may also see an average of all the SACs, or a subset of those values… a specific, often-used subset is the Noise Reduction Coefficient (NRC).
NRC and how it’s calculated
NRC (Noise Reduction Coefficient) is a number that represents a material’s average absorption performance at mid-to-high frequencies. It’s calculated by taking the arithmetic average of the material’s sound absorption coefficients (SACs) at 250 Hz, 500 Hz, 1000 Hz and 2000 Hz (per ASTM C423 or other standard test procedures). NRC is typically reported to the nearest 0.05 and runs from 0.00 (reflective) to 1.00 (very absorbent). Being an average, it isn’t the most accurate method, but it can give you a quick estimate which can be useful in the planning stages.

Practical Mathematic Relationship
- From measured data: SAC = measured sabins ÷ sample area.
- NRC is the average of SACs across four bands (250 Hz, 500 Hz, 1000 Hz and 2000 Hz).
- To convert NRC into a working absorption number for a planar surface:
sabins = NRC × area (ft²). - For discrete units (baffles, clouds): manufacturers often give sabins per unit, so total absorption is sabins per unit × number of units.
Why sabins for baffles and NRC for wall/ceiling panels?
Hanging devices like baffles are three-dimensional, exposed on multiple faces, and their effective absorption depends on orientation, spacing, and edge behavior. It’s more accurate and user-friendly to report their absorption as “# sabins per unit.” Flat-mounted wall or ceiling panels cover a known area and behave predictably per square foot, so SAC or an NRC (per ft²) is a convenient, normalized way to estimate absorption across a room.
Putting it into RT60 calculations
RT60 calculations depict the amount of time it takes for a sound to decay 60dB in a particular space with specific treatments. (60dB is roughly a 1000-fold reduction in sound pressure.) Reverberation-time formulas (like Sabine’s) use the room’s total absorption in sabins in the function. A basic average will use NRC × area for planar coverage and add sabins-per-unit for baffles. Sum everything up to get total sabins, then plug that into your RT calculation to estimate RT60.
If using feet your calculation is…
RT60 = 0.049 x Room Volume ÷ Total Sabins
If using metric your calculation is…
RT60 = 0.161 x Room Volume ÷ Total (Metric) Sabins
In summary:
NRC is an area-based average (for flat-coverage estimates); SAC is a sabins per square foot coefficient (for efficient absorption calculations using area); sabins per unit are direct, measured absorption values (better for discrete, hung, multi-faced items).
Similar, yet Different: Pyramid vs. QuadraPyramid
Posted by Acoustics First in Articles, Product Applications, Products on November 15, 2024

Based on the golden-ratio, offset pyramid… both the Acoustics First® Pyramids and QuadraPyramids have a great deal in common. They are asymmetric in their scattering, which reduces lobing. They have different sized surfaces of different angles, which impose different polar radiation patterns at different frequencies. Both allow for redirection, while allowing much of the signal phase to remain intact, which keeps a great deal of energy moving together, which works great for performance spaces. However, there are some subtle differences which change how these units perform and how you maximize their use.
While both the Pyramidal and the QuadraPyramid come in a 2’x2′ format, the QuadraPyramid packs 4 pyramids into that footprint. That isn’t the only difference though. The depth of the QuadraPyramid is only about 2-3/4″ to the 8″ deep single peak of the classic Pyramidal. On top of that, the Pyramidal comes in different sizes and ratios of length to width including a 4’x4′ and a 2’x4′ at up to 13″ deep.
These different sizes do more than change their aesthetic. The large pyramid geometry allows for greater impact on lower frequencies, as the longer wavelengths are less skewed by small surfaces. The different ratios and sizes also changes the angle of throw off the surfaces, allowing for more options to redirect the sound. The larger surfaces also impose some limitations to their use. Being physically larger means that the listener will need to be further away from the device to allow the reflections to spread out, and the greater depth means that, at certain angles, the geometry can place other devices in their acoustic shadow. The larger pyramids work great in larger rooms with high ceilings, where they can be placed higher in the room. This makes them ideal for performance spaces and large band/music practice rooms – where everyone is spread around and needs to be able to hear everyone else.

The QuadraPyramids have a higher density of reflective faces per square foot. There are 16 facets on a 2’x2′ QuadraPyramid, which means more smaller faces to reflect sound. These faces are optimized for higher frequencies which have shorter wavelengths – but the profiles are actually better suited for smaller rooms with lower ceilings. In smaller studios, listening rooms, and media spaces, space is at a premium, and having a large diffuser hanging a foot down from the ceiling would be more of an impediment. This is where the QuadraPyramids shine. Their low-profile and many facets allow for sounds to spread out while breaking up flutter echoes and reducing other higher frequency artifacts.

Finally, the size of the cavity behind the larger pyramid allows for greater bass trapping, especially with the ability to fill the cavity with fluffy insulation. While the QuadraPyramid still imparts some absorption due to the resonance of the thermoformed plastic material, it is more focused at the resonant frequency (250Hz) – while the larger pyramids have a wider frequency range they affect.
| Device | 125hz | 250Hz | 500Hz | 1000Hz | 2000Hz | 4000Hz | NRC |
| 2’x2′ Pyramid (insulated) | 0.57 | 0.41 | 0.38 | 0.21 | 0.16 | 0.16 | 0.30 |
| 2’x2′ Quadra Pyramid | 0.23 | 0.58 | 0.05 | 0.04 | 0.04 | 0.11 | 0.20 |
While the Pyramid and the QuadraPyramid have their roots in the same geometry, their specific implementation changes their performance characteristics to provide more options in treating your space. Using the right treatment changes depending on the space and its function… even two identical rooms can have drastically different performance requirements – needing drastically different treatments. Acoustically, a Quadrapyramid is drastically different than a 2’x4′ Pyramid – but fundamentally, at their core, they are very similar.
Acoustical Considerations for Classrooms
Posted by Acoustics First in Absorption, Articles, Classrooms, Product Applications, Products, School & Educational Facilities, Teaching Rooms on September 19, 2024
Poor classroom acoustics has long been the invisible problem that has the farthest reaching implications for learning. Excessive noise and reverberation degrade speech intelligibility, resulting in reduced understanding and therefore reduced learning. In many classrooms in the United States, the speech intelligibility rating is 75% or less. That means, in speech intelligibility tests, listeners with normal hearing can only understand 75% of the words read from a list. Imagine reading a textbook with every fourth word missing. Wouldn’t that make comprehension near impossible? Fortunately, poor classroom acoustics can usually be remedied with some basic knowledge and commercially available treatment. But before getting into specific treatment, let’s go over some basic acoustic principles.
Noise
Obviously, it’s difficult to understand what the instructor is saying when there is a lot of naturally occurring noise in the room. A glut of factors can be considered noise sources, including HVAC “rumble”, traffic outside the building and students moving in their chairs. These sources contribute to a “noise floor” that makes understanding speech very difficult. Since there is no one “cure-all” for an excessive noise floor, it is often best to seek the assistance of a professional acoustical consultant to properly diagnose and find a solution to these issues.
Reverberation: Undesirable vs Useful Reflections
When not attributed to a noise issue, the culprit of poor classroom acoustics is often excessive reverberation. In simple terms, reverberation is the sound energy that remains in the listening environment as a result of lingering reflections. As mentioned before, these reflections can easily interfere with speech intelligibility. As you may have experienced at some point, it can be difficult to understand what is being said when reflections from old information cover up what is newly spoken.
The reverberation time (RT or RT60) is used to determine how quickly sound decays. The RT is dependent upon the volume and surface materials of a given room. Large spaces with hard materials (tile, drywall, etc.) have longer reverberation times, while small rooms built with “softer” materials sound more “dead”. Ideally, classrooms should have relatively short RT’s, somewhere in the .6-.8 second range.
A long reverberation time is not the only factor that should be considered when treating a classroom with poor acoustics. Flutter echo is a particularly significant problem when it occurs between the side walls at the front of the classroom where the teacher is speaking. This condition can be heard as a “ringing” sound (when one claps) as the sound rapidly bounces back and forth between two parallel walls. Flutter and other discrete echoes are considered “undesirable reflections” and should be controlled with absorptive or diffusive materials.
Not all reflections are bad though. There are “useful reflections” that reinforce spoken word, rather than cover it up. The teacher’s voice can be propagated throughout the room by shaping a sound reflecting gypsum board ceiling over the front of the room or by making the center of the ceiling a hard, reflecting surface (see figure 1). This will help project the speaker, so they don’t have to strain their voice to be heard over the students.

Reducing Reverberation
Often reducing the dimensions of a classroom to attain a more suitable reverberation time is not feasible, but one can improve the acoustics by introducing sound absorptive materials. Typical classrooms usually have a dropped “acoustical” ceiling that has some absorptive qualities. In classrooms that don’t have this ceiling, reverberation can be reduced by installing an acoustical ceiling or a number of fabric faced fiberglass panels, like Sonora® Ceiling Clouds. Likewise, if there isn’t carpeting in the room, you can marginally reduce the reverberation time by installing sound absorptive flooring.
Wall treatment: Acoustic Panels
If the ceiling and floor are at least rudimentarily treated, then hard walls are usually at fault for poor speech intelligibility. Absorptive wall panels, like Acoustics First Sonora® panels, are a common treatment to control lateral reflections and reverberation.
These panels are popular because they can be customized with a variety of colors, edge designs and fabric facings. They also can come with a high-density fiberglass adder that improves durability. In classrooms, these “Hi-impact” panels are particularly useful because the adder allows for the panels to be used as tack boards. This brings an extra level of functionality to the panels outside of their absorptive properties.
Though wall panels are a perfectly suitable treatment, uncovered areas between the panels can sometimes allow a few hard reflections and/or flutter echo to still occur (although full treatment of the walls would likely result in a room sounding too “dead”). For these situations, Acoustics First often recommends Sound Channels® acoustic wall fabric.

Acoustical Wall Fabric
In many instances, acoustic wall fabric is actually a viable alternative to traditional wall panels. Unlike a typical “wall carpet”, Sound Channels® is made of 100% recycled content and has ridges to increase surface area and absorption. Perhaps most importantly, the uniform coverage you get by treating the walls with acoustic wall fabric eliminates the flutter/slap from reflective parallel walls (without making the space too “dead”). Acoustic wall fabrics are generally light weight and most can be put up just like any other wallcovering.
Also of note are the additional benefits when using Sound Channels® in early education classrooms. The effective range that this wall fabric controls is the higher speech frequencies, which is the ideal range for classrooms with younger children (there are not many bass/baritone kindergarteners). Another advantage is in keeping the treatment clean. Wall panels may suck up sound, but they can also absorb fluids (like the occasional juice box). Sound Channels®, on the other hand, is resistant to moisture, mildew and rot. It is also is non-allergenic, easy to clean, and is highly resilient to common wear.
Acoustical Considerations for Classrooms
Although this knowledge has been around for decades, classrooms across the country continue to be plagued by a lack of acoustical forethought. Perhaps as this information becomes more readily available to architects, contractors, administrators and teachers we will begin to see (and hear) better sounding classrooms. School is challenging enough on students and teachers as it is, let’s not compound their daily obstacles by continuing to overlook classroom acoustics.
(Originally published in Christian School Products Magazine – November, 2015)
Why use a mix of objective and subjective goals to make a great sounding space?
Posted by Acoustics First in Articles, Media Room, Music Tracking Room, Recording Facilities, Recording Studio, Studio Control Room on July 30, 2024
With the ability to measure and analyze every detail of an acoustic environment, sometimes we forget about the basic fact that it should sound the way we want it to sound. There are scenarios where objective measurement is important, desired, and even required. If there is a physical safety concern that may damage hearing ( loud noises, machinery, etc.), a need to have safety information understood (evacuation/safety notices or alarms, etc.), absolute sound privacy is required (HIPAA regulations, government security, or legal need…), or the need for speech clarity for education… often we require some guidelines be met to insure the acoustics meet a decided standard for performance. These standards use objective measurement and data to make these determinations. There isn’t a governing body that regulates how your home theater should perform, or how an office needs to sound (beyond the safety and privacy concerns mentioned above.)

Entertainment venues, theaters, churches, commercial spaces, restaurants, offices, and residential spaces have very little regulation, and while there are many occasions that testing is used to improve the performance of these spaces, there are some environments where the effort to measure and quantify everything can get in the way of the goal of making a great acoustic space. If you wanted to compare different small “critical listening environments” (mixing and mastering studios are examples of these), there would be some general commonalities in their construction and treatment. Many are built to minimize parallel reflections, have short reverb times, symmetric placement of source speakers, control first reflections, and balance the frequency performance of the space.
A “ruler-flat” frequency response shouldn’t be the acoustic goal.
“Balancing the frequency performance of a space” doesn’t mean “attain ruler-flat frequency response across the entire human hearing range.” There are several reasons that the “ruler-flat” interpretation is counterproductive – the first being that it is nearly impossible to attain in any room. Second, is that everyone perceives sound differently. As humans age, almost all people will experience some degree of “presbycusis,” which is slow decline in high-frequency sensitivity that comes with age. If you are lucky enough to reach a ripe old age, there is a 60% – 80% chance (depending on the study you read) that your high-frequency hearing won’t be what it was when you were young. But even with that factor removed, when your hearing was at its best, your personal perception of sound is different from every other person – making sound, by definition, subjective.

The closest you can get to ruler-flat performance is to remove the room entirely and get some high quality headphones – but you may still find yourself tweaking the equalization curve to your preference. There are many people who feel that headphones sound unnatural, or that they are uncomfortable to listen to for long periods of time. Even the best mixing studios are not completely flat. Also, you will see many different sets of speakers in these spaces… or even headphones. These different sources are to compare how a mix will sound in different environments… and that the mix will “translate” in different listening scenarios. These environments which people will listen to music in vary to include outdoors, bathroom, kitchen, movie theater, grocery store, car, truck, SUV, convertible, living room, and more… coming from sources like phone speakers, headphones, assistants like echo and Google, bookshelf speakers, sound bars, audiophile equipment, movie theater sound systems, and an array of automotive audio systems.

Start with the basics.
If you are making a space for critical listening, there are some objective guides that will help you. If building from scratch, build with a geometry that will reduce room modes and parallel surfaces. Reduce reflections that will interfere with the source. Reduce reverb time. Control the bass response to reduce build up. These can all be readily calculated, measured, and controlled with bass traps, absorption, and diffusion. Most of the time, just following these objective guides will get you a room that will sound subjectively “good.”
After you get that far, you could continue trying to measure the room and tweak the performance to try and attain the unattainable ruler-flat response… or you could listen to music in your room and decide with you ears what should to be done to make it sound how you want. There are many subjective arguments people make about why they think something sounds better. There are philosophical arguments about listening to it “as the engineer/artist intended.” There are debates about if you should equalize music at all – even if you are in the majority of the aging population who may need to give the high-frequencies a nudge to experience the sizzle of Stevie Wonder’s glorious high-hat mastery.
When it comes to your own space… if it sounds good to you… it’s right. By following a few objective guidelines to get you in the arena, you can tweak the last bit with your ears until you are experiencing the material the way you prefer it to sound.

You must be logged in to post a comment.