Similar, Yet Different: Aeolian® vs. MiniAeolian™
Posted by Acoustics First in Broadcast Facilities, Home Entertainment, Home Theater, Media Room, Multipurpose Rooms, Music Rehearsal Spaces, Music Tracking Room, Product Applications, Products, Recording Facilities, Recording Studio, Studio Control Room, Uncategorized, Vocal Booth, Worship Facilities on September 28, 2023

In this installment of “Similar, Yet Different”, we are going to compare the two current variations of the popular Aeolian® Diffuser – the original 2’x2′ Aeolian and the 1’x1′ MiniAeolian™!
Design
This comparison has some similarities to the very first “Similar, Yet Different” post we made comparing the ArtDiffusor® Model C to the ArtDiffusor® Model F. We are looking at a diffuser that uses identical mathematic functions to create the shape… both the Aeolian® and the MiniAeolian™ are an “Organic Quadratic” constructed from a Bicubic Interpolation of a Quadratic Residue Function. They are both truncated so that they are completely asymmetric, even to the edge. The MiniAeolian™ IS an Aeolian®, only it is scaled differently.
You may recall that the Model F was constructed of 4 scaled down Model C diffusers in a monolithic 2’x2′ tile – This is not the case with the MiniAeolian™. The Original Aeolian® Diffuser is a 2’x2′ footprint that is 5″ tall, and will fit in a standard 2’x2′ ceiling grid. The MiniAeolian™ is a single scaled down unit, and it is a little different – The 1’x1′ footprint stands alone as a single unit, but it is only scaled down in height to 4″.
In this case, form follows function. The MiniAeolian™ was built to fill a specific function as a smaller wall-mount unit, or a direct-mount ceiling unit for smaller spaces. Part of this wall-mount function was to have a version of the Aeolian® that would fit in tight areas or in spaces that didn’t have enough clearance for the 5″ standard Aeolian® (or would require modification to those areas (or diffusers) to allow this extra height). Some people implement configurations that have tighter footprint requirements, and the 1’x1′ footprint of the Mini allow it to be used in these types of layouts.
Performance
So how does this change affect the performance of the unit? Surprisingly, they are quite similar. The Organic curved design, with only a 20% reduction in height, shows only minor differences in performance of their overall frequencies ranges – with both primary ranges starting at about 1500Hz-1600Hz with and average between 150° and 170° of horizontal and vertical dispersion up to between 5Khz and 7Khz. While the primary range is a good indicator, when we look at the actual polar response, we can get a better picture of their full range performance.

A quick glance shows two very similar performing diffusers, except for the low-frequency performance. The larger elements and deeper formfactor of the original Aeolian® are more effective at the 1000Hz range, where the MiniAeolian™ appears to be mostly specular. There are some surprises however. It appears that at the 2000Hz range leans slightly in the favor of using 4 MiniAeolians™ in an array verses the single Aeolian®. There is more surface variation over the same footprint (2’x2′ in the array of 4), and the size of the Mini’s features are a bit more optimal for diffusing the 2Khz wavelength. This swings back slightly into the favor of the single Aeolian® at 4Khz, where the larger elements have a wider throw, and the elements of the Mini have steeper wells. At 8Khz, it tips back to the Mini, and then at 16Khz, they are both neck-and-neck.
The amazing similarity is that the variations are quite subtle through their entire effective ranges, and even quite a bit above those ranges. While there are slight differences in the performance of the diffusers when we compare the directly, these are really very minimal except for the low-frequency edge in performance of the larger original Aeolian®.
Closing
With the similarity of performance in the two diffusers, they can almost be used interchangeably – or even used together in the same environment to implement an aesthetic vision or add more randomness/variety to the diffusion in the space.
There are several occasions where you may require one over the other.
- If you need more 1Khz diffusion, you should add some 2’x2′ Aeolians® – as they perform better in that range.
- If you need to install diffusers that fit in a ceiling grid… you will also want to use the original.
- If you want the Aeolian® but need diffusers that will fit in a space that is less than 2’x2’x5″, you may want to go with the MiniAeolian™.
Currently the MiniAeolian™ is a custom order item only, and is subject to minimum order quantities.
Contact Acoustics First® for more information and pricing.
Project: Beginning to End – Biltmore Park Clubhouse
Posted by Acoustics First in Absorption, Customer Feedback, HOW TO, Multipurpose Rooms, Product Applications, Products, Video on August 16, 2023
Occasionally, we get the opportunity to show the entire process that goes into a project, and today we have one which we will run through – beginning to end.
Biltmore Park clubhouse was getting a full aesthetic and acoustic makeover. Acoustics First® was asked to collaborate with Harmony Interiors on the acoustic panel recommendations for this project. After an initial consultation, a layout was developed that would attain the desired effect.
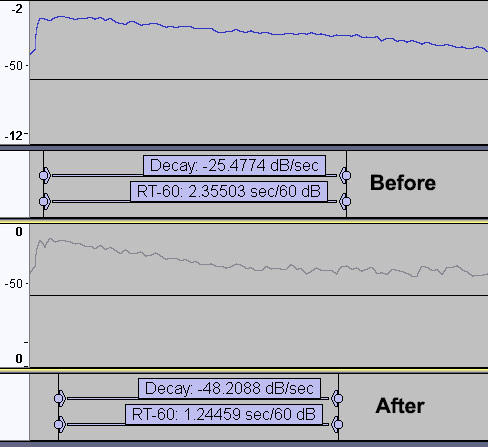
Along with this layout, a pre and post treatment acoustic performance was predicted and supplied.

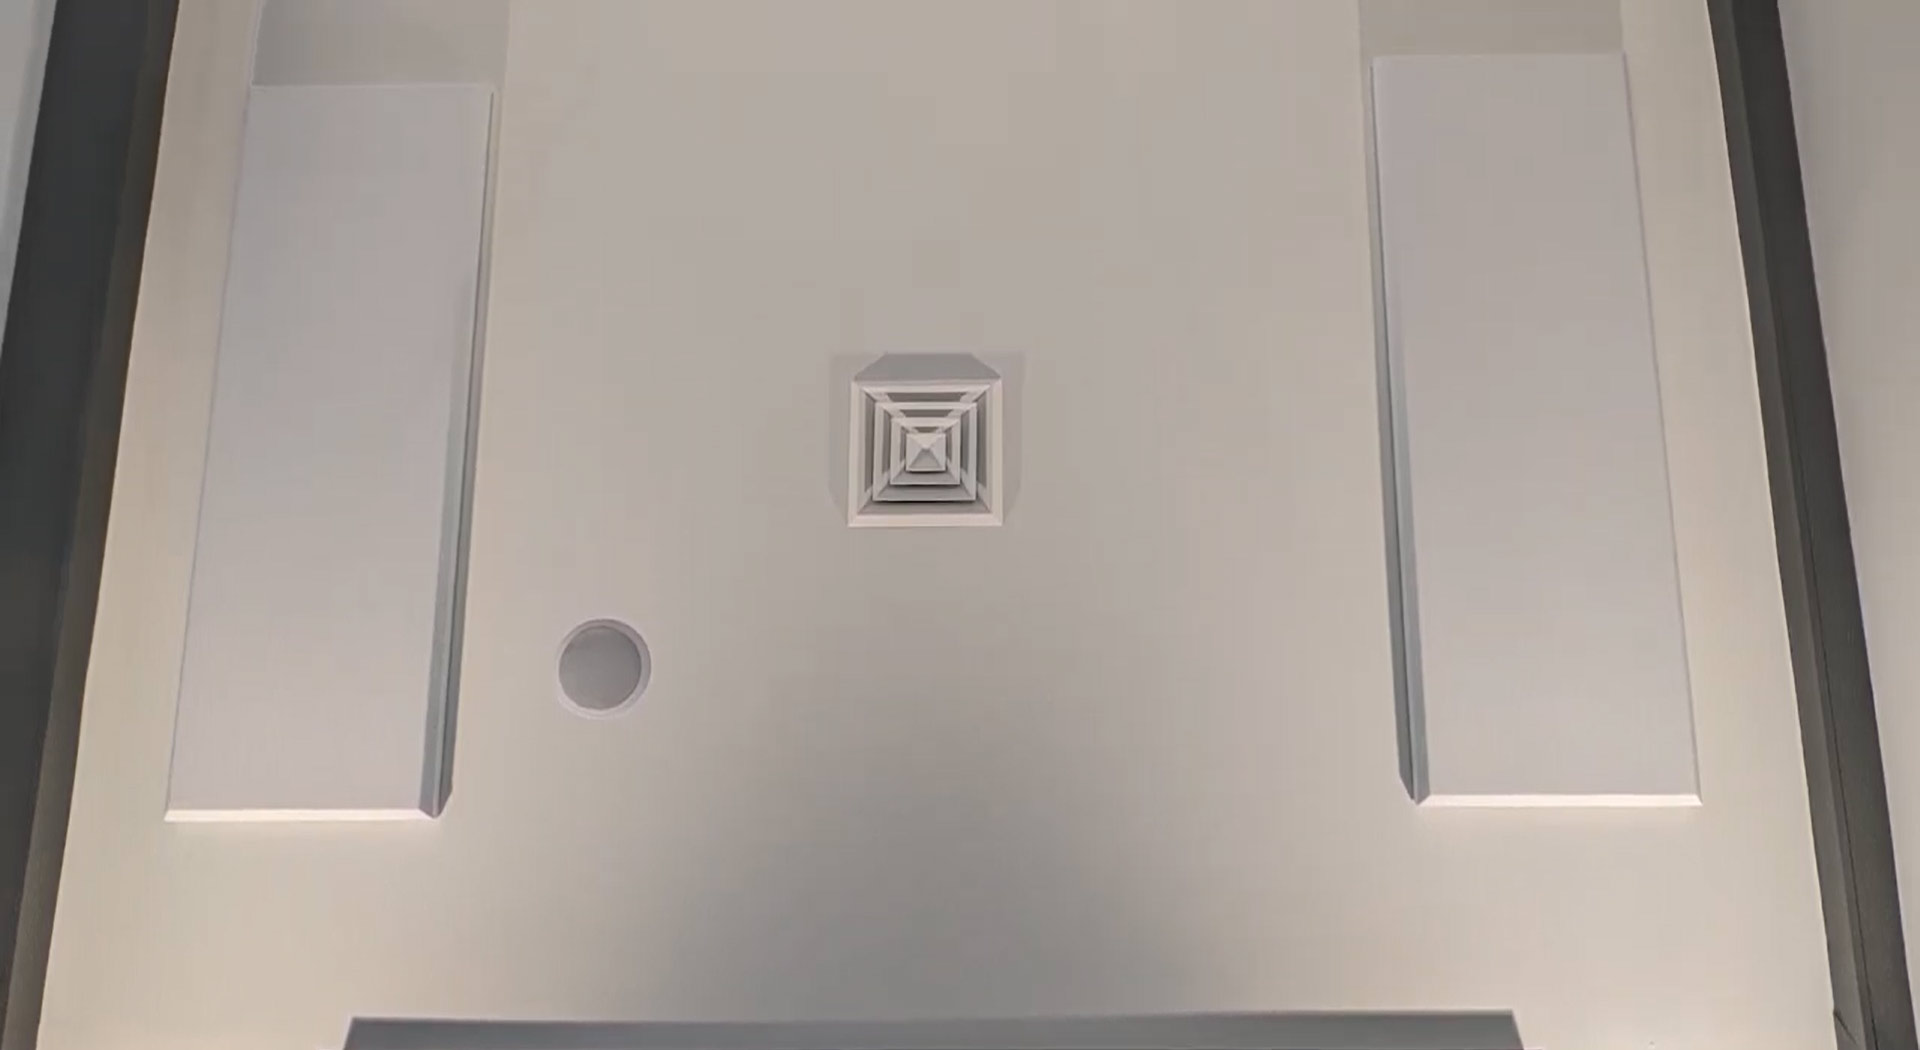
After the treatment was approved and ordered, the panels were manufactured and supplied to the customer for install. This installation included several Sonora® panels for the ceiling, and others for the walls. After the customer received the order, Harmony Interiors began the installation.


BONUS! This is often all the information we receive… along with some comments about how great the room sounds. But on this occasion, we were able to obtain a full before and after comparison of the effects of the treatment!
Video of the room – pre and post treatment!
The second benefit of getting this before-and-after comparison video is that we were able to critique our initial predictions of the pre- and post-treatment reverb times.
We hope you enjoyed seeing this acoustic project from the initial consultation and layout phase, through the installation, and to completion.
Similar, yet different: Quadratic vs. Itself?
Posted by Acoustics First in Diffusion, Product Applications, Products on July 6, 2023
For this installment of “Similar, yet different,” we will take a classic welled-quadratic sound diffuser, The Model Q, and compare its performance to itself – only installed backwards!

Taking “similar” to the extreme in this case, we are testing the difference in performance of a 1-dimensional, welled-quadratic diffuser installed in the standard welled configuration, and then installed reversed – with the sound impeding on the back side of the wells. For a bit of history, the Classic Quadratic Diffuser (or Schroeder diffuser) was designed with a grid separating the reflectors – creating wells of different depths proportional to the remainders of n2 (mod N). This design has some interesting facets.
- They are inherently symmetric if left in the original sequence.
- They are periodic (i.e. they repeat.)
- The discrete Fourier transform of the exponentiated sequence has constant magnitude.
The design principal is simple if you tear apart the math, and it’s simply wells that have a different effect on different frequencies, depending on the geometry of the wells. The Model Q is an advanced 1D-Quadratic with angled well-bottoms, which assist in smoothing out the performance and widening the 1D polar radiation. So if this design is relying on the wells to be effective, why would we reverse it?
An acoustically diffuse environment develops due to many factors, and while the frequency focus of the wells is useful, there are other scenarios where different methods may be preferred. If the geometry of the elements were flipped around, you would get the same (albeit reversed) ratio of distance, but you lose the containment and channeling that the wells provide. This imparts a diffraction on the unrestrained elements. This also allows for a different interaction between the elements, as the face of the unit is no longer planar.
Let’s look at the effect this has on the performance of the device at some different frequencies – starting low and moving up…
First, we will look at the 1150Hz performance of the devices… standard welled-install on the left, reversed on the right.

At 1150Hz, there is a little variation in the performance. Both are front focused, with a strong 1D horizontal polar response, but they are not identical. The welled-design (left) shows a broad frontal response, while the reversed design has a smoother vertical response, sharper front lobes, and stronger side performance. Overall, this difference is relatively small at this frequency.
Now, we will look at 2300Hz.

Again, we have two similar looking balloons, but there seems to be a bit more variation. The welled-design (left) shows a smoother 1D pattern in the front as the wells release sound within the same plane – at the front face of the wells. On the right you will notice sharper and more discreet lobes, but you will also notice that it has wider horizontal performance again, as it isn’t as front focused due to its free standing elements. The vertical performance is also a bit different – the welled design is broad and smoother vertically, while the reversed installation shows sharp lobes again.
Step up to 2800Hz, and we see some more drastic differences.
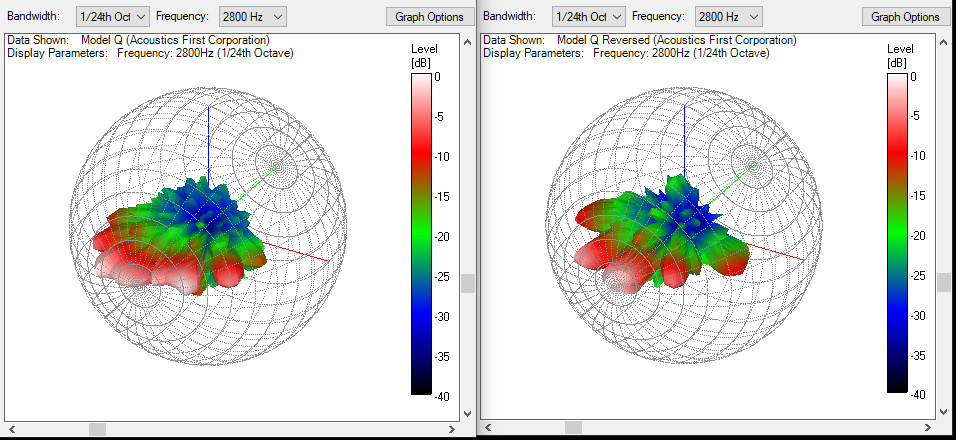
The performance of the standard welled-install (left) stays smooth and front-focused, while the lobes of the reversed install (right) have become even more distinct. Interestingly, the side lobes are even larger, showing an even wider polar pattern than before. These two instances show a marked difference between the smooth front-focused wells and the wide sharp scattering of the unrestrained elements. These two configurations are both very different, but are still both very effective at helping to disperse the incoming energy. Remember that the room develops diffusion through sound travelling in many different directions – these are not simple reflectors sending the specular energy in a single direction.
Now at 3650Hz we see a shift toward the reverse installation.
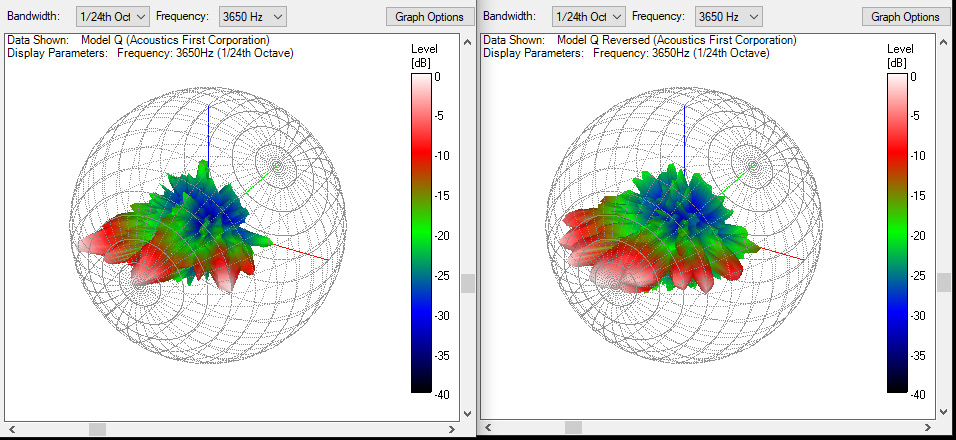
At around 4K the welled-installation (left) begins to move back front and center. It’s primary method of diffusion uses the wells to channel the energy, and at higher frequencies sound becomes much more directional. This directionality is used to create a temporal shift in the sound, as the reflections will occur out of phase from the source, and controlling that reflection is paramount to tuning this method of diffusion. However, as stated before, there are other mechanisms contribute to diffusion. The unrestrained elements on the right balloon, have hit their stride and still maintain a wide 1D polar pattern. The lobes are still sharp, showing the interaction of the elements with sound. This installation is showing the strength of its spatial dispersion, which will send acoustic energy in more directions and use the travel through the space to create a diffuse environment. It loses some of the frequency tuning of the wells, but makes up for it in the wide polar pattern.
Now for the super high frequencies – we jump straight to 10Khz.
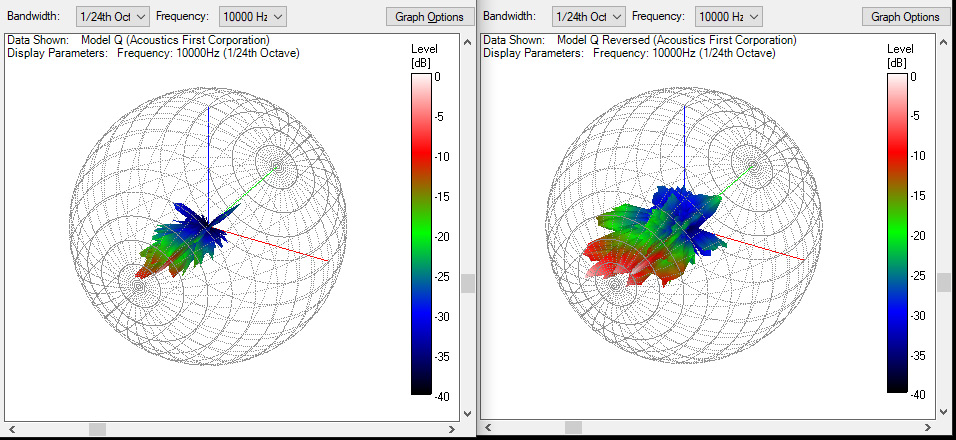
This final set shows two diffusers pushed to the limits. The welled-installation (left) is a very narrow focused beam now. You will note that it has some variance due to the interactions with the walls of the wells but all of its work is done through phase shifting at this point. In contrast, the exposed elements (right) are still allowing for a bit of diffraction to occur, and the angled faces are still allowing for a bit of spatial redirection. Also note that these polar patterns were generated with a sound source directly in front of the device at 0° incidence, and the exposed elements would offer more exposure to its surface area than a welled design at wider angles of incidence.
In summary…
Diffusion develops using many different variables, including the untreated walls of the space. While both of these installations are functioning in nearly identical frequency ranges due to their geometry, the mechanisms which they work are slightly different and have different strengths. The welled-design (in classic temporal Schroeder configuration) uses the wells to channel sound and address the frequencies in a tuned and controlled fashion. By simply flipping the device around, however, you change its performance from a controlled time shift, to an unrestrained spatial redirector, which imparts time shift through dispersion, diffraction, and distance travelled – further reducing intensity by having a wide 1D diffusion polar pattern. Both have scenarios which one configuration would be preferable over the other, making the Model Q diffuser a very versatile device.
Both configurations are literally two sides of the same coin… they work in different ways, over the same frequencies, providing results – no matter how you flip them.
Scoop up some Fireflex™ Waves
Posted by Acoustics First in Absorption, Product Applications, Products, Restaurants on June 6, 2023

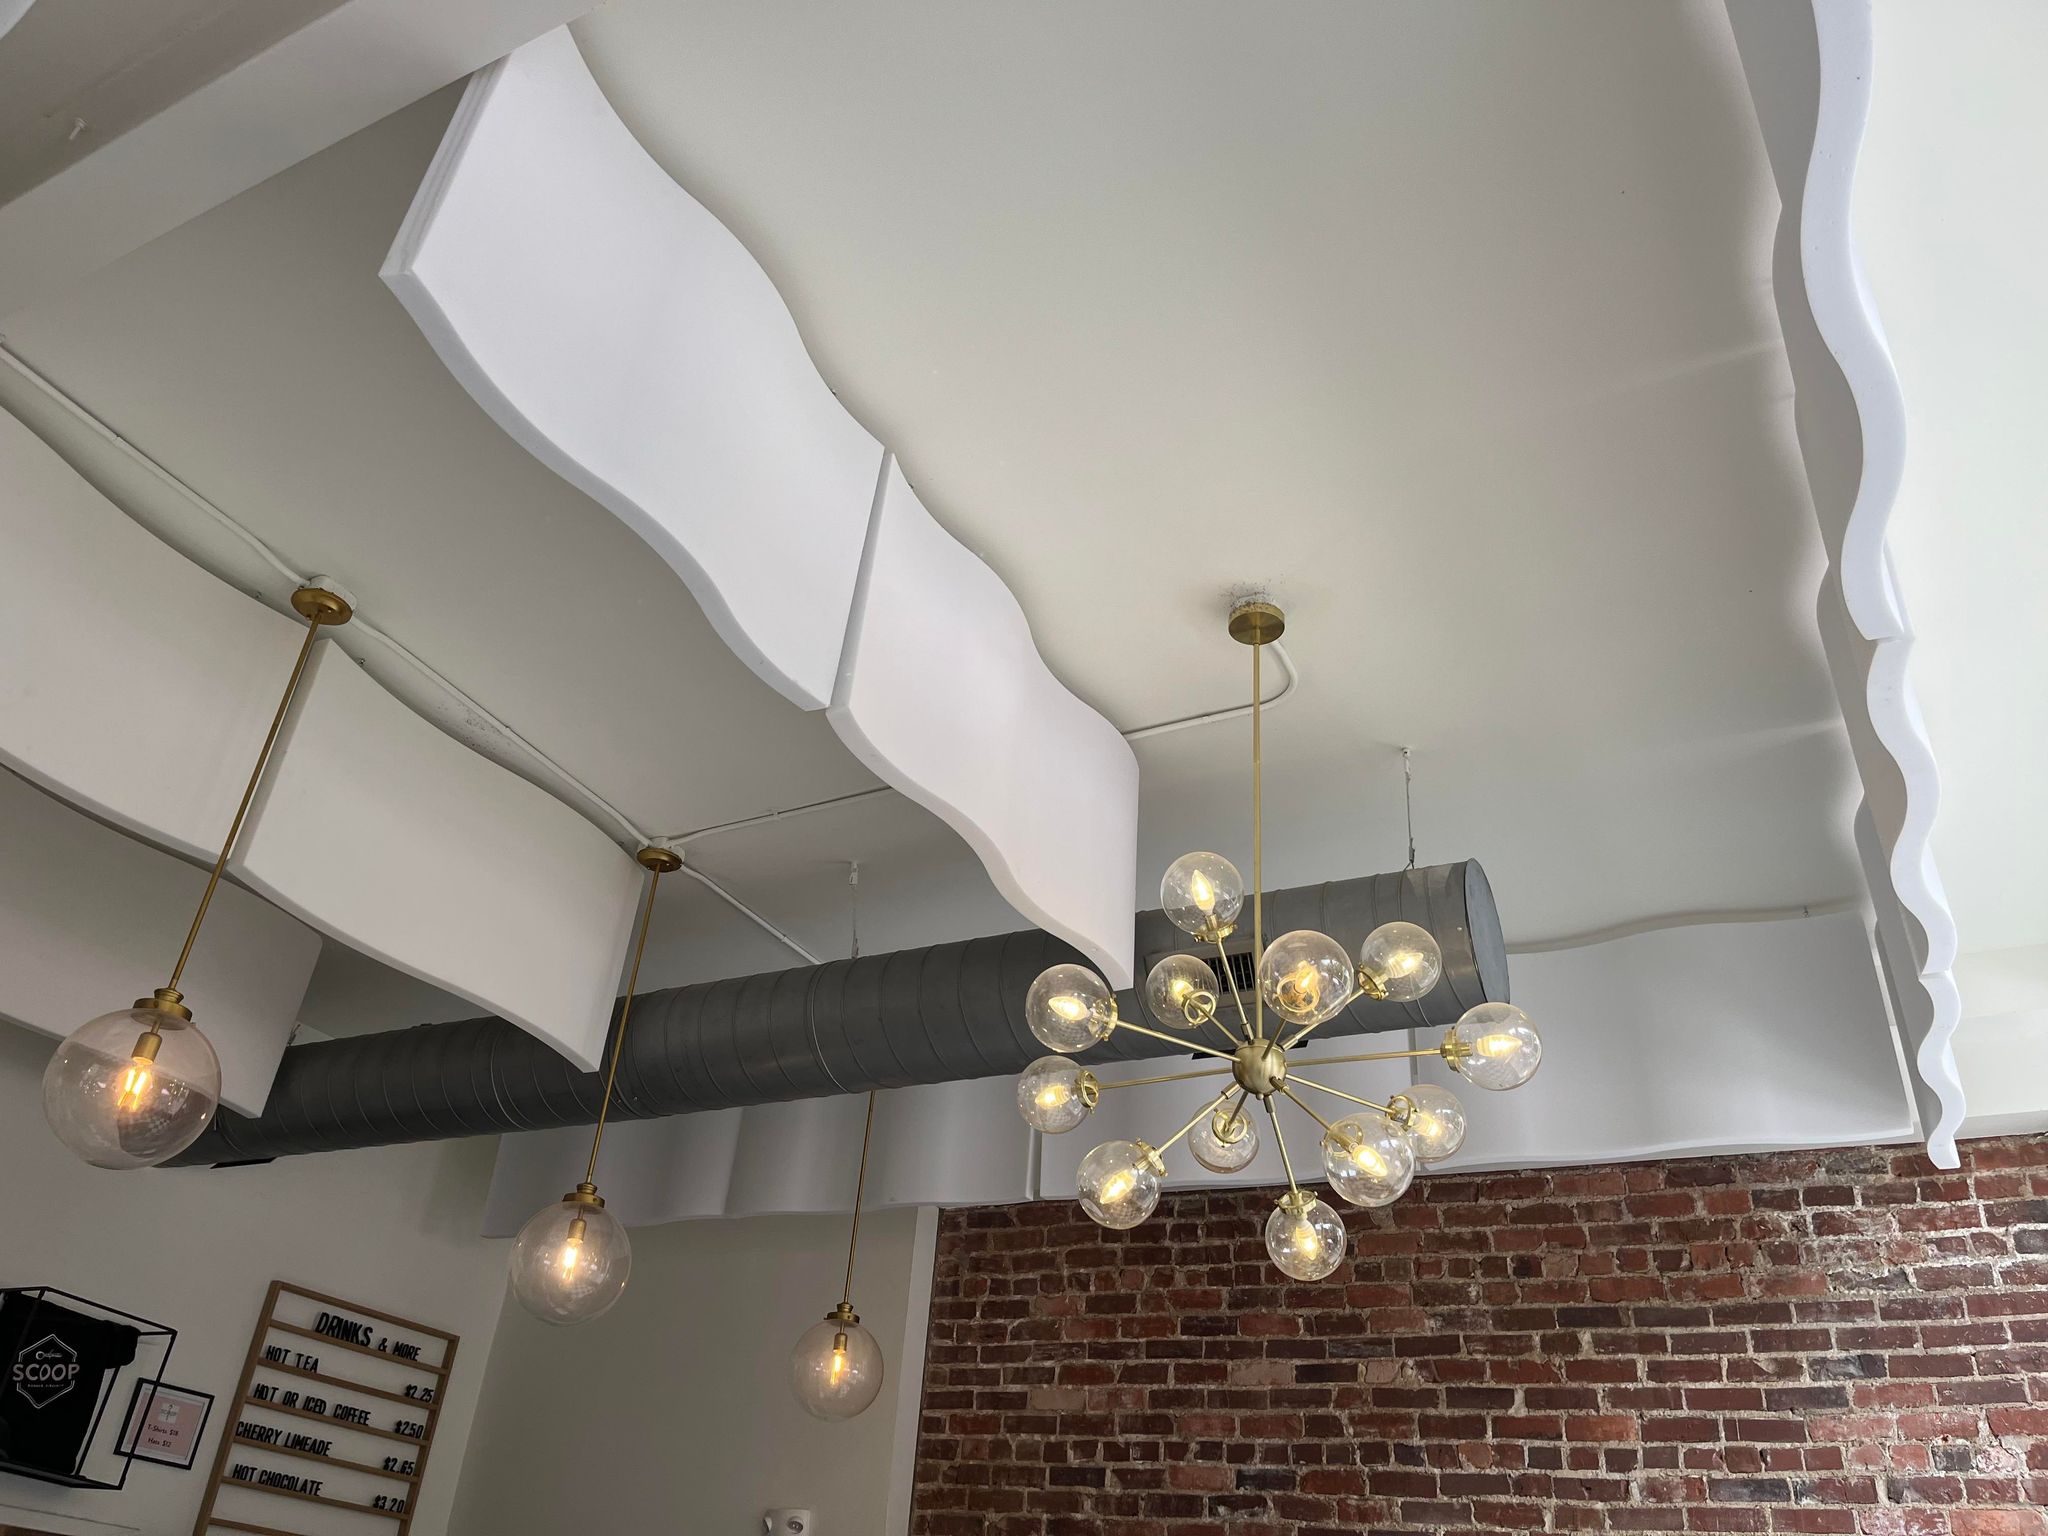
Ice cream shops are often places with acoustic challenges. Some have large glass windows, glass freezers, compressors, and other equipment… Let’s not forget all the patrons and excited children! In retail environments like these, good acoustics are important for accurate order taking, customer comfort, and safety concerns. These spaces also require Class A fire rated materials to meet many local fire codes.

The high ceilings were an easy place to put some acoustic treatment without interfering with the activities of the shop and Fireflex™ Waves were an ideal solution. The ceiling-mount Waves can be installed in either a cloud (horizontal) or baffle (vertical) configuration. In this particular space, the perpendicular baffle installation was the most efficient use of the Waves, and their Class A fire rated Fireflex™ material is also easy to cut in the field – which was handy when they had to work around an I-beam.
If you have an environment that needs acoustic treatment, reach out to Acoustics First® online or at 888-765-2900.
John Bullard Live Room – Tuning a Live Room for Classical Banjo
Posted by Acoustics First in Absorption, Customer Feedback, Diffusion, HOW TO, Music Tracking Room, Product Applications, Products, Recording Facilities on May 3, 2023
When you think of classical music; what instruments come to mind? Piano? Violin? Cello? …What about Banjo?
In the summer of 2022, classical banjoist John Bullard reached out to Acoustics First for assistance with his newly renovated home-studio. John is one of a select group of classical musicians aiming to showcase the versatility of this uniquely American instrument. The banjo, with John’s expertise, lends a very distinct, melancholy sound to contemporary and traditional compositions.

Having recorded a number of albums already, John knew he wanted his live room to be catered specifically to tracking solo, classical banjo as well as small acoustic ensembles. Acoustics First analyzed John’s live room and came up with a treatment design that would achieve an “ideal-as-possible” acoustic environment for recording classical instruments.
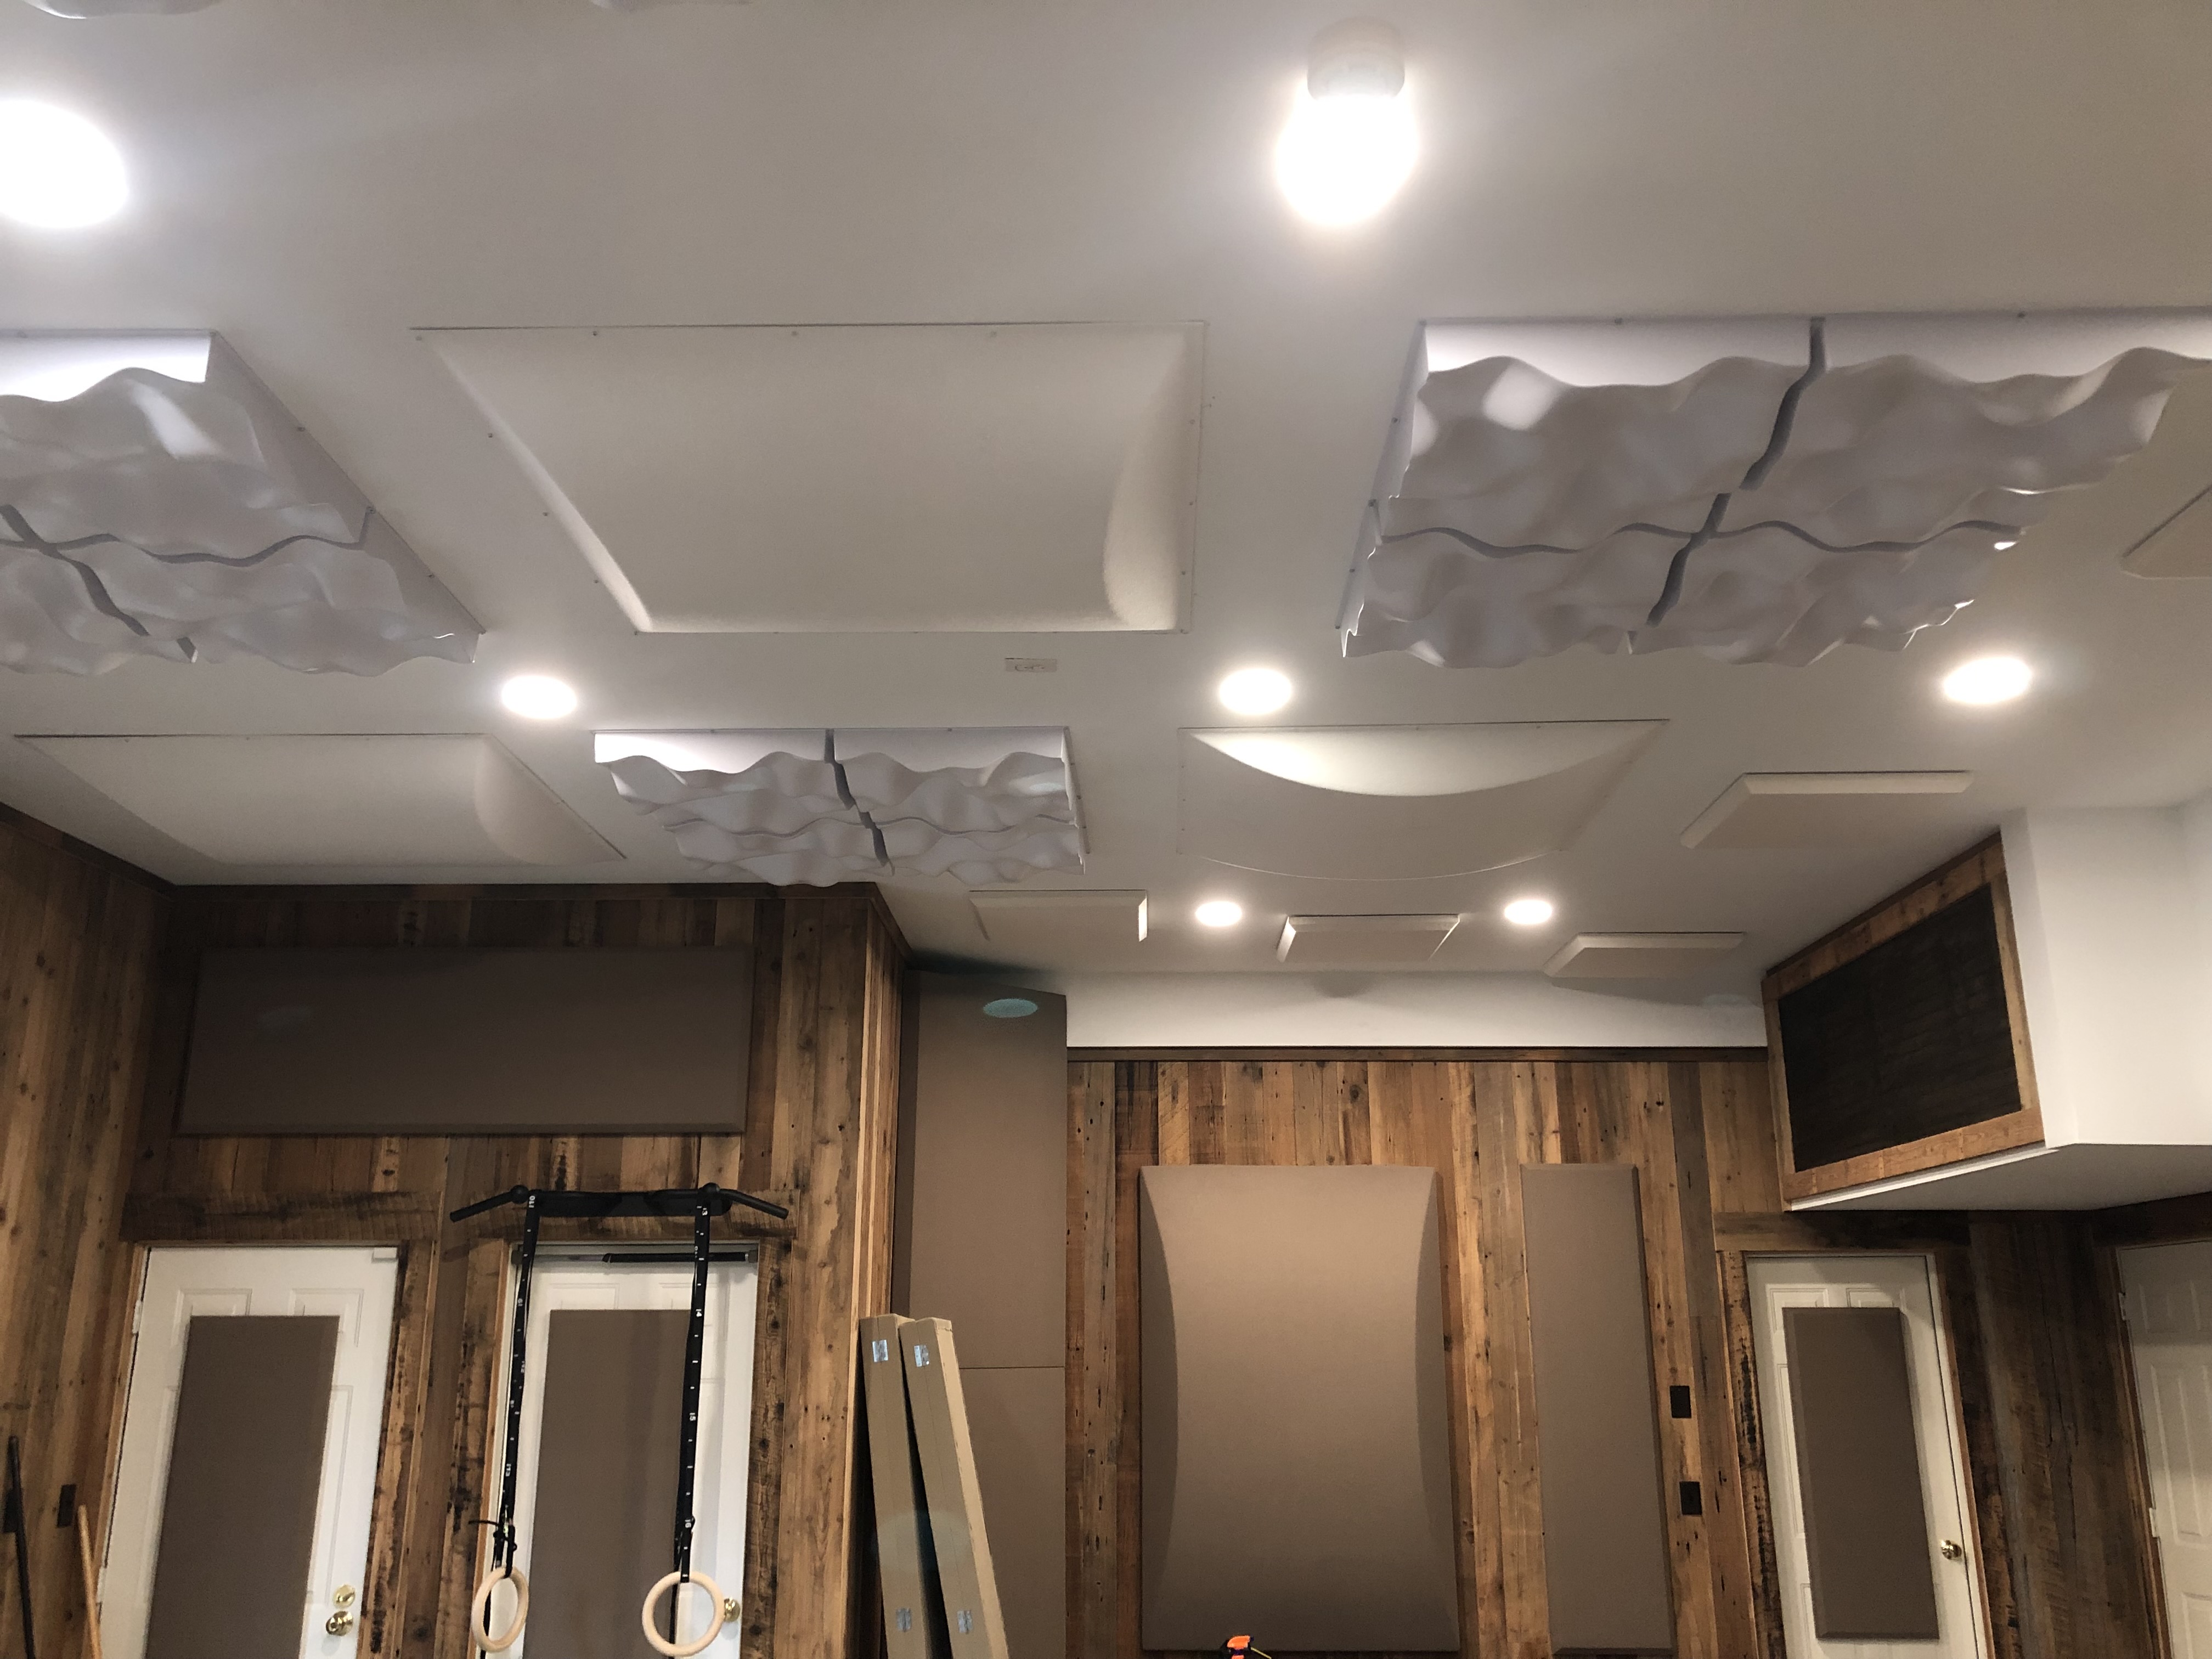
The largely reflective live room had walls comprised of unfinished, reclaimed wood planks over plywood, a drywall ceiling, stone fireplace and a polished concrete floor. The parallel, hard surfaces contributed to a poor tracking environment; with standing waves and “flutter” echoes adding unwanted coloration to recordings, inhibiting music definition.
Spaces used for rehearsing and recording classical music often benefit from elevated levels of reverberation, which add a sense of warmth and ambience to acoustic music. Although the reverb in John’s untreated room was only slightly excessive when measured, it was far from “diffuse”, with the majority of energy coming from early reflections.
The primary challenge in the live room was to address the early specular reflections and standing waves without taking too much “life” out of the room. To achieve this delicate balance, wide band diffusion was recommended as the primary ceiling and wall treatment with selective sound absorptive treatment with fabric-wrapped Sonora® panels.

Double Duty Diffusers™ and Aeolian® sound diffusers were recommended as they would also provide some much needed low-frequency absorption in addition to broadband diffusion.
After the treatments were installed, John got right to work on experimenting…
“…ready to start doing extensive test recordings to locate the best spot and rug configuration for solo banjo… It sounds really good to my ear – now to see how the microphones hear it!”
John Bullard

Please check out John Bullard’s music!! – https://www.johnbullard.com/

You must be logged in to post a comment.