Acoustics First
This user hasn't shared any biographical information
Homepage: http://acousticsfirst.info
Acoustics First® releases new 3D Model Repository.
Posted in Press Release, Products on February 25, 2026
For those users who like to design visually, Acoustics First® has released a new 3D model repository at:
https://acousticsfirst.com/acousticsfirst-3d-model.htm
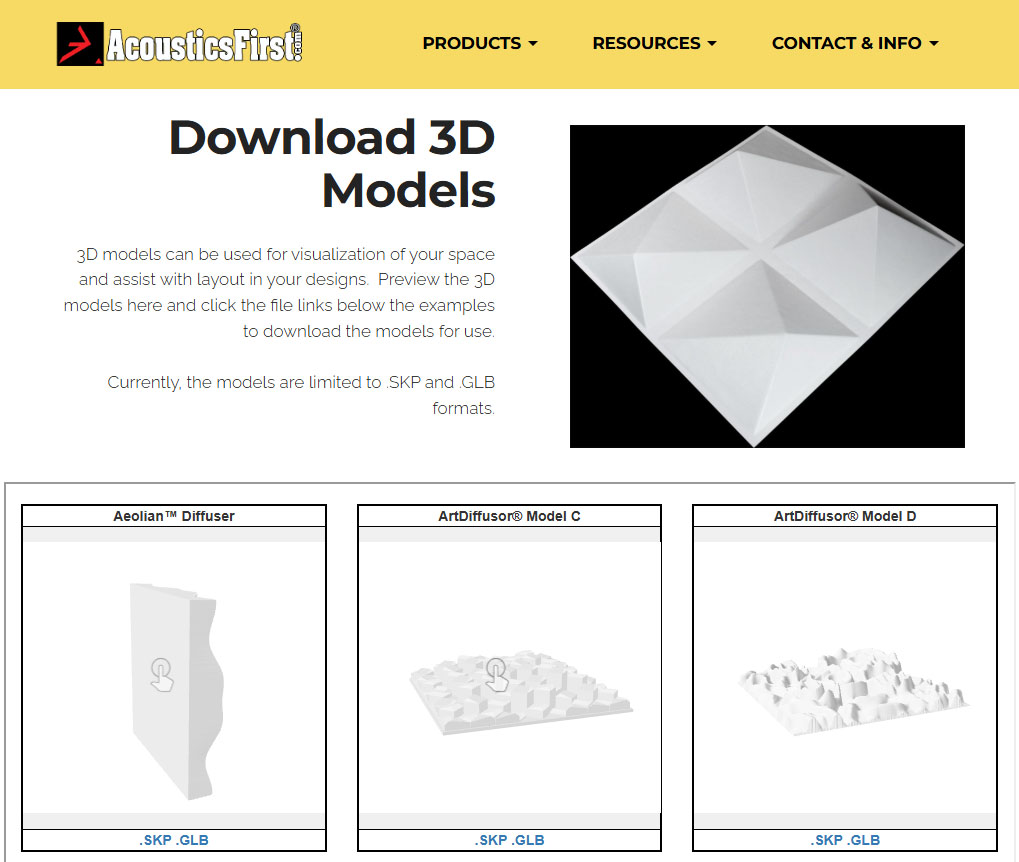
Currently, the 3D models are available in .SKP and .GLB format for:
More models are coming soon. The repository is available at https://acousticsfirst.com/acousticsfirst-3d-model.htm or it is linked from any of the diffuser pages listed above.
Joint ASA/ASJ Meeting – 2025 Recap
Posted in Press Release, Uncategorized on January 23, 2026
The joint meeting of the Acoustical Society of America (ASA) and the Acoustical Society of Japan (ASJ), held in Honolulu in December 2025, was a welcoming gathering for the international acoustics community. This joint congress happens only once every ten years, making it a rare opportunity for researchers, consultants, and students from both societies to come together, reconnect, and exchange ideas. Hosting the meeting in Hawaiʻi—literally and figuratively a bridge between the two countries—added to the collaborative and relaxed atmosphere.
Across the week, a wide range of ASA and ASJ technical committees organized sessions that showcased the diversity of acoustics research and practice. These included:
- Architectural Acoustics
- Noise
- Physical Acoustics
- Psychological and Physiological Acoustics
- Speech Communication
- Musical Acoustics
- Computational Acoustics
- Engineering Acoustics
- Education in Acoustics
- Structural Acoustics and Vibration
- Underwater Acoustics
- Signal Processing in Acoustics
- Biomedical Acoustics
- Animal Bioacoustics
- Acoustical Oceanography
Together, these sessions reflected the breadth of the field—from fundamental physics to human perception, from engineered systems to the natural environment.
One such session was organized by the Architectural Acoustics Technical Committee and focused on the Advances in Absorption Measurement and Design. Presentations explored how these materials are evaluated in the lab, how they are specified and integrated into buildings, and how they ultimately shape the acoustic experience of everyday spaces. This session was co-chaired by Jim DeGrandis (Acoustics First Corporation) & Daniel Robinson (Sublime) from the ASA, as well as Toshiki Hanyu (Nihon University) and Tetsuya Sakuma (The University of Tokyo) from the ASJ.

A highlight of the session was a three-part breakdown of a developing Japanese acoustics standard for general spaces—such as lobbies, sporting facilities, and multipurpose rooms. The proposed standard is being informed by the well-established German DIN 18041 room acoustics standard, with thoughtful adaptations for Japanese building practices and cultural expectations. The presentation sparked lively and friendly discussion, illustrating how international collaboration can help refine tools and standards that benefit practitioners worldwide.
Overall, the session captured the spirit of the once-a-decade ASA–ASJ meeting: technically rigorous, openly collaborative, and genuinely enjoyable.
End-of-Year Warehouse SALE 2025!
Posted in Absorption, Diffusion, Press Release, Products on December 23, 2025
It’s that time again! Time to do The End-of-Year cleanout of overstock, B-Stock, etc! Help us clean house!
Free Ground Shipping to the lower 48 states included on warehouse sale items – Available until January 31st… or while supplies last!
Aeolian™ Sound Diffusers – B-Stock

These Aeolian™ Diffusers have minor imperfections due to the batch of plastic having small orange specs in it. Barely noticeable, and easily paintable.
Quantity at time of writing – 102
Original Price $175 per unit – Sale price $87.50 per unit!
ArtDiffusor® Model D Sound Diffusers – Overstock
These ArtDiffusor® Model D Diffusers are A-Grade Stock – they are simply overstock items!
Quantity at time of writing – 96
Original Price $175 per unit – Sale price $87.50 per unit!
2’x2’x1″ Tone Tiles – Overstock

These 2’x2’x1″ ToneTiles are A-Grade Stock – they are simply overstock items!
Quantity at time of writing – 60
Original Price $70 per unit – Sale price $35.00 per unit!
2’x2′ Cloudscape Ceiling Tiles – Tile Backed – Customer Return

These Cloudscape Ceiling Tiles with Fog Pattern are a customer return – Listed as B-Stock. They are mounted to a ceiling tile backer for use in a drop ceiling grid.
Quantity at time of writing – 66
Original Price $60 per unit – Sale price $30.00 per unit!
Contact Acoustics First today at 888-765-2900 or reach out to info@acousticsfirst.com to inquire about these deals – but don’t wait… once they are gone, that’s it!
Big vs. Bigger: 2′ vs 4′ Acoustic Diffusers
Posted in Diffusion, Product Applications, Products on December 16, 2025
A couple common form factors in acoustics are based on building material sizes. Ceiling grids are a common place to install acoustic devices, and you will find that many are built to either work in a 2’x2′, 2’x4′, or 4’x4′ ceiling grid installation. This makes sense, but did you know that these devices also perform differently in some cases due to their dimensions? This is especially true with acoustic diffusers.
When you’re tuning a room—whether it’s a studio, theater, rehearsal space, or even a high-end listening room—acoustic diffusers are one of those rare tools that improve clarity without taking the life out of the space. Designs like the Double Duty Diffuser, Pyramidal Diffusers, and Quadratic Diffusers all share that same mission: redistribute sound energy so your room feels open, natural, and honest.
But while they may look similar in concept, their size changes the game. A 2’x2′ panel and a 4’x4′ panel both diffuse sound, but their effect—especially in the low-frequency and low-mid ranges—can be very different.
2’x2′ Diffusers — Compact Control
2’x2′ units are the most modular diffusers in the lineup. Their smaller footprint makes them ideal for:
- Breaking up mid and high-frequency reflections
- Treating small and medium rooms
- Sitting comfortably in grid ceilings or tight wall spaces
Because of their size, 2’x2′ diffusers don’t interact as much with the low-frequency energy in a room. Bass waves—being physically large—tend to wrap around smaller objects. The result? Excellent clarity improvements in the mids and highs, with a very predictable diffusion performance. The Double Duty Diffuser and Pyramidal diffusers have been a standard in breaking up planar surfaces for decades. While their diffusion in low frequencies is limited at this size, the air cavities do help control some upper bass frequencies through absorption.
The tuned mid frequency effects of the 2’x2′ quadratic, and the smooth performance of the Double Duty or Pyramidal diffuser are perfect for control rooms, edit rooms, drum booths, and anywhere you want accuracy without sacrificing sparkle.

4’x4′ Diffusers — Where Diffusion meets Bass Control
Now we get to the big ones.
A 4’x4′ diffuser is similar in concept to its smaller relatives, but the scale moves it into a different acoustic category. At this size, diffusers begin to influence longer wavelengths, which opens the door to something smaller diffusers often struggle with…
Low-frequency interaction
Large diffusers present enough depth, volume, and surface area to affect the bass spectrum. The extra size creates cavities which are tuned to reduce bass, and they have surfaces large enough to redirect those lower frequencies.
- Break up standing waves in the low-mid range
- Reduce modes and nodes common in rectangular rooms
- Add a sense of openness to the bass field
- Prevent buildup behind listening positions
In other words: same diffuser concept, very different low-end behavior.
Wide-area coverage
A single 4’x4′ panel can modify a huge portion of a wall, creating an even, spacious character that feels less like “treatment” and more like a room that’s naturally well-behaved.
These panels shine in larger studios, live rooms, and worship spaces—anywhere you need diffusion that reaches deeper into the frequency spectrum – and can break-up large, flat, specular surface reflections, which are responsible for flutter, echoes, bass buildup, and long reverb times.
Which do you need?
There are two main factors in the decision: space and performance requirements. In certain environments, it’s impractical or impossible to install large 4’x4′ or larger diffusers; It also may not be the best solution – even if it may appear to be on paper. While a single, large barrel diffuser may appear ideal, you may not have enough physical space to allow the diffusion to develop – where several smaller diffusers would be the better solution.
In short, your physical space and acoustic conditions will dictate which size elements will give you the most benefit in your environment.

You say “Diffuser,” I say “Diffusor”
Posted in Diffusion, Q&A, Uncategorized on November 11, 2025
If you’ve spent any time around acoustic treatment—especially sound diffusion—you’ve probably noticed something odd: sometimes the product is called a “diffuser“, and other times it’s a “diffusor“. For newcomers, this can feel like a secret code or a subtle technical distinction – But the truth is much simpler.

Many trace the dual spelling back to Manfred Schroeder, the German physicist who developed the mathematically designed Quadratic Residue Diffusor (QRD).
In German, the word is spelled “Diffusor.” When Schroeder’s work entered the academic world, the spelling likely came with it.
Because his research became foundational in architectural acoustics, the German spelling spread through physics papers, textbooks, and graduate-level acoustics programs. Over time, “diffusor” became a common spelling when discussing mathematical or Schroeder-style diffusors specifically.
As manufacturers began producing these mathematically derived designs—like the ArtDiffusor® line from Acoustics First® (and many other early products)—they retained the “diffusor” spelling as a nod to the academic and scientific origins.
Before long, the industry ended up with two spellings that referred to the same thing:
- Diffuser – the standard English spelling
- Diffusor – the academically inherited, German-influenced spelling tied to Schroeder’s work
Both spellings appear throughout the professional audio world, and both are correct.
Is There Any Practical Difference?
No. None. Zero.
There is no technical difference between a “diffuser” and a “diffusor.” They both refer to devices used to redistribute sound energy and improve the acoustic quality of a space through accelerating the development of sound field diffusion. The spelling variation is purely linguistic.
Think of it like “colour” vs. “color” or “flavour” vs. “flavor.” British English keeps the “u,” American English drops it. (However, if you ask a Brit, they’ll tell you Americans are obviously spelling it wrong.)
The “diffusor/diffuser” split works the same way—just with a German twist.
So Which Should You Use?
Use whichever feels natural or matches the context you’re writing in. Many engineers and academics use “diffusor” when referring to Schroeder-type or other mathematical designs, simply out of tradition. Others stick with the standard English “diffuser.”
Tomato. Tom-ah-to.

You must be logged in to post a comment.